
03-31-2009, 03:37 PM
|
 |
Member
|
|
Join Date: Sep 2008
Location: Silver Spring, MD
Posts: 3,523
|
|
|
How to install & Configure DIS v55 with VMware
1 Set your laptop IP address, Subnet Mask and Default Gateway
a) Go to Start Menu, Control Panel and open Network Connections. Right-click on the Local Area Connection you will be using and select Properties.

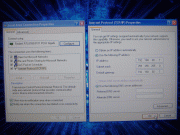
b) The Local Area Connection Properties dialog box pops up. Highlight Internet Protocol (TCP/IP) and click on the Properties button. The Internet Protocol (TCP/IP) Properties dialog box pops up.
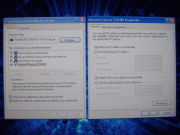
c) Select the Use the following IP address radio button. Enter the following information and select the OK button afterwards:
IP = 192.168.68.1
Subnet Mask = 255.255.255.0
Default Gateway = 192.168.68.1
2 Install & Configure VMware Player software
a) Copy the VMware Player install EXE onto your HDD, along with the DIS v55 files, for faster installation. The files total about 6GB.
b) Run the install EXE and follow the prompts and any recommendations.
c) After the reboot, run VMware Player. Under Commands double-click on the Open icon. The Open Virtual Machine dialog box pops up. Navigate to where you stored the DIS v55 files on your HDD and select the DIS 55 English.vmx file click on the Open button to continue.

d) You will receive a pop-up that asks if you move or copied the virtual machine. Select the I copied it radio button and click on the OK button to continue.

e) Once DIS v55 is open go to the menu bar at the top and select Devices. From the pull-down menu, mouse over Network Adapter and click on Bridged at the following menu. Notice it also says Disconnect above it. This means its already CONNECTED dont click on Disconnect. Apply those settings for both Network Adapter 2 and Network Adapter 3.

3 Configure DIS v55 to recognize DK (yellow diagnostic head)
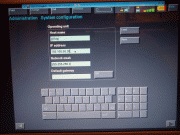
a) Hit CTRL + G to switch to DIS v55. You will be in the Administration section by default. Select Config, System and look under Operating Unit. Set Operating Unit IP address to = 192.168.68.35. Leave Network Mask as the default 255.255.255.0. Leave Host Name to the default of "gt1ap". Leave Default Gateway as blank also by default.
b) After all of that, you need to connect to the OBD-II on the X. It must be connected to the OBD-II port on the X as if you're about to run Diagnostics.
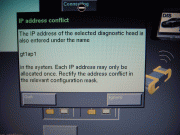
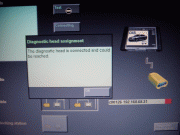
c) If you left, go back into Administration, Admin., Connection Setup and look under Operating Unit. You should now see an item under Free Diagnostic Heads. Highlight the item and then select Connecting.

d) You will receive an IP address conflict prompt for "gt1ap1" (notice it is not "gt1ap"), select IGNORE. You will receive another similar prompt but it will say "gt1ap" this time, select IGNORE.
e) You will see a progress bar while its connecting. Once its finished select the TEST button and you should see a screen saying diagnostic head is connected and could be reached.
Done! 
Last edited by TwinsPoppa; 04-01-2009 at 07:17 PM.
|