
|
|
|
|
||||||||||
| Xoutpost server transfer and maintenance is occurring.... |
| Xoutpost is currently undergoing a planned server migration.... stay tuned for new developments.... sincerely, the management |
 |
|
|
LinkBack | Thread Tools | Display Modes |
|
#1
 01-02-2016, 12:03 PM
|
||||
|
||||
|
DIY: Modding Spyder headlights & projectors
Headlight specifications: Hella RS6 projectors w/ clear lenses, custom foreground limiter and tuned hotspot/rotation VHT Nightshade spray tint on all the chrome Morimoto 35W D2S ballasts and 4300k bulbs LED halos: Click here for the link. You need 125mm full-circle and 145mm semi-circle rings, mention it in the ordering comments. 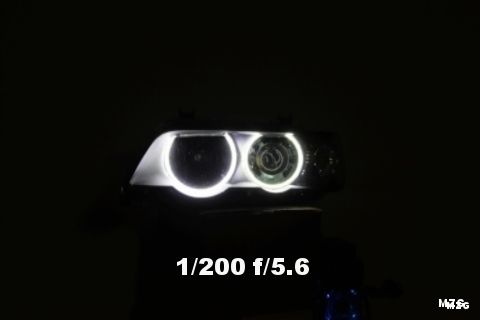 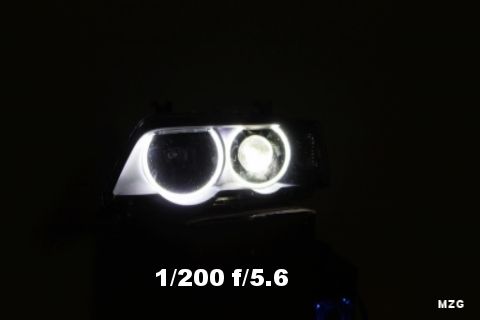 Foreground limiters: I didn't mention the custom foreground limiters I had on there, since most popular replica projectors will have them on there already. What foreground limiters do is redirect the foreground light back into the bowl so that it can be projected elsewhere in the output for more distance intensity. Cut a piece of aluminum that mounts onto the extra mounting holes of the projector and hangs down from the top part of the bowl. I used a Coke can as a template since the aluminum is thin, but use non-colored aluminum flashing from the roofing section of a hardware store as the final design. You must test on your own how much the limiter hangs down to see how much foreground light you want to limit. 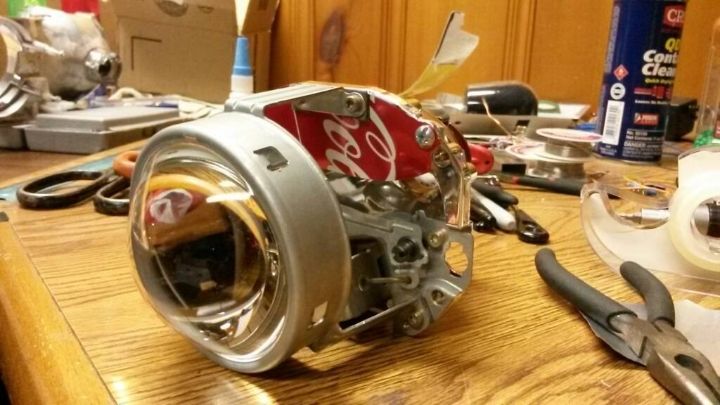 Hotspot: Note the yellow hotspot is right on the step of the cutoff. 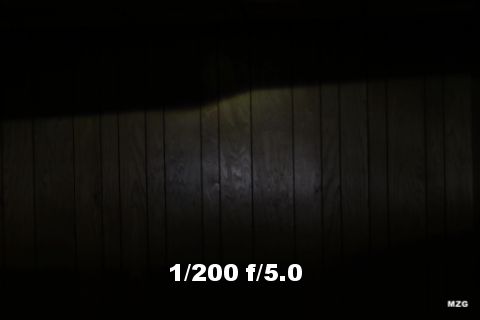 Aftermarket 125mm halos (low beam application): You can reuse the original halo bracket to mount these with minimal modification. 1) Cut the inner ring of the bracket off but leave the legs so the halo has a place to sit on. Tie fishing string at the bottom and top of the halo to secure it. 2) Sand down the black halo housing so that the fatter ring can fit through without getting crushed between the bracket and housing. 3) Sand the top part of the bracket down since the aftermarket ring will be fatter than the original CCFL halo. 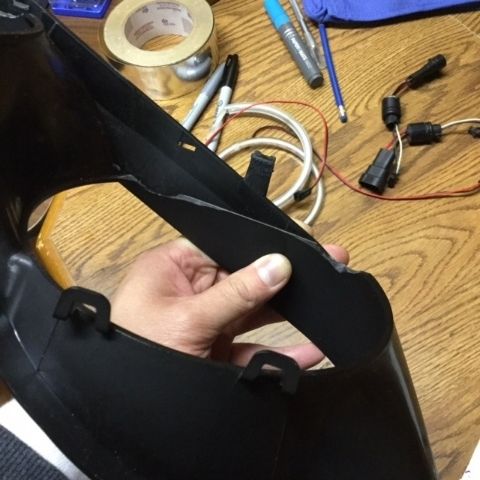 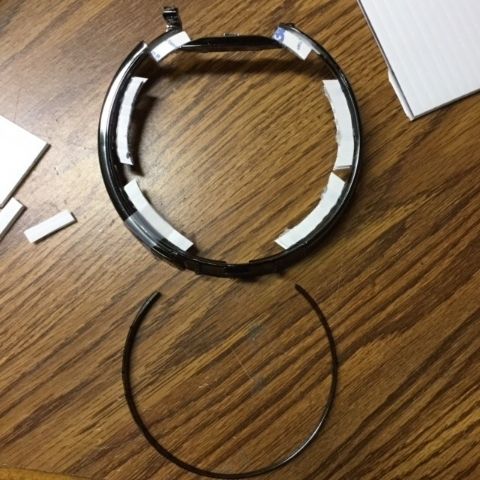 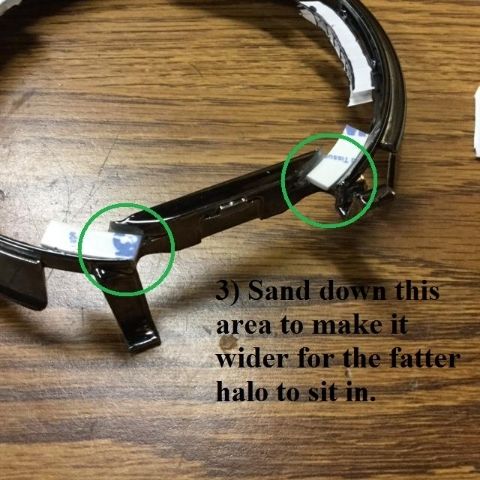 Aftermarket 145mm halos (low beam application): You do not reuse the original halo bracket. 1) Sand down the black halo housing so that the fatter ring can sit flush in the housing. 2) Drill 4 small holes at 4 corners for fishing string to go through and make secure knots. This will hold the halo in place. 3) Tape up the perimeter of the halo to make sure the knots or ring do not loosen up over time.  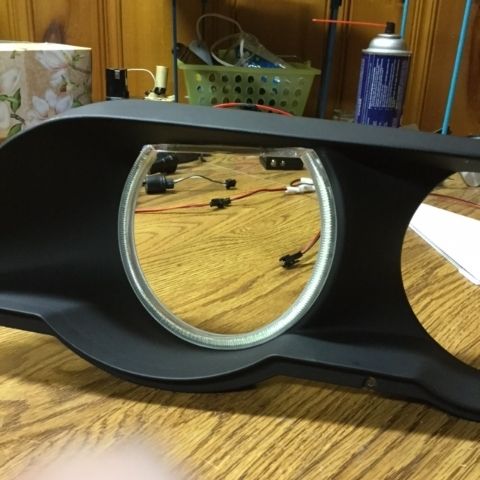 If you guys have any questions or comments, post them up. Subscribe to my channel for more cool DIY/racing videos!
__________________
Last edited by MINIz guy; 01-03-2016 at 09:50 PM. 
|
| Sponsored Links | |
|
|
|
|
#2
01-02-2016, 12:10 PM
|
||||
|
||||
|
rofl - everyone is losing minds over this headlight upgrade.
There's like 4 different threads going demanding attention  We should have a mega thread and sticky it
__________________
2000 E46 323Ci 5spd Sport 2001 E38 740iL Security 2002 E53 X5 3.0i 5Spd Sport 2003 E39 540i/6 MSport #501 Family Photo
|
|
#3
01-02-2016, 01:25 PM
|
||||
|
||||
|
Andrew awesome video man and use of the illustrations on your tablet are sure to help people out!
__________________
2018 Ram 2500 6.7L Cummins 68RFE 19k miles -Bright White/Black - Big Horn Sport - Crew Cab Short Bed 2013 X5 35D (CEO's) - Born on 5/17/2013 - 82k miles - Alpine White/Cinnamon Brown/Premium Pkg, Sport Activity/Premium Pkg and Sound/20" Style 214/Running Boards
|
|
#4
01-02-2016, 01:29 PM
|
||||
|
||||
|
Thanks guys
 Lots of threads asking specific questions on retrofitting, so I figured I'd bring a modern touch with a video DIY. If you search hard enough, all the information is on this forum, but I think I covered 90% of the required information to complete a retrofit. I will update the OP with more information if people ask it and I didn't go over it in the video. Even after 7 years on this forum, I'm still around! 
__________________
|
|
#5
01-02-2016, 08:46 PM
|
||||
|
||||
|
OK - so I ordered the COB Led's that BimmerE38E53 has and they look way different than the CCFLs.
BMW Angel Eye Halo Light Lamp Ring COB LED Kit White Headlight E53 x5 1999 2004 | eBay I'm guessing I'll need to bust out the dremel if I want to retain the Spyder halo retainers.
__________________
2000 E46 323Ci 5spd Sport 2001 E38 740iL Security 2002 E53 X5 3.0i 5Spd Sport 2003 E39 540i/6 MSport #501 Family Photo
|
|
#6
01-02-2016, 11:34 PM
|
||||
|
||||
|
Quote:
The sizes I have listed 100% work. I've tried 145mm full-circle halos for the high beam and there is no way they would fit. Per Ricky Bobby, I ordered these, with some hesitation, and they are a perfect fit with little modification required. Don't stray from these dimensions (125mm & 145mm) or you will waste time and money!
__________________
|
|
#7
01-03-2016, 09:17 AM
|
||||
|
||||
|
Recommendations on LEDs then? Really didn't want segmented SMDs. Would love to see some photos, up close, of these modded halos.
__________________
2000 E46 323Ci 5spd Sport 2001 E38 740iL Security 2002 E53 X5 3.0i 5Spd Sport 2003 E39 540i/6 MSport #501 Family Photo
|
|
#8
01-03-2016, 09:38 AM
|
||||
|
||||
|
Those look great Andrew and you're right they really fit in the housing well! Enjoy the new brightness!
__________________
2018 Ram 2500 6.7L Cummins 68RFE 19k miles -Bright White/Black - Big Horn Sport - Crew Cab Short Bed 2013 X5 35D (CEO's) - Born on 5/17/2013 - 82k miles - Alpine White/Cinnamon Brown/Premium Pkg, Sport Activity/Premium Pkg and Sound/20" Style 214/Running Boards
|
|
#9
01-03-2016, 10:07 AM
|
||||
|
||||
|
Can't cancel them, already shipped from Hong Kong, return shipping would be stupid. So I'm not out $70, I'll need to find a way to make the COB versions work.
Looks like they'll have to be mounted on the outside of the inner shroud, rather than sit flush with the opening. Will you guys share your links to the LEDS you used? Or is it trade secret
__________________
2000 E46 323Ci 5spd Sport 2001 E38 740iL Security 2002 E53 X5 3.0i 5Spd Sport 2003 E39 540i/6 MSport #501 Family Photo
|
|
#10
01-03-2016, 08:21 PM
|
||||
|
||||
|
Quote:
Also updated the wording on some parts of the DIY as I found better ways to do it while assembling everything.
__________________
|
|
| Bookmarks |
|
|
|
|


 Linear Mode


