
|
|
|
|
||||||||||
| Xoutpost server transfer and maintenance is occurring.... |
| Xoutpost is currently undergoing a planned server migration.... stay tuned for new developments.... sincerely, the management |
 |
|
|
LinkBack | Thread Tools | Display Modes |
|
#1
 03-09-2009, 06:02 PM
|
|||
|
|||
|
CV Boot DIY (pictures)
as well as to we350z and katit for their valuable info. Anyone who is considering this should read through the procedure in its entirety. we350z started the long-ass thread here which I found very informative since it included pictures of his disassembled hub following the shortcut by katit. It’s definitely much easier this way. I’m not going to get into the tools needed and torque values since everything is in the detailed DIY above. It’s not that hard, I’d say about 7 on a scale of 1-10 for the casual DIY person, however it is very dirty work and can be time consuming without the right tools. I would caution you if you’ve never worked on brakes/suspension, these are critical parts and now is not the time to learn, let a professional do it or a knowledgeable friend help with assembly due to the torque values. What you do to your car is your business so I am not responsible for what you do to your car. Do yourself a favor and devote a whole weekend to the project and do both axles at the same time. You’re going to do it eventually anyway. If one CV boot is leaking, the other boot is very close behind (mine is an 03 3.0 with 56K miles, garaged all its life when the boot started to leak) I inspected the other boot and it had very fine cracks in the inner part of the folds of the boot so it was ready to blow. It was also a lot less messy to work on the axle that did not spew grease everywhere. In addition to your regular metric sockets and wrenches (10mm-22MM) as well as allen wrenches, you WILL need the following: Boot kits with grease packs (make sure to use the correct grease) New rear control arm bolts (they are torque to yield) Pitman arm puller (2 sizes) $26 for both at my local cheap parts store CV joint boot clamp plier $9 Snap ring pliers (if using the EMPI inner boot kit) 2 rolls of blue shop towels (you’ll need both if your boot is already leaking) 1 box of latex gloves (100 ct.) Harbor Freight has them cheap Zip ties (heavy duty) a thick wire coat hanger may work too Small floor jack to raise/lower the hub assembly Here are the most critical tools: 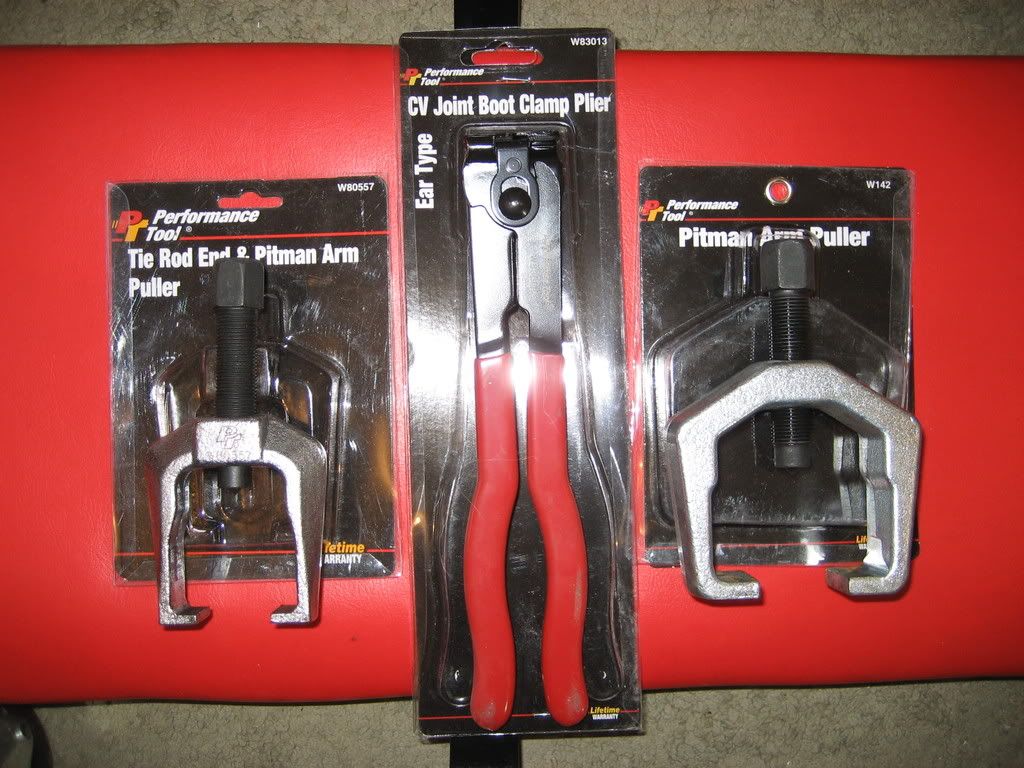 Removal: Chock the rear tires, jack up front and secure with jack stands, remove both front tires/wheels so that you can use the opposite side for reference, bolt orientation, etc. I left the key in the ignition so that I could turn the steering wheel right/left. Remove the ABS brake sensor with an allen wrench, then remove the two 16mm bolts holding the brake caliper to the hub. Slide the caliper off the rotor and zip tie it to the strut. It’s heavy so secure it well or else it could fall and damage your brake line (see pic below) 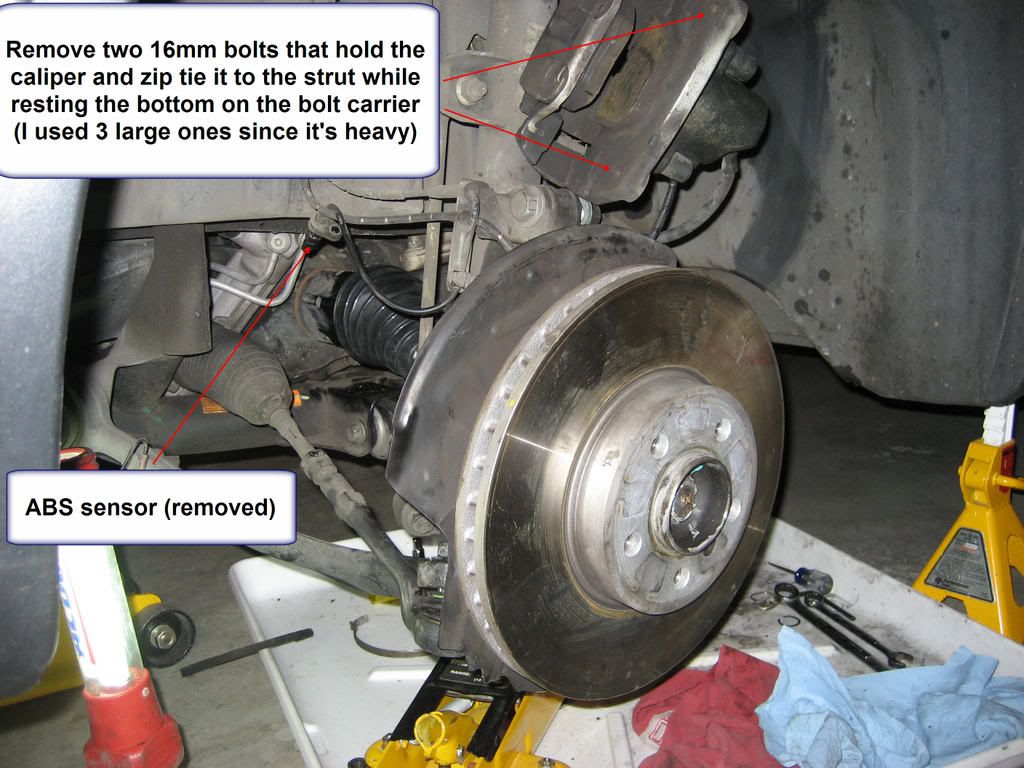 Below is a picture of everything you have to remove in order to pull off the hub assembly. I pulled off the whole thing including the brake rotor since I couldn’t remove the motherf&^%$#@! allen screw holding it on which made it HEAVY. ***Leave the top bolt holding it to the strut for last so that you can disconnect the axle and all the bolts/nuts without the whole assembly falling on your foot. Remove 16/18mm bolt & nut combo for the rear control arm (see pic below) 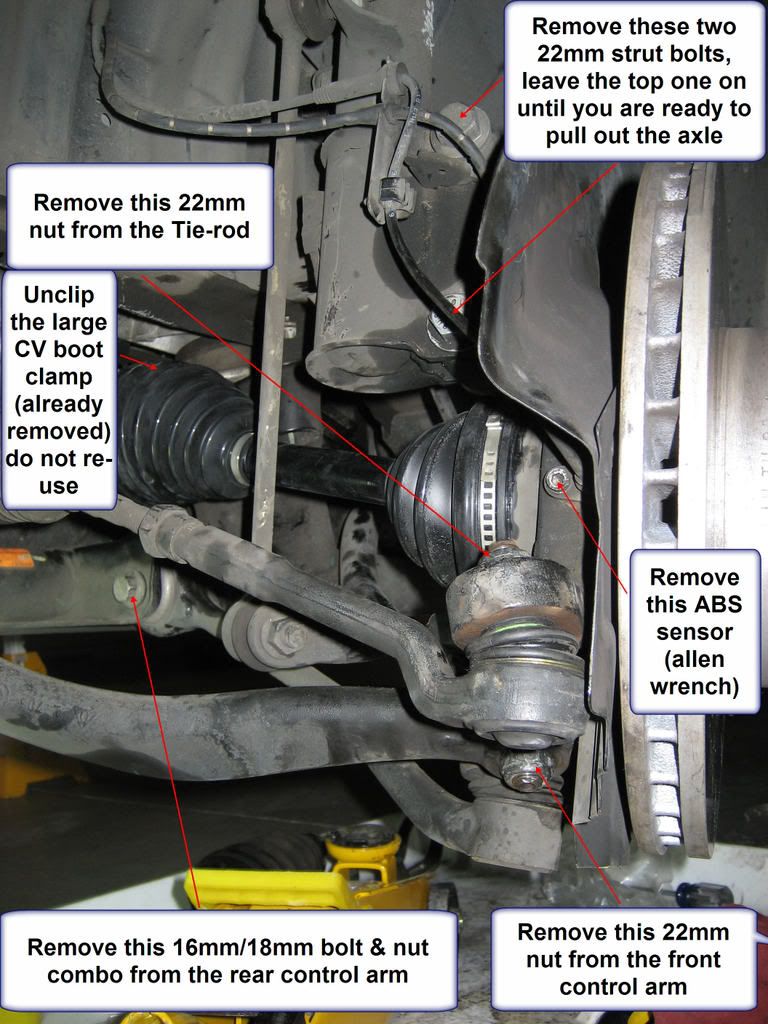 Remove 22mm nut from the front control arm using the small pitman arm puller (see pic below) 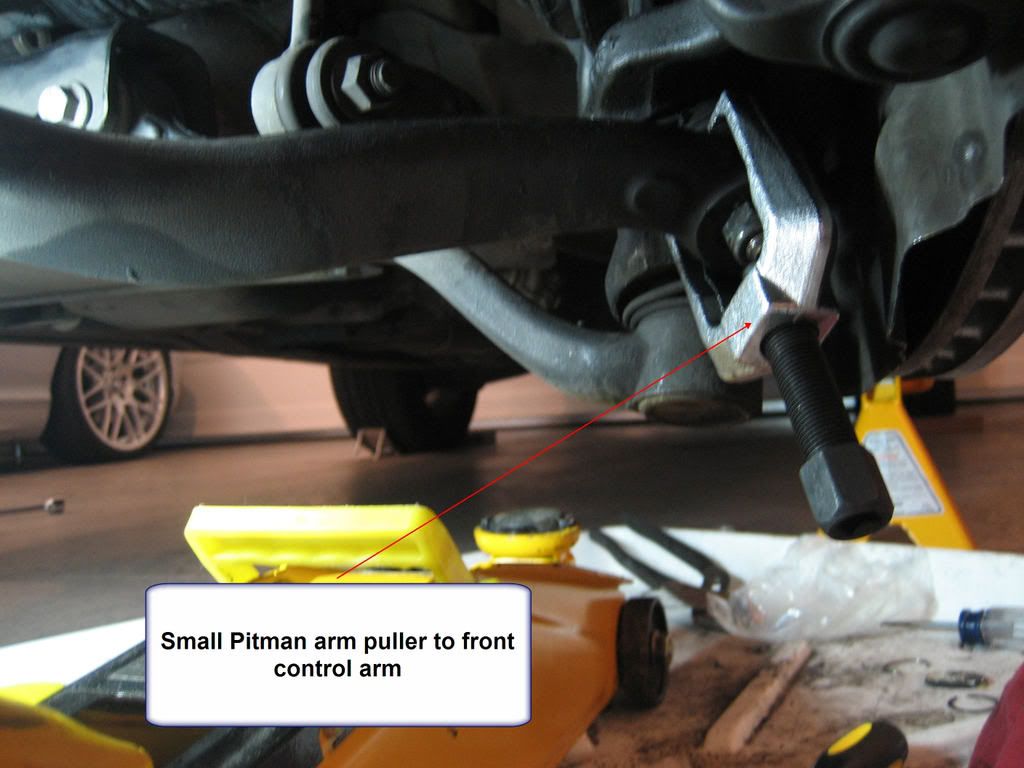 Remove 22mm nut from the tie-rod using the large pitman arm puller. Turn steering wheel all the way to the right (when working on the LF wheel) so that you can get it on (see pic below)  Remove the large CV boot clamp from the inner boot, don’t re-use. Once this is removed, the axle will slide out and grease will spill out (see pic below) 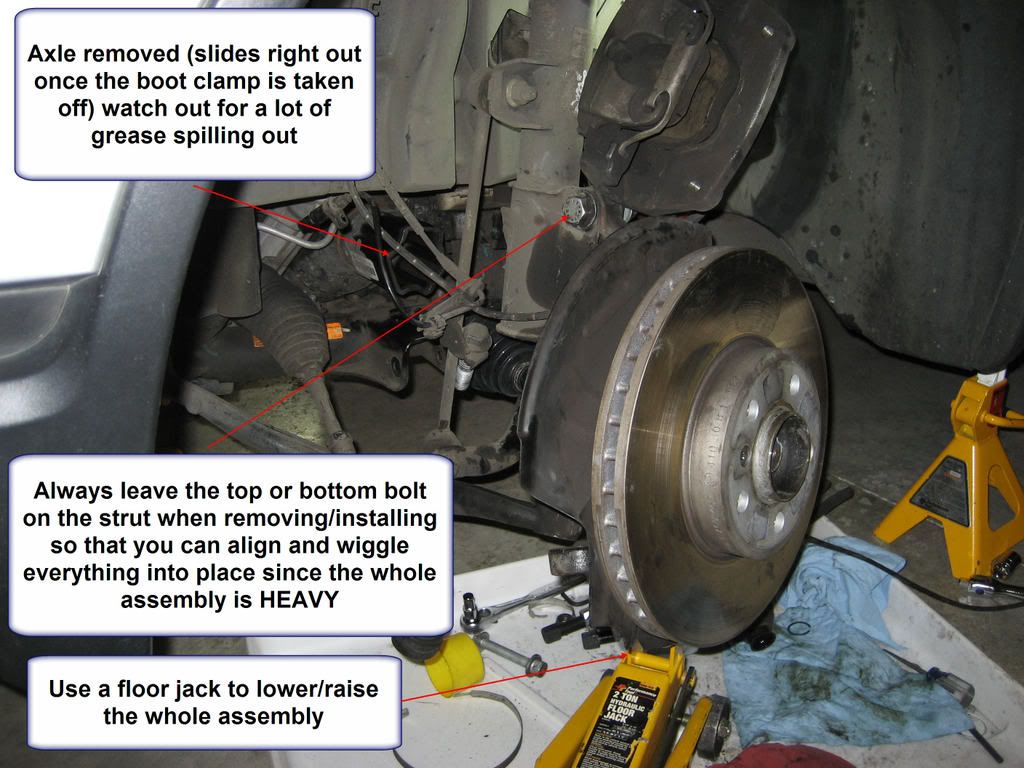 Here is another pic with the grease cleaned out. 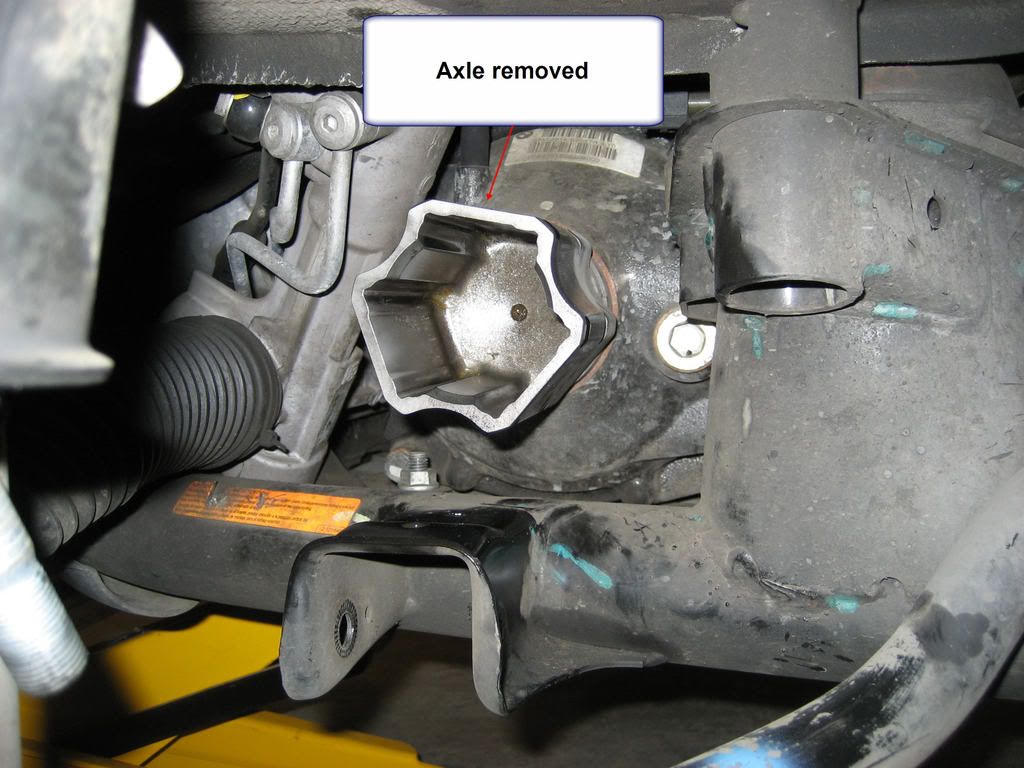 Once everything is off, put a small floor jack underneath the hub assembly then take off the large bolt and lower it gently. I laid mine on some rags on the floor to protect the brake rotor with the axle sticking straight up so that I could work on it (see pic below) 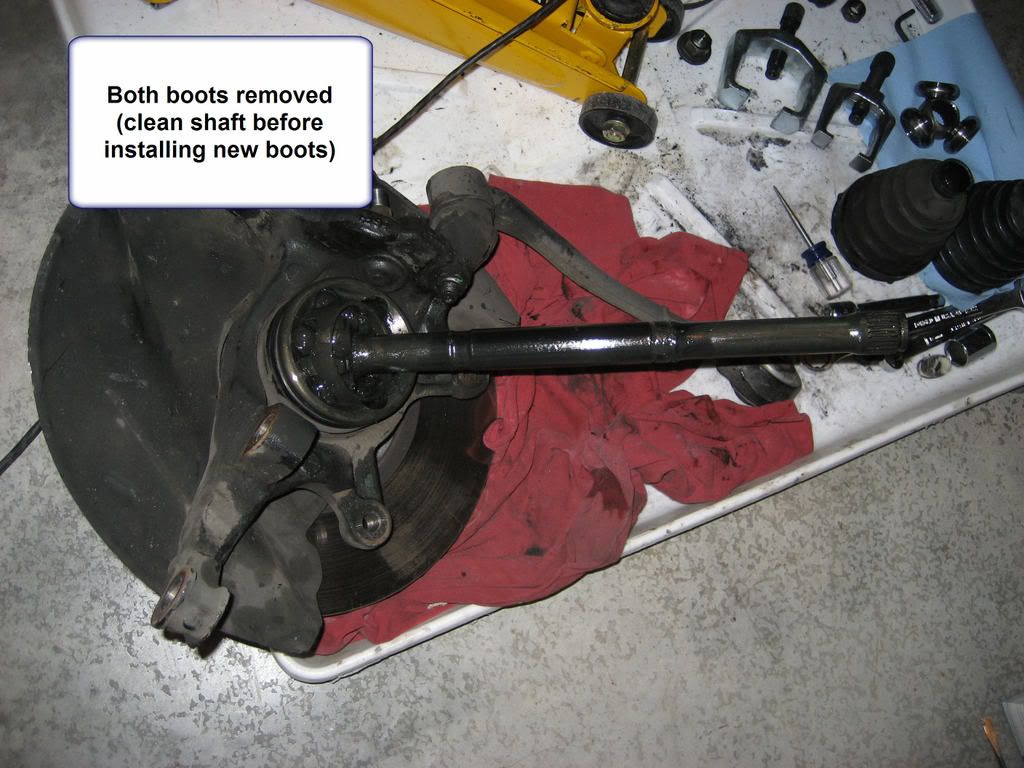 Clean the whole axle shaft so that when you slide the boots off/on, you don’t contaminate anything with dirt. This is the time to remove the remaining CV boot clamps on inner and outer boots. Clean up all the grease from the inboard side, remove the retaining clip and hammer out the 3-sided bearing assembly from the shaft (see pic below)  Remove inner and outer CV boots. Remove the rubber adapter from the old inner CV boot to be re-used if your kit did not come with one (my EMPI kit did not come with this adapter) Clean up outer CV joint, I just wiped off as much of the excess grease as I could since mine was not contaminated and then added the grease supplied with the kit. Apparently you are supposed to use non-petroleum based cleaners (these can leave a residue) Install new outer and inner CV boots as well as the clamps (leave the large inner clamp for last) I also noticed that the inner joint used a yellowish lithium grease so I did not use the supplied dark gray grease pack from EMPI and instead bought some Coastal brand lithium grease from Autozone. It’s not a good idea to mix different kinds of grease since they react with each other. The EMPI outer boot kit from Autohausaz fit perfectly. The inner boot kit however did not come with a rubber adapter and the OEM BMW adapter did not fit very well. I used it anyway and just hope that it does not come off, I recommend using a new OEM inner boot. I would not recommend the EMPI replacement boot (see pics below) 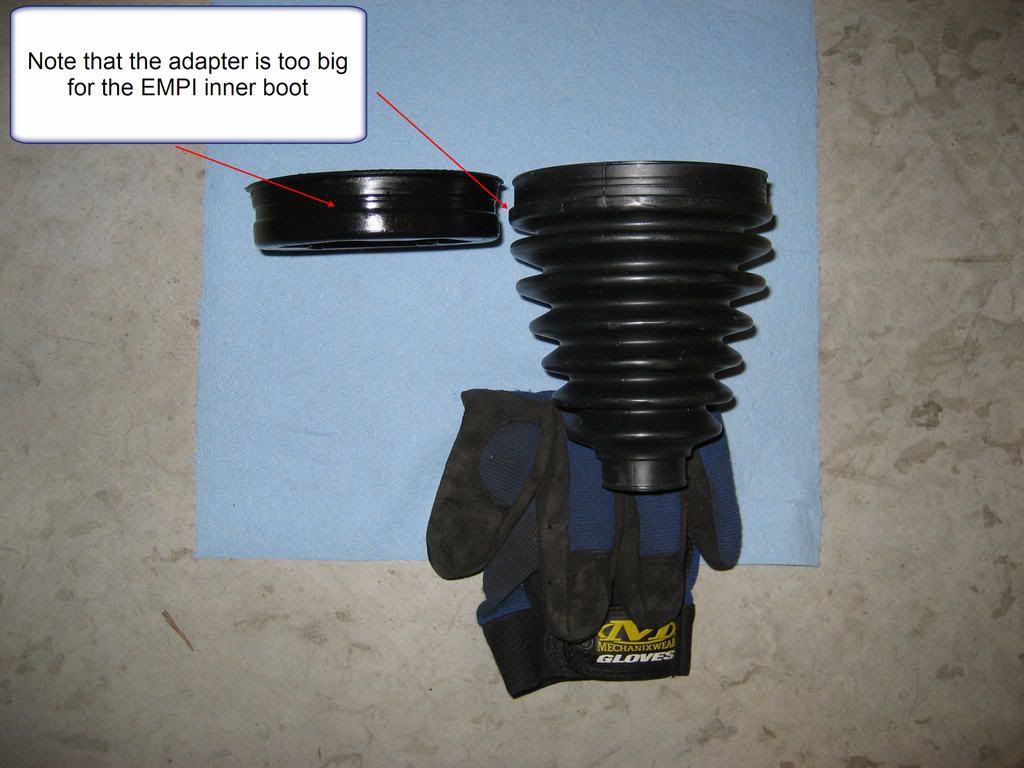 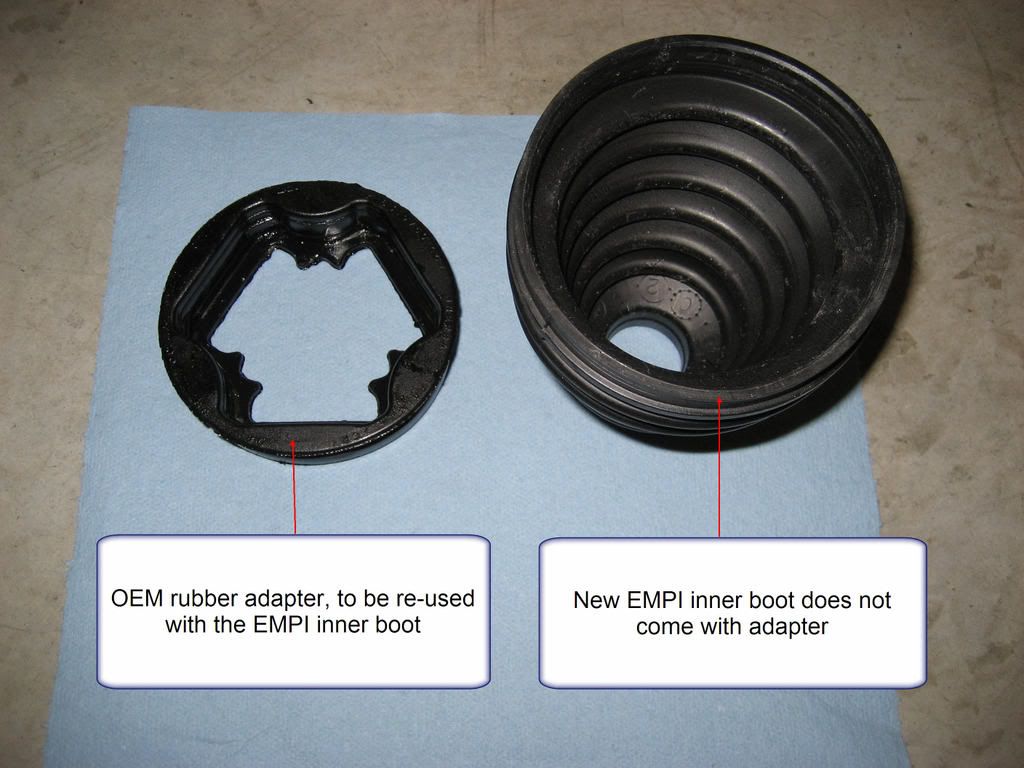  Once inner and outer boots are on and clamped, install the 3-sided bearing assembly. One side is tapered for easy install and alignment to the spline so make note of this when hammering it back on (do this gently and avoid hitting the bearings) Install a new snap ring (provided in the boot kit) and then the rubber adapter. Put a ziplock bag around it to keep it clean during assembly. Assembly: Lift the hub assembly onto your floor jack and raise it so that you can put the top (or bottom) large bolt to hold it temporarily to the strut. You can still wiggle it around to bolt up everything. I greased up the receiving end of the inner CV joint and carefully inserted the axle, make sure no dirt or debris gets in there. Also, make sure that the rubber adapter is on there BEFORE bolting up anything. You can fit the CV boot on there, don’t clamp it on yet though. Bolt up the rear control arm, front control arm, tie rod, two strut bolts, as well as the ABS brake sensor. I didn’t tighten anything yet since I used threadlock before using the torque wrench to tighten everything down. I plan to get some new 22mm nylock nuts later since mine were pretty rusty. I spun the axle around and inspected everything for fitment before installing the large CV boot clamp. Untie the brake caliper and install the two 16mm bolts. Here are the torque values I used for everything according to the previous DIY, you may want to double check these. Strut Bolts 185 ft-lbs. Front Control arm 45 ft-lbs. Tie-rod 59 ft-lbs. Brake caliper bolts 77 ft-lbs. Rear control arm to chassis bolts 74 ft-lbs. + another 90-degree turn (these are torque to yield bolts so new ones should be used) ***these need to be tightened with the car on the ground while the suspension is fully compressed. The FR side is the same procedure. Install both front tires/wheels, torque lug bolts 101 ft-lbs. Lower car, drive up onto ramps and tighten the rear control arms to the proper torque. Go for a test drive. Done! Pour yourself a cold one. And a shot. I did. Last edited by generx; 03-13-2009 at 03:16 PM. 
|
| Sponsored Links | |
|
|
|
|
#2
07-26-2009, 11:44 AM
|
|||
|
|||
|
Excellent write up. I just used this to do my passenger side inner and outer CV boots and your descriptions and pictures make it an easy job - much easier than I anticipated. I can't believe anyone would go the other route of pulling the hub off, it must be rough. I used GKN Loebro inner and outer boots from germanautoparts.com. The Loebro inner boot does not come with a new rubber adapter but it fits perfectly with the existing OEM adapter.
|
|
#3
07-26-2009, 12:02 PM
|
||||
|
||||
|
texmln , i bought both inner and outer boot kits for right side , the outer boot is heavy flexible rubber but the inner boot is thin plastic so can you say if your kits are the same as mine , i bought from a bmw dealer in france for 30 euros each boot .
|
|
#4
07-26-2009, 12:05 PM
|
||||
|
||||
|
excellent? not really, this is too much un necessary work.
1)remove wheel 2)remove 36mm nut 3)remove lower control arm bolt and let the arm hang 4)use air hammer to push axle shaft out of hub. 5)using a razor blade, cut boot in half(if not already completly torn 6)using a small sledge hammer, hit cv joint out of splines. 7)replace cv boot takes 15 minutes!
|
|
#5
07-26-2009, 12:52 PM
|
||||
|
||||
|
Mr killcrap sir ,can you tell me is the 36mm nut the one on the end of drive shaft seen when bmw cap removed and when the control arm bolt removed is there enough movement available with the tension arm and steering still connected to allow the drive shaft to be removed from hub .
also can i leave wheel speed sensor in place whilst doing this . i need to replace right front outer boot so will i need to disconnect some piece of the ride height sensor .and are you saying that the brake calliper stays put .
|
|
#7
07-26-2009, 01:31 PM
|
||||
|
||||
|
i just mean is that the nut that is behind the bmw cap ,and when i said driveshaft i actually mean axle shaft or half shaft as some know it .
i`m tryng to figure how to do this so i`ll try to describe what i`ll attempt remove wheel remove collar nut remove control arm nut and bolt at subframe , let arm hang do not remove brake caliper or tension strut or steering rod end do i need to turn steering to allow me to hammer out axle shaft from hub do i need to remove speed sensor before hammering axle shaft
|
|
#8
07-26-2009, 02:10 PM
|
|||
|
|||
|
killcrap, how do you manually put the necessary 330 foot pounds of torque on the axle nut? I've found it difficult to get much above 200 foot pounds without some serious air tools...
amacman, my loebro inner boot seems to be a less flexible blend of rubber/plastic than the outer boot but it is still quite pliable. Flexibility is not as important with the inner boot because it isn't twisted when turning the wheel like the outer boot.
|
|
#9
07-26-2009, 02:42 PM
|
||||
|
||||
|
Amacman
why ask pointless questions, as if turning the steering wheel is so hard to do? did i say to remove the wheel speed sensor in my post? Texmln I used a 1/2" air gun to rescure the nut, and then use the air hammer to bend the collar nut tabs in.
|
|
#10
07-26-2009, 08:06 PM
|
||||
|
||||
|
so if i follow your first instructions to the letter then that is the job done and no other parts need to be removed , correct or not .
all other methods say to remove hub from strut and control arms to allow cv joint separation so using your method i would think that it is neccessary to turn steering to allow the cv some route for removal . your instructions are not clear on that point .
|
|
| Bookmarks |
|
|
|
|


 Linear Mode


