
|
|
|
|
||||||||||
| Xoutpost server transfer and maintenance is occurring.... |
| Xoutpost is currently undergoing a planned server migration.... stay tuned for new developments.... sincerely, the management |
 |
|
|
LinkBack | Thread Tools | Display Modes |
|
#1
 03-23-2009, 01:38 AM
|
||||
|
||||
|
Latest mod: HID fog lights installation
I had been running Hoen XenonMatch H3 fog light bulbs until recently when one blew out. I don't use my fog lights much so the Hoens lasted me quite a while. They do a very good job of matching the factory xenon headlights but they aren't cheap bulbs so instead of ponying up $40 for a set of xenon-look bulbs I decided to go with a true HID setup for not much more. I ordered a set of 4300K H3 bulbs and ballasts from KHOALTY MOTORGRUPPE on the recommendation of another X5world member who has Khoalty HID fogs in an E46. Khoalty offers 4300K, 5000K, and 6000K. I opted for the 4300K as they are the best quality light and best match the headlights. I do not like the bluish tint of the higher K lights. The price was excellent at $65 plus $7 shipping and Khoa got them to me quickly. Khoa was also very good about e-mails and answered questions promptly.  I know there are a ton of vendors out there that sell this kind of stuff. I went with one that is known to me by a referral and a quick Internet search. I know there are a ton of vendors out there that sell this kind of stuff. I went with one that is known to me by a referral and a quick Internet search.The kit I bought is well made. They are almost certainly a kit known on BMW boards, E46 ones in particular, as "Apexcone" HID kits. There are actually the letters "APX" on one part of my kit. The ballast is a slimline one and is quite compact. Here is one half of the kit. As you can see, it includes wiring harnesses, ballast, and bulb (in its protective plastic shipping cylinder). It all seems to be good quality, especially for the price. 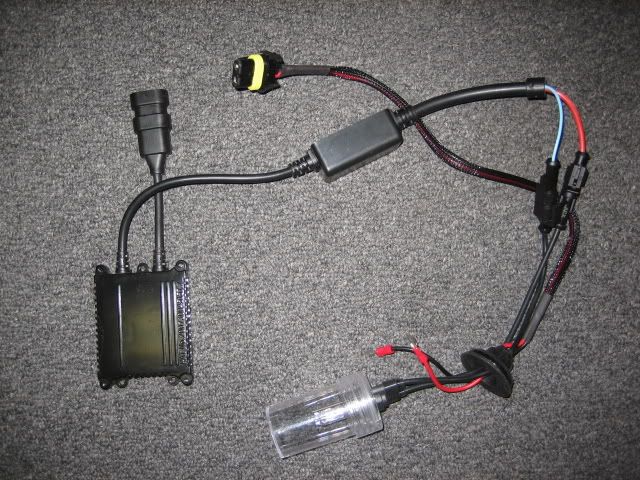 The first step was to figure out what the heck was going on. There were no instructions whatsoever hence, I wanted to write something up for others who might do this mod. The way the wiring comes, all of the wires go through a rubber grommet. I found this to be a problem. If you look at the photos above and below you can see a red and black pair of wires, in addition to two other black wires, that run through a rubber grommet. The two thick black wires run to the HID bulb which will be inside the fog light housing. The red and black pair with metal taps on the ends do not go in the housing. If that pair are left within the grommet, the grommet cannot be used for this application. You will see why later. 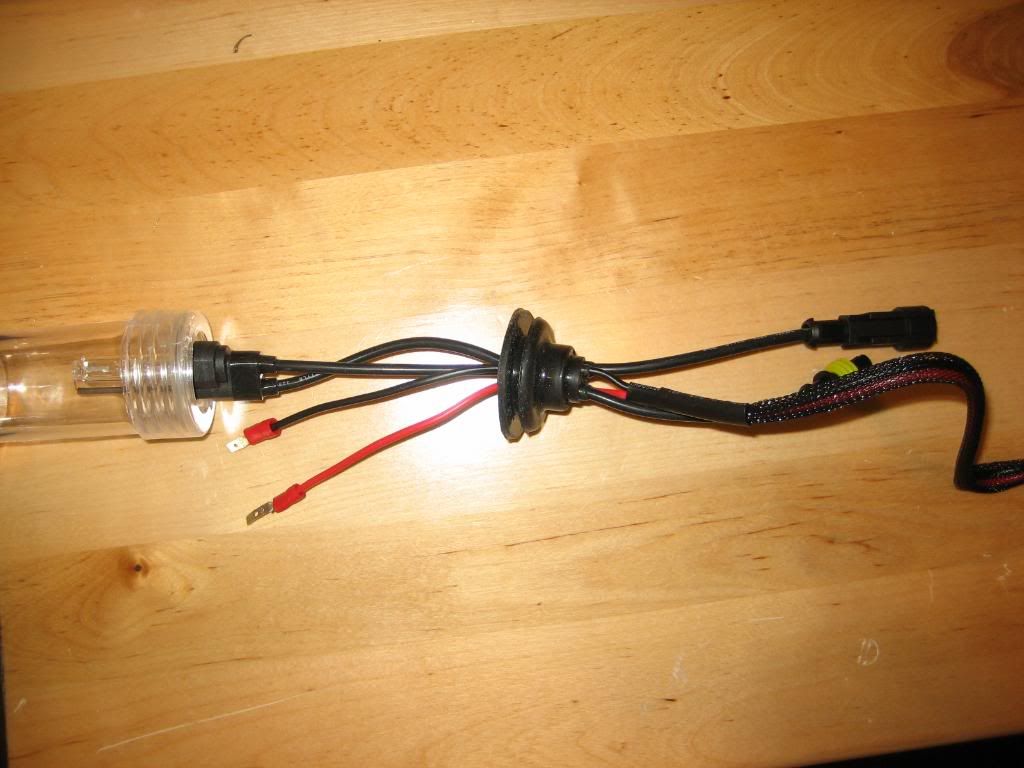 I cut a small slit in the grommet where the red and black wire go through so that they could be pulled out, leaving just the two thick black wires that go to the HID bulb still in the grommet. Here you can see the wiring all separated. 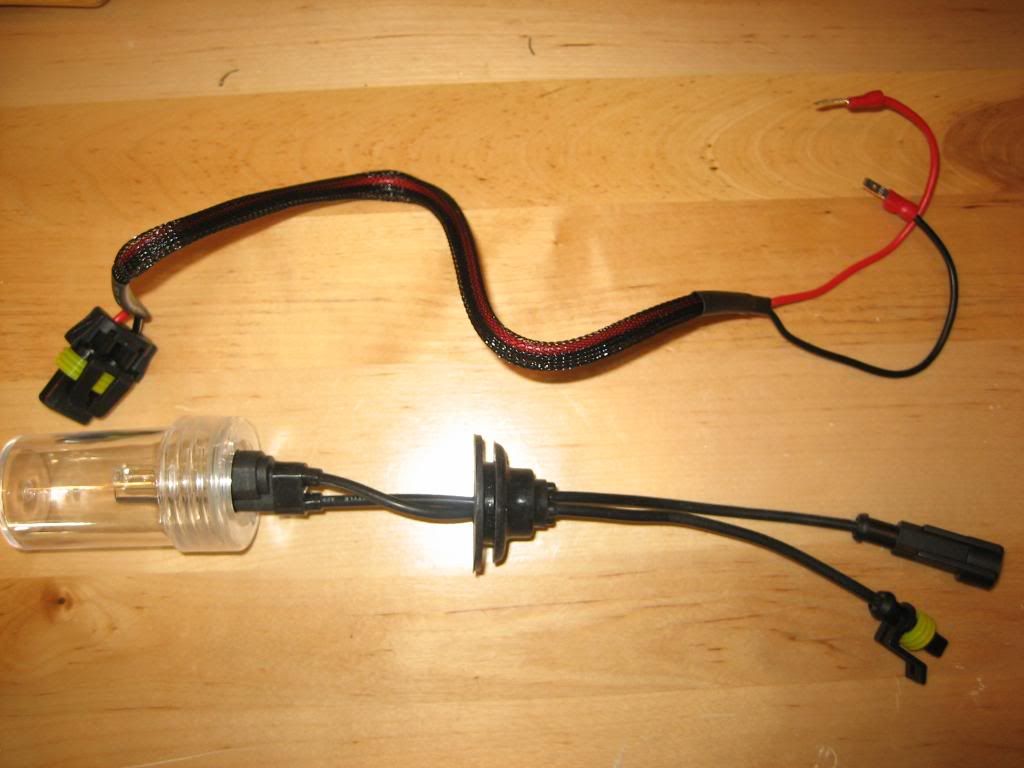 Once separated, the next step was to modify the metal taps. The ends of the red and black pair had taps on them that were too wide to fit in the X5's original fog light wiring harness so the choice is to either replace the taps with narrower ones from Radio Shack or cut them down. I opted to cut them down with tin snips and a file. Here are the original taps. 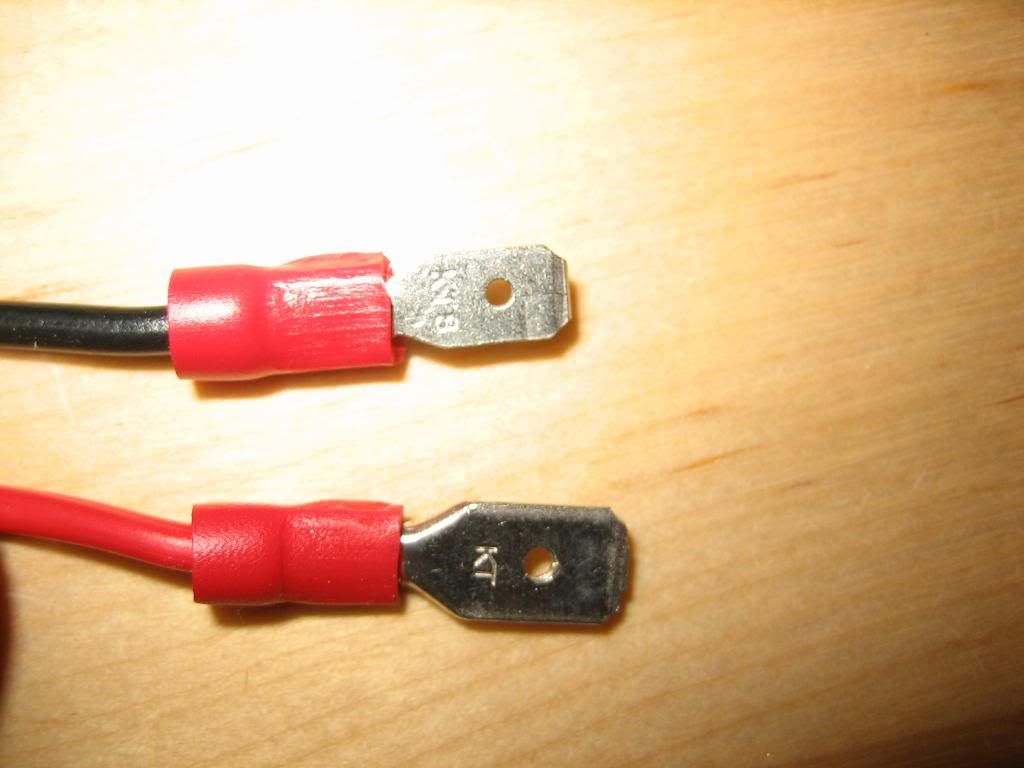 Here they are after being cut and filed. 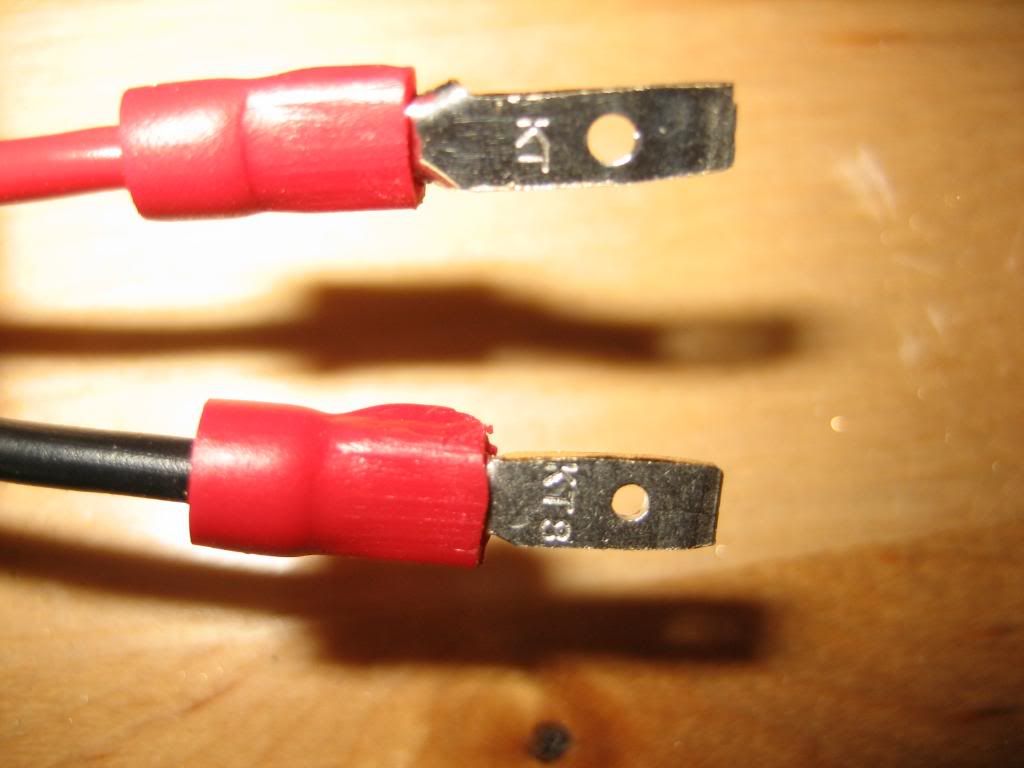 After doing this it was time to prep for installation. The fog lights must be removed, of course. Follow the instructions here to remove your fog lights. Once you remove the housing you get this. 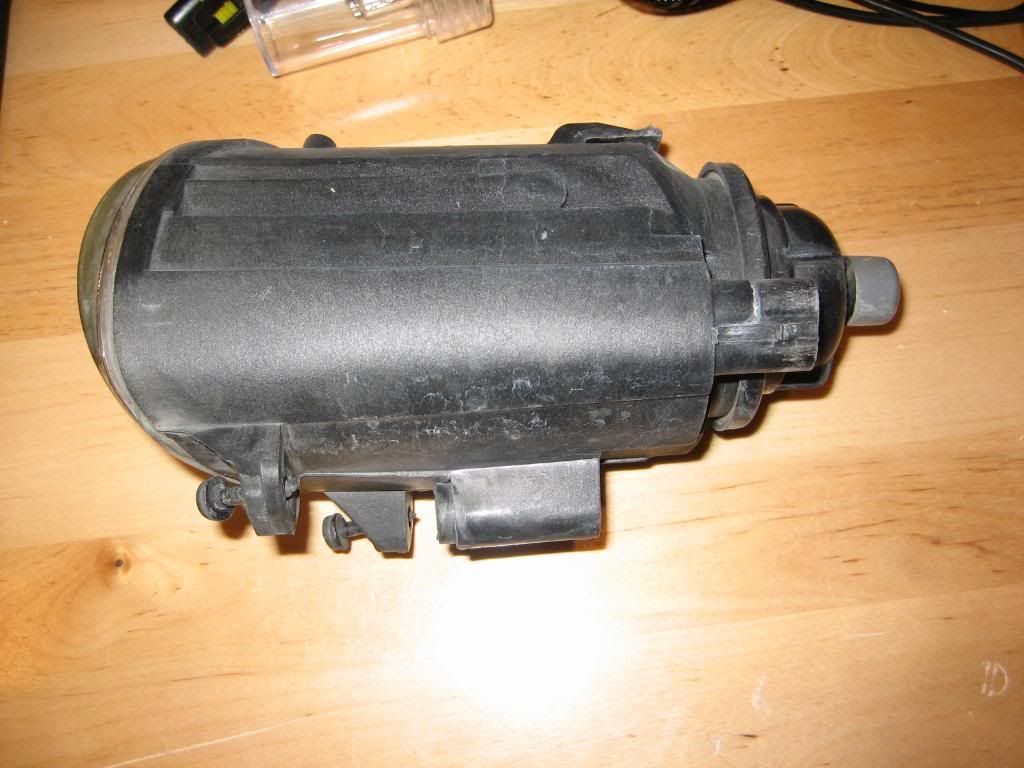 There is a cap on the rear of the housing. This is what it looks like with the cap and then when the cap is removed. 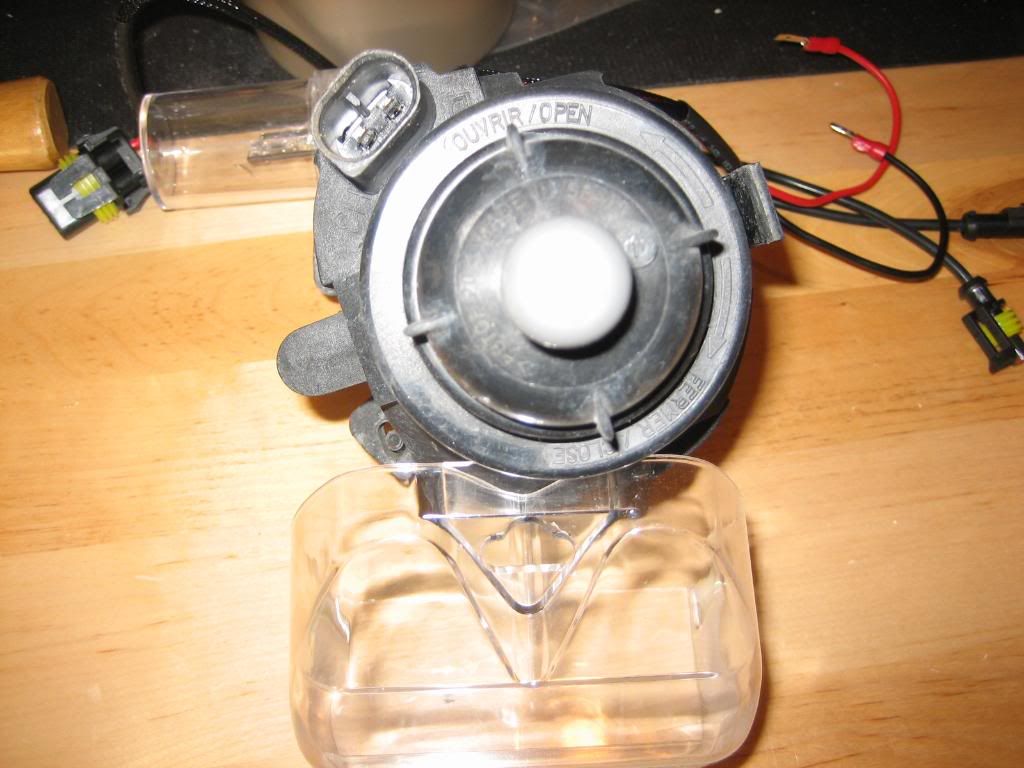 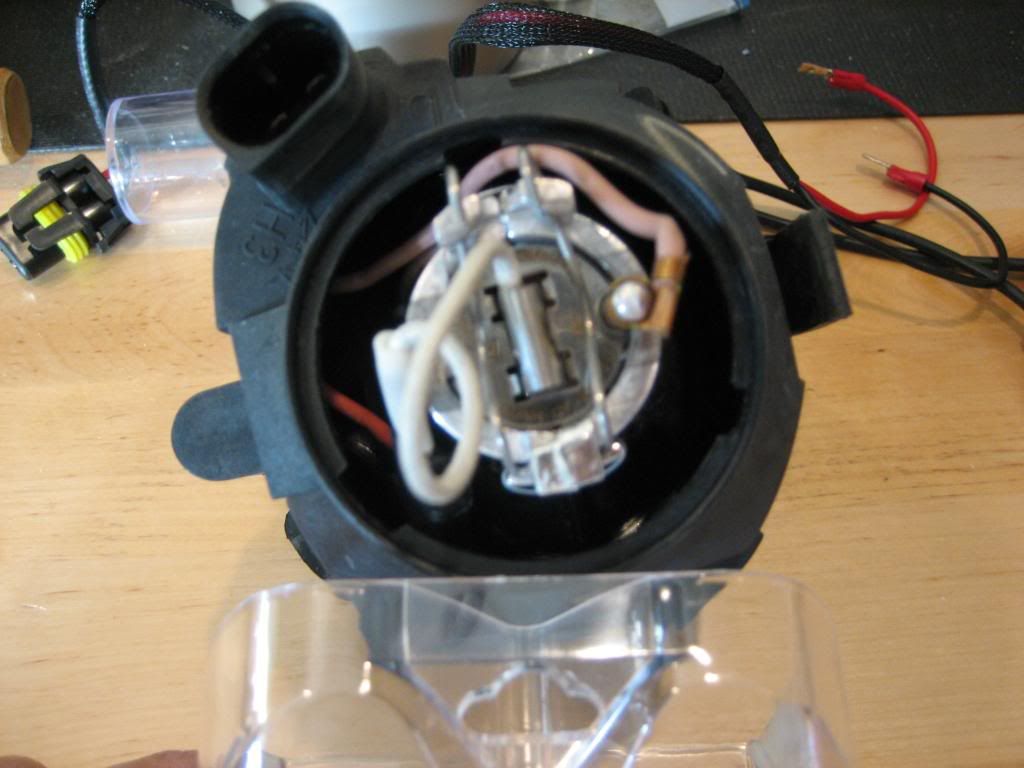 Take out the original bulb. There is a wire that the bulb is plugged into. That wire will not be used. None of the connections on the housing will be used with the HID kit. The next thing you will need to do is to modify the cap. Break out the top part of the cap in a circular shape so that the wiring can go through and the rubber grommet can be used to seal up the housing. If this part is not done with this kit, the rear of the housing will be left exposed to the element which cannot be a good thing. I used a hammer and small chisel to break the plastic. It was quite thin so be careful not to smash the cap! Here is the before and after of the cap.   Once that is done, insert the HID bulb into the housing. Here is the bulb on its own and then show inserted into the housing. 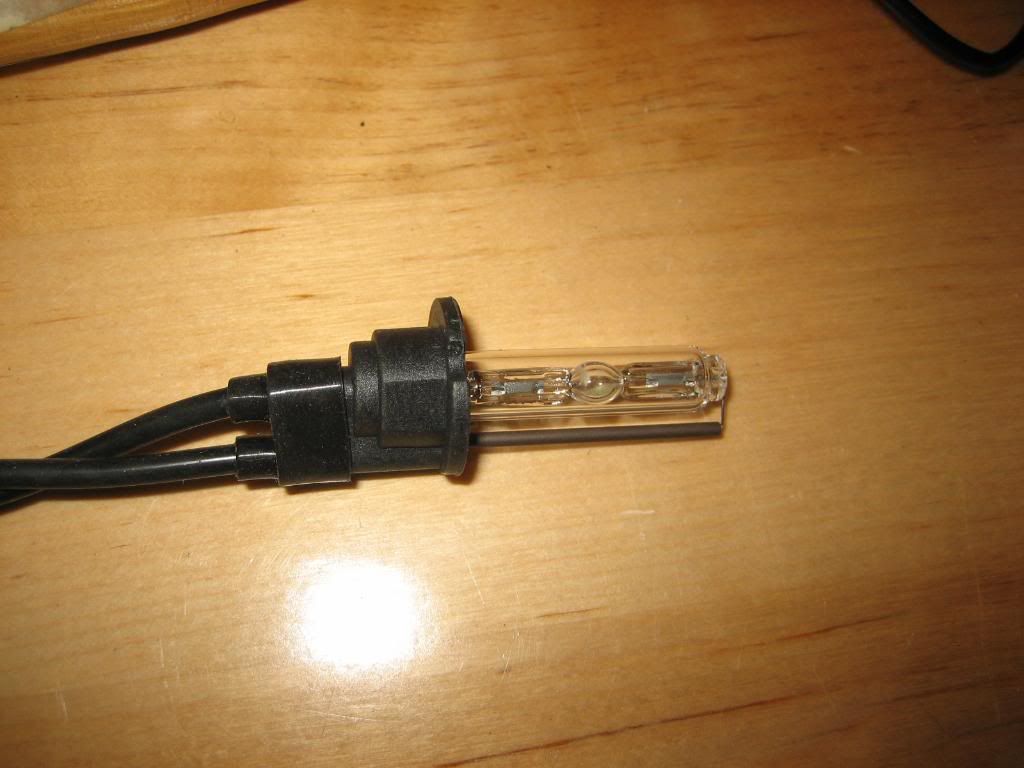 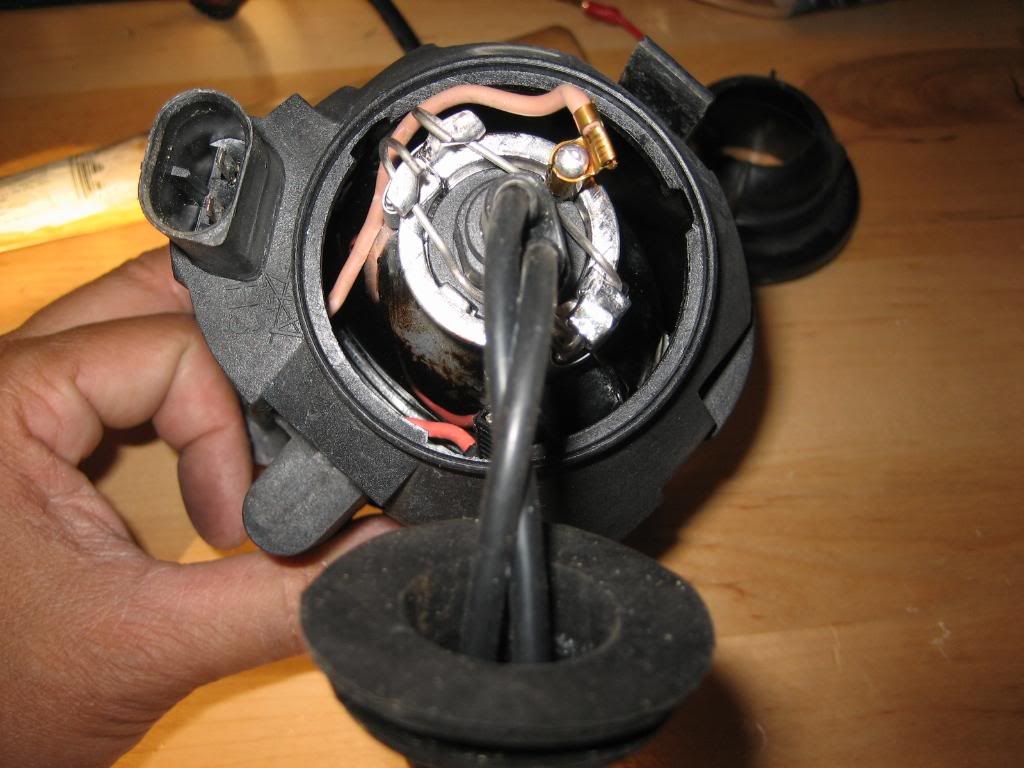 Now that the bulb is in the housing you can plug of the hole by inserting the rubber grommet into the hole you made in the cap. It should look like this. 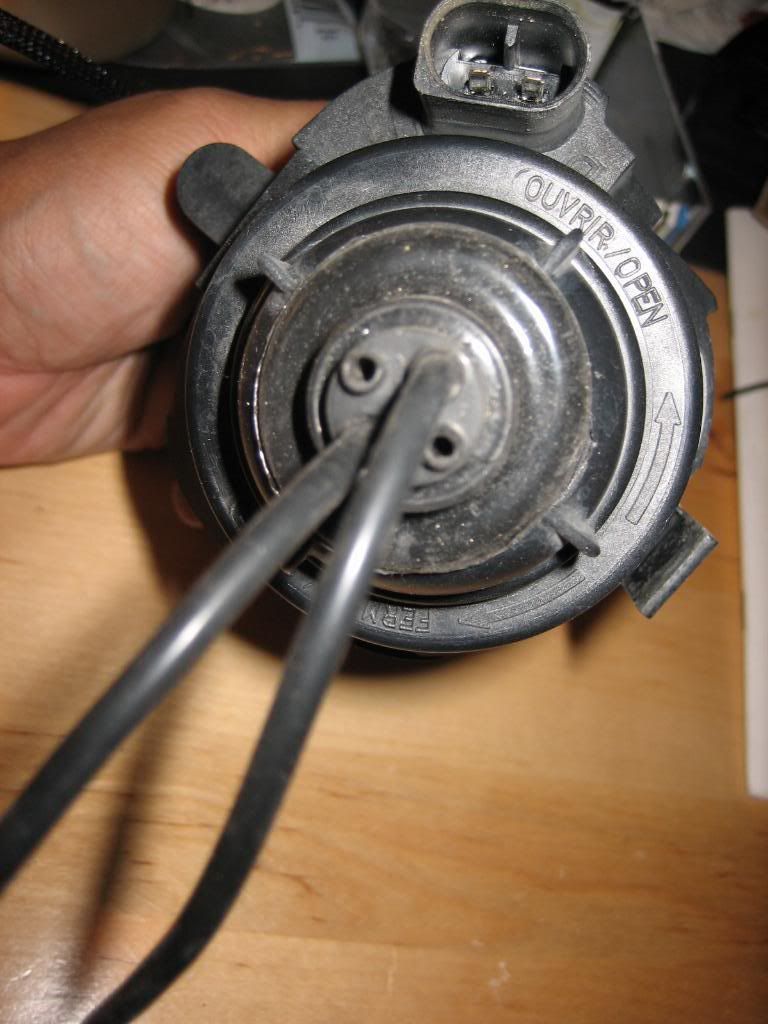 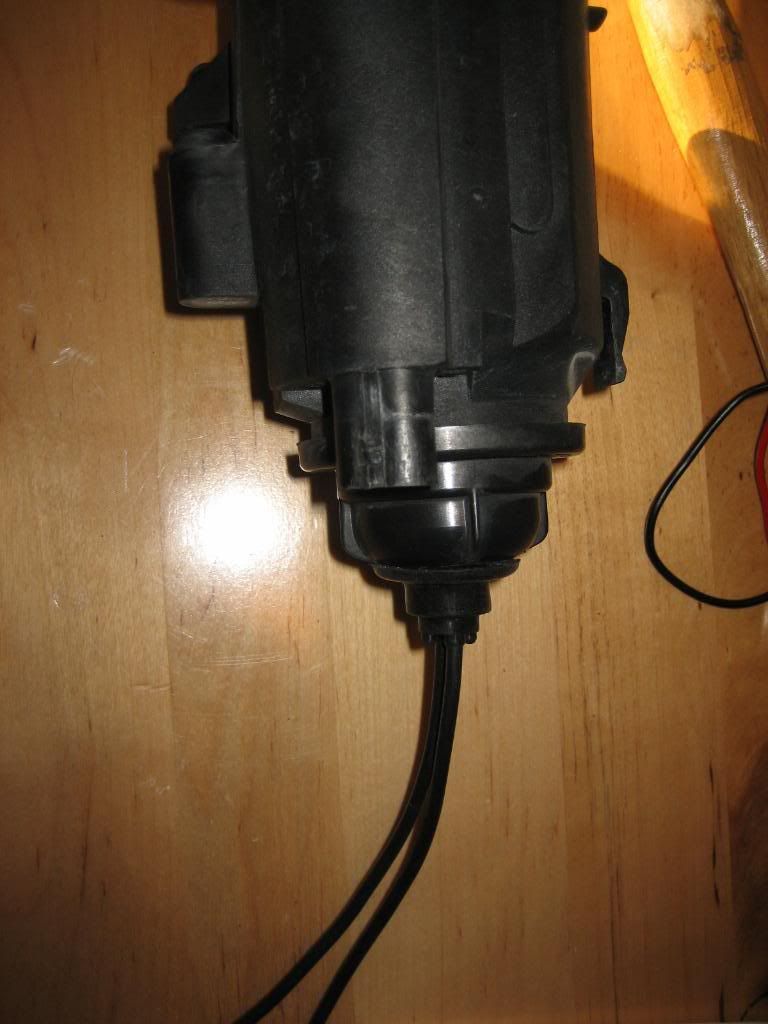 As you can see, the only wires that go inside the housing are the two black wires on the HID bulb. The red and black pair don't go in there so if you leave them attached to through the grommet you cannot use the original cap, the bulb is exposed, and the grommet just hangs on the wiring. My way is better.  Now you are ready to get it wired to the X5. The first step of this is to connect the wiring. All you need to connect the HID harness to your X5 are the red and black wire pair with the taps on them. They will connect to the factory plug that you unplugged to get the fog light housing out. The trimmed down taps will slide into the factory connector as shown below. I then wrapped them in electrical tape to protect the connection. Brown/yellow wire = power = red wire Brown wire = ground = black wire 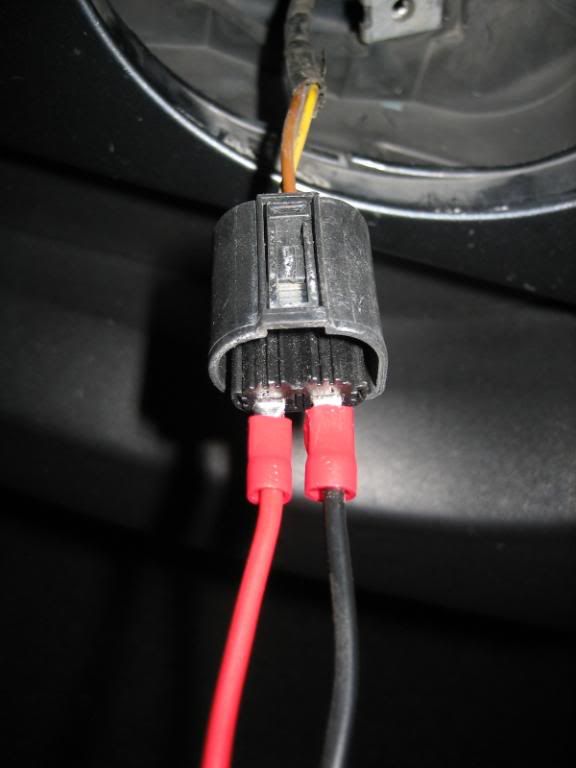 This is how the whole rig will look before you put it inside the bumper. 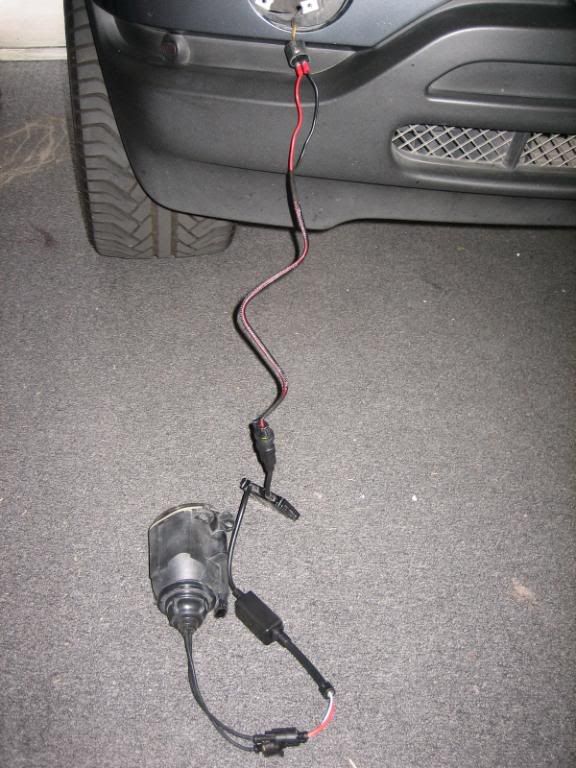 At this point I would test it out. There are a few different problems that can occur because after all, this is a mod not intended by BMW. Some people might experience the light flickering that requires the addition of a capacitor to correct. I do not have this problem although it did go through some flickering but seemed to have corrected itself after I checked all my connections. Once you determine that everything functions you can close it up. There is plenty of space behind the bumper so don't worry about the wiring and ballast fitting. The only issue is mounting the ballast. It's quite slim so fitting it in is easy. There are a few different ways to mount the ballast so that is up to you. You can use strong double stick tape, screw mount it if you dare, or secure it with wire or other material. I found a horizontal metal bracket that I lashed the ballasts to with wire. They are sort of dangling and don't bang up on anything. The rest of the wire tucks inside. You can reinstall the fog light housing and here are the results. Comparison: Hoen XenonMatch on passenger side vs. HID on driver's side with halogen DRL's on and then with xenon headlights on 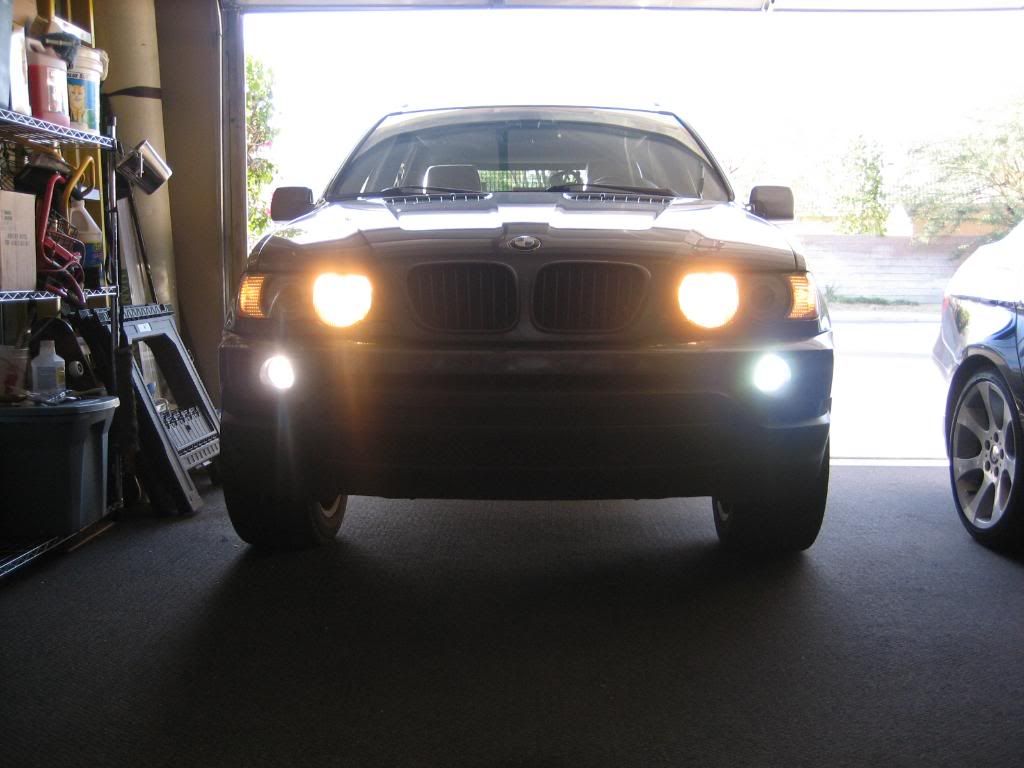 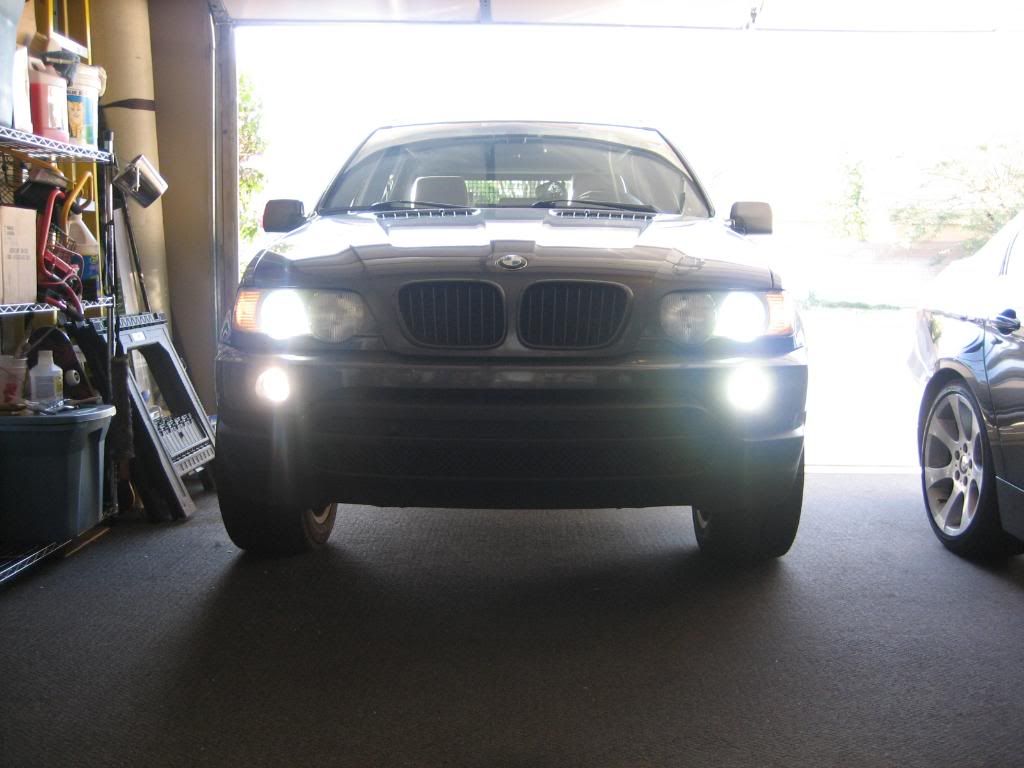 Comparison: Original halogen bulb on passenger side vs. HID on driver's side 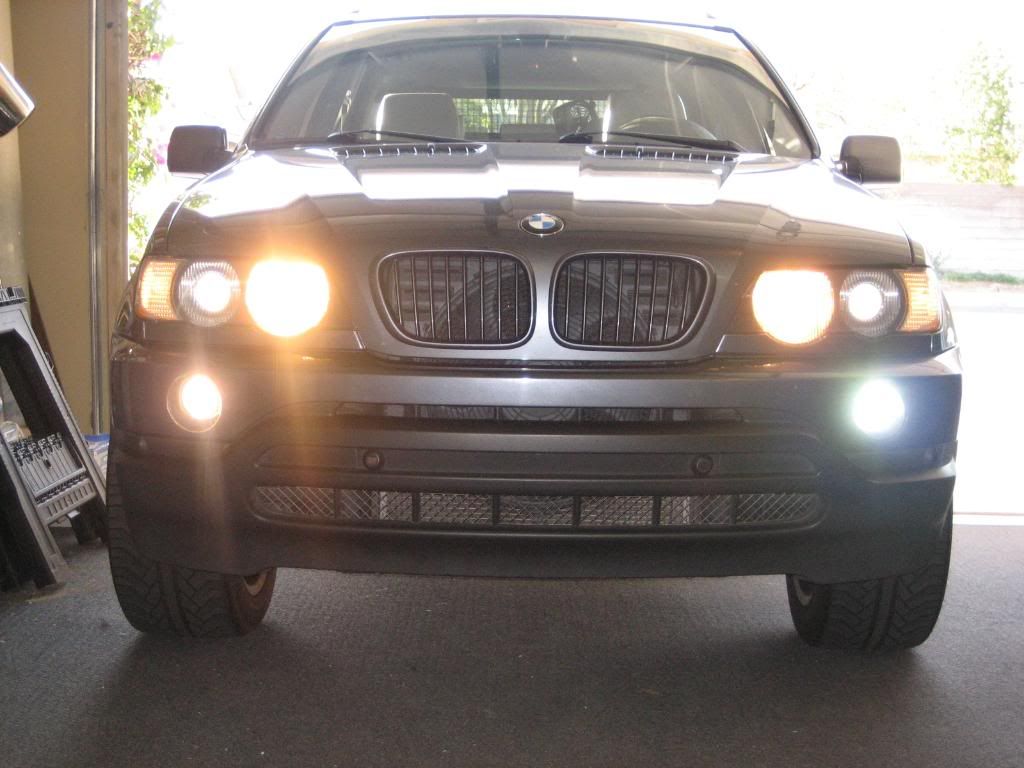 The finished product: HID on both sides 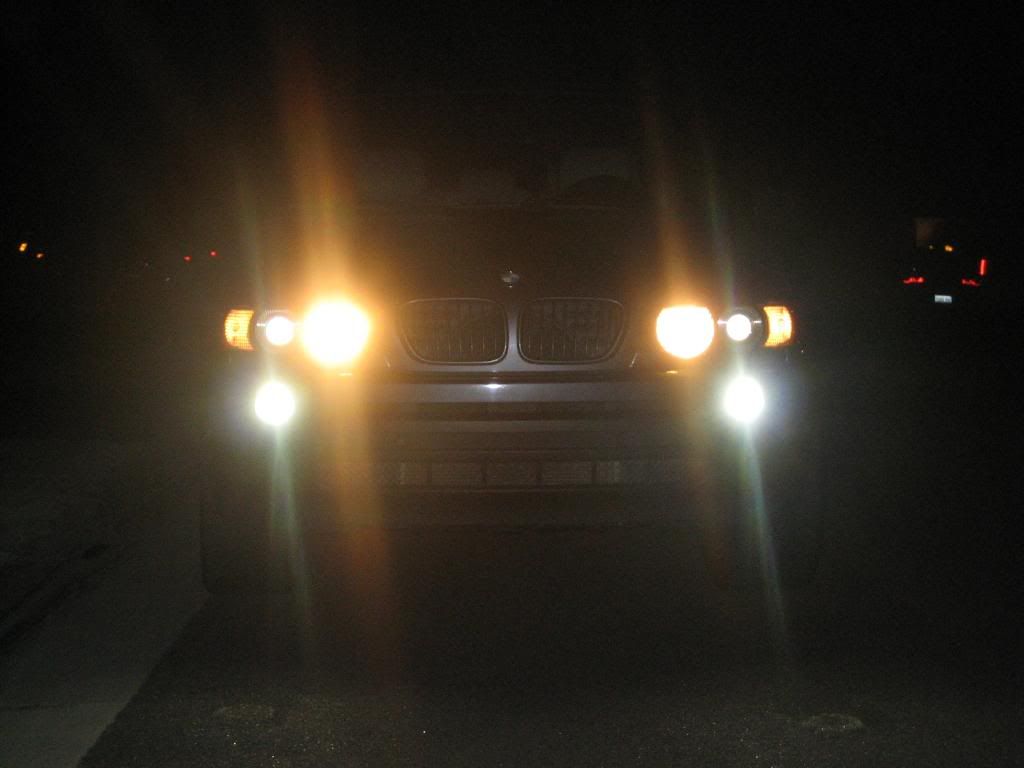 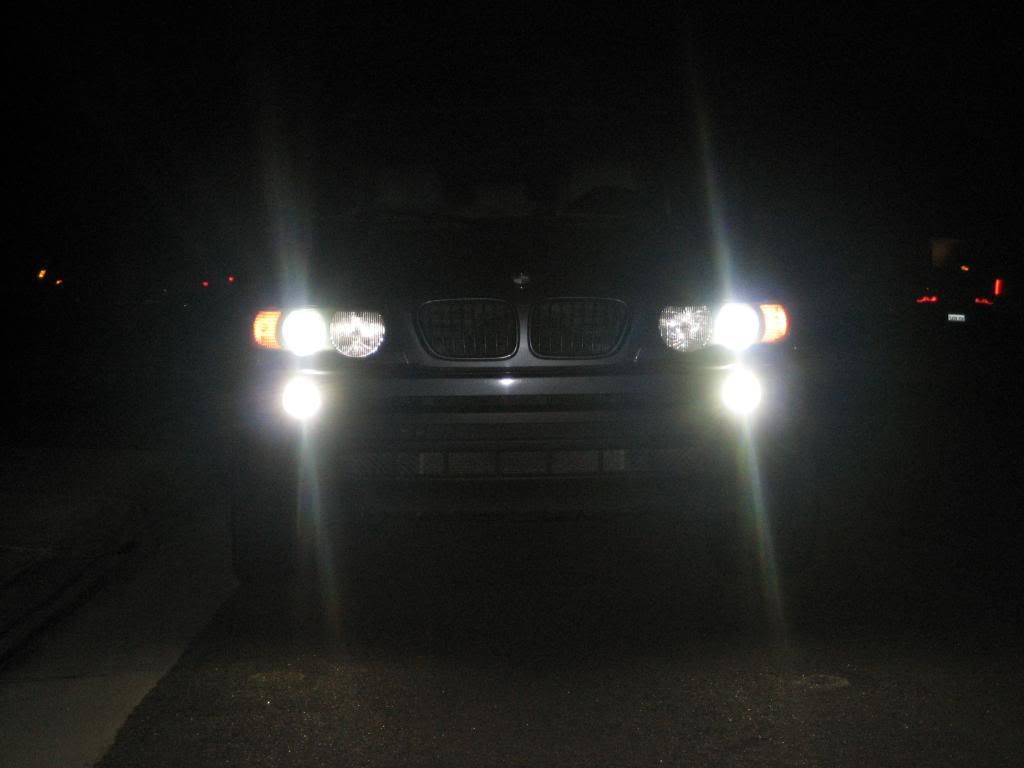 Another great mod for me.  This mod is also just about 100% reversible. All you need is to replace the two end caps. YMMV on this install and you take your chances but I hope my instructions will help people out. This mod is also just about 100% reversible. All you need is to replace the two end caps. YMMV on this install and you take your chances but I hope my instructions will help people out.
__________________
 Last edited by PersonaNonGrata; 03-23-2009 at 01:46 AM. 
|
| Sponsored Links | |
|
|
|
|
#2
03-23-2009, 01:43 AM
|
||||
|
||||
|
looks good! seems to be just about the same thing Jose and I (mostly Jose though) did to my foglights.
However, I went with 6000k from AngeliBright.
__________________
___________________    ___________________ 2002 BMW X5 3.0i ----sold---- 2008 BMW X5 3.0si 2010 BMW 335i M Sports Package & BMW Performance Kit
|
|
#3
03-23-2009, 01:46 AM
|
||||
|
||||
|
Also, where exactly did you mount your ballasts? I have mine secured by plastic tie downs..i believe the passengers side is on some tube/wire leading towards the washer fluid, and the drivers side is sitting with a tie down below the air intake. this was supposed to be temporary but they don't move so i decided it was fine? hmm..
__________________
___________________ ___________________ 2002 BMW X5 3.0i ----sold---- 2008 BMW X5 3.0si 2010 BMW 335i M Sports Package & BMW Performance Kit
|
|
#4
03-23-2009, 01:51 AM
|
||||
|
||||
|
Quote:
How are your 6000K? I thought that there would be too much blue with 6000K. Now, I think 5000K might have been good but I'm by no means disappointed with 4500K. Heck, I can always change out bulbs later.
__________________
|
|
#5
03-23-2009, 02:04 AM
|
||||
|
||||
|
sounds too complicated for me.. i think i will stick with the plastic tie downs for now
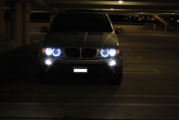
 6000k is great! at startup its light blue, but it comes out as pure white, but on the road it illuminates with a slight hint of blue. i guess with 4500k you are getting better light output. but just to give you an idea of 6000k light out put: i drive around at night with just foglights for the most part, and 6000k still illuminates a great amount. (if its really dark though i have the lowbeams which are also 6000k.) what color is 4500k exactly? pictures can be deceiving. here is a pic to give you an idea of how 6000k is..  (more can be found here, didn't want to pollute your thread: http://www.xoutpost.com/x5-e53-forum/...re-thread.html http://www.xoutpost.com/x5-e53-forum/...installed.html )
__________________
___________________ ___________________ 2002 BMW X5 3.0i ----sold---- 2008 BMW X5 3.0si 2010 BMW 335i M Sports Package & BMW Performance Kit
|
|
#6
03-23-2009, 02:12 AM
|
||||
|
||||
|
Quote:
Comparing with your photo I would say that the 4500K are not quite as white as your 6000's. BTW, your angle eyes look awesome. Nice and bright!
__________________
|
|
#7
03-23-2009, 02:21 AM
|
||||
|
||||
|
i think i have a good idea of what they look like...stick with 4500k it'll do you well. while 6000k looks nicer on the road, there are times when they betray you, like in heavy fog (you need yellow light).
and thanks on the compliment for the AEs! i just need to get that passenger side, big halo fixed (weaker than the rest).
__________________
___________________ ___________________ 2002 BMW X5 3.0i ----sold---- 2008 BMW X5 3.0si 2010 BMW 335i M Sports Package & BMW Performance Kit
|
|
#8
03-23-2009, 02:43 AM
|
||||
|
||||
|
I think the red/black wire may work with them staying inside the grommet. The red wire can hook into the slot where the original bulb white wire would go. The only issue is to find a place to crimp/attach the black ground wire. This way, you can just plug everything back into place using the OEM connections without further modifications/electrical wraps, etc...
|
|
#9
03-23-2009, 03:06 AM
|
||||
|
||||
|
Quote:
However, his HID kit was different (from Angelibright) and cost waaay more. I have the same kit as this but 6000K and I needed the code-cancelling thing. Great write-up ... definitely put effort into it! Looks great!
|
|
#10
03-23-2009, 01:17 PM
|
||||
|
||||
|
Quote:

__________________
___________________ ___________________ 2002 BMW X5 3.0i ----sold---- 2008 BMW X5 3.0si 2010 BMW 335i M Sports Package & BMW Performance Kit
|
|
| Bookmarks |
|
|
|
|


 Linear Mode


