
|
|
|
|
||||||||||
| Xoutpost server transfer and maintenance is occurring.... |
| Xoutpost is currently undergoing a planned server migration.... stay tuned for new developments.... sincerely, the management |
 |
|
|
LinkBack | Thread Tools | Display Modes |
|
#1
 08-09-2009, 11:48 PM
|
||||
|
||||
|
headlamp scratches
have tried plastic polish, but hand use will require ALOT of elbow grease. I could purchase a small 3" polisher, but since some scratches appear to be deep, I'm not sure removing that much plastic would affect the beam pattern, and I'd have to remove the assemblies to keep from marring the paint. am I forced to buy new? I would like to upgrade to angel eyes, but using the present assemblies would just bring more comments how scratched they are. any suggestions on what options I have?
__________________
Mark         _______________________________ _______________________________2001 X5 4.4i topaz blue/sand Sport, complete Dinan S2  , hitch, V1, tint, BSW Stage 1, Alpine INA-W910BT , hitch, V1, tint, BSW Stage 1, Alpine INA-W910BT___________ Life is not fair! You can't protect people from their own stupidity! Laughter makes life worth living 
|
| Sponsored Links | |
|
|
|
|
#2
08-09-2009, 11:51 PM
|
||||
|
||||
|
new headlights with angel eyes will give an updated look and solve your problem. just make sure to put some lamin-x headlight protection film
__________________
___________________    ___________________ 2002 BMW X5 3.0i ----sold---- 2008 BMW X5 3.0si 2010 BMW 335i M Sports Package & BMW Performance Kit
|
|
#3
08-10-2009, 12:21 AM
|
||||
|
||||
|
I am not sure how deep your scratches are or if it is just the typical pitting/discoloring.
I wet sanded the damage and resealed the assemblies using a $19.00 kit. Took about 15 minutes each side and the results were pretty amazing really. Check out this thread. You can see my before and after photos. If you are looking to save money on the assemblies, this may be worth a try. Sorry, just realized I never included the link. Here it is; http://www.xoutpost.com/bmw-sav-foru...ight-lens.html
__________________
Profeshenal spellar Last edited by FSETH; 08-10-2009 at 05:34 PM.
|
|
#4
08-10-2009, 02:42 AM
|
||||
|
||||
|
Quote:
I finally got around to working on my set, and all I can say is the results are phenomenal. Here's an overview to what was done. 1. Open the hood and remove the upper headlight rubber molding. It's just clipped on so pull towards the front to remove. Remove any existing polish/wax with denatured alcohol and a cloth. 2. I used 3M Blue painters tape to mask off the painted areas surrounding the headlights.  As you can see my lenses were in pretty bad shape. The hazing is due to scratches and oxidation. 3. It really depends on the condition of your lenses. I consider mine being on the slightly worse side, so I chose 3 different grits of sandpaper. I started with 800, then on to 1000 then finishing with 2000 grit. I used 3M branded paper. Make sure to use lots and lots of water during the sanding process. Always keep the lenses nice and wet. So, started with 800 grit. I've read that you should alternate sanding direction between each grit of paper. I'm not sure if that is necessary, but I do believe that you should always sand in one direction. Do not sand using a circular motion. 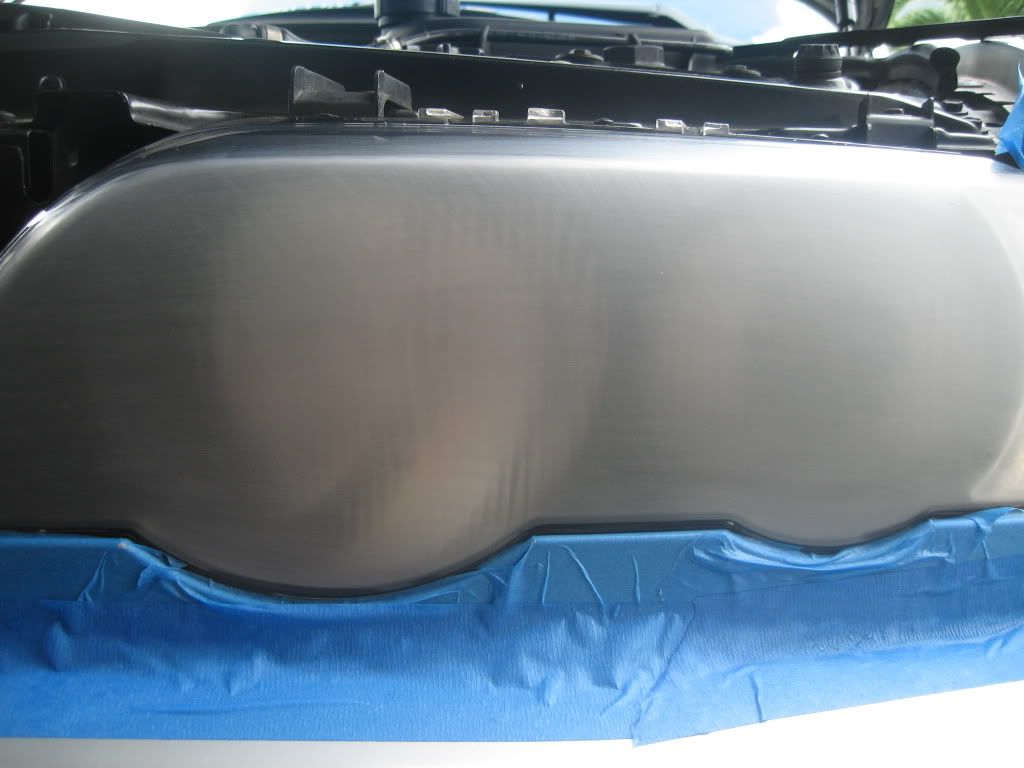 After sanding for 8 minutes or so, and wiping the lens dry. Did the same with 1000 grit, here's the picture.  Finished off with 2000 grit. Sorry didn't take a picture. Now for removing the scratches left behind from the 2000 grit paper. I used 3M Perfect-It II Foam Polishing Pad Glaze along with their Foam Polishing Pad. I used my Makita 9227CX3 polisher, not exceeding 1800RPM. Within 2 minutes all scratches were gone. Finished it off using my PC7424 with a closed-cell foam pad, and Black Magic finishing polish to remove the last of the 3000 grit scratches. And last but not least gave it a good coat of paint / plastic sealant. The results speak for themselves. 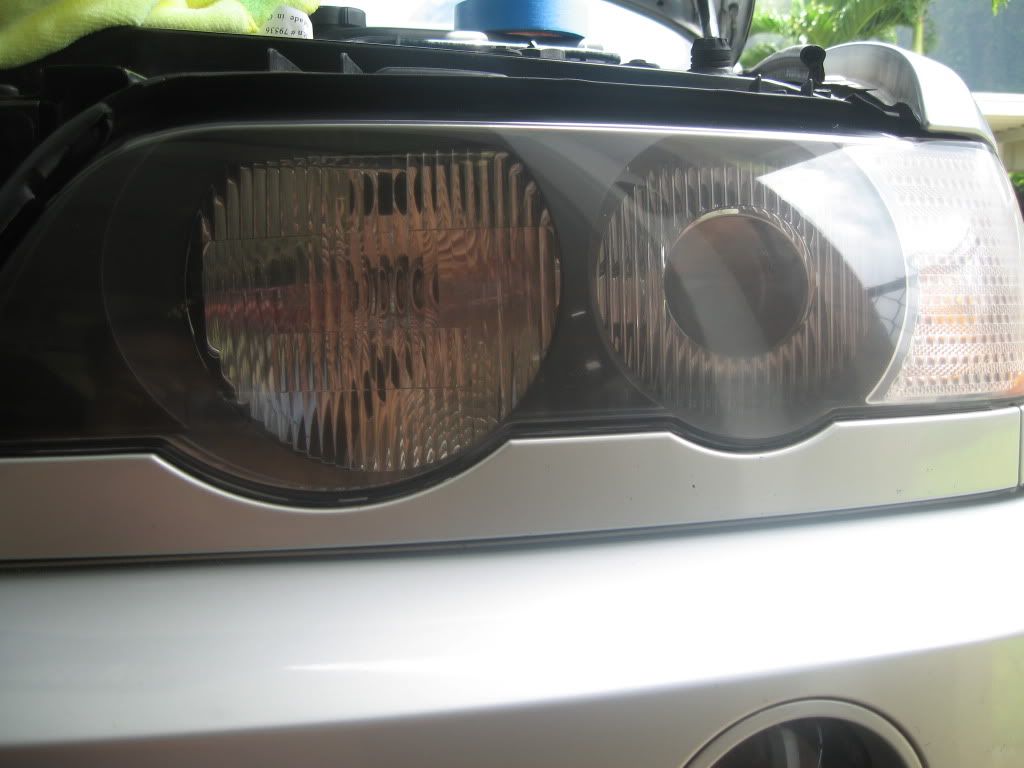 All together spent no more than 1-1/2 hours to complete. Very productive morning. Now it's time to tackle the paint. Can't wait for next weekend. 
|
|
#6
08-10-2009, 05:31 PM
|
||||
|
||||
|
Lawaia, that is basically the same thing I did with the kit I mentioned in the above link (actually forgot to post the link originally). Same basic procedure as well. The kit comes with two grades of paper (2-step process) and a sealer to protect it. I agree that the results were amazing. I generally don't buy products I haven't heard of, such as this kit, but it really was amazing before and after.
__________________
Profeshenal spellar
|
|
#7
08-11-2009, 06:44 PM
|
||||
|
||||
 that definitely looks the way to go - many thanks, guys that definitely looks the way to go - many thanks, guys
__________________
Mark _______________________________2001 X5 4.4i topaz blue/sand Sport, complete Dinan S2 , hitch, V1, tint, BSW Stage 1, Alpine INA-W910BT___________ Life is not fair! You can't protect people from their own stupidity! Laughter makes life worth living
|
|
#9
08-12-2009, 05:16 PM
|
|||
|
|||
|
I used a kit from Autozone. A 3m headlight repair kit that came with a drill attachment, different grit sanding discs, polishing pad, and headlight scratch filler. I did have to come in after using the kit and use Meguires Plasti-X and it cleared them right up after about an hour of sanding and polishing.
|
|
| Bookmarks |
|
|
|
|


 Linear Mode


