
|
|
|
|
||||||||||
| Xoutpost server transfer and maintenance is occurring.... |
| Xoutpost is currently undergoing a planned server migration.... stay tuned for new developments.... sincerely, the management |
 |
|
|
LinkBack | Thread Tools | Display Modes |
|
#1
 04-14-2012, 11:56 PM
|
|||
|
|||
|
X5 E53 Dynavin and amp DIY install (stock nav and DSP replacement)
2003 BMW X5 E53 4.4i 16:9 stock navigation DSP audio 6 disc CD changer Legal Disclaimer: This is a DIY, so all legal disclaimers typically associated with DIY instructions apply, e.g. I accept no responsibility. Parts: 1 x Dynavin E39 D99 Android unit (with all wiring accessories) 1 x Fakra cable 1 x 5 channel amp (the following dimensions closely matches the stock DSP amp…10-1/8" W x 2-1/2" H x 7-1/2" D) 1 x Amp power wiring kit 4 x 3 channel passive crossover, FL/FR/RL/RR 1 x Radio antenna extension cable, male to female (20 feet…the radio antenna extension included in the Dynavin is not long enough to properly do all the routing to the radio in the trunk) 3 x RCA audio cables, FL/FR/RL/RR and L/R sub (18 feet) 1 x AUX 3.5mm to RCA cable, optional (6 feet) 2 x USB extension cable, optional (6 feet) 1 x Rear backup camera, optional (NTSC video format) 1 x Composite video cable for rear backup camera, optional (25 feet) 1 x Speaker wires (20+ feet) 20 x Tap connectors, tapping into the speaker wires' +/- N x Spade terminals, connecting speaker wires to amp and crossovers N x Plastic tie wraps 2 x High/Low converters (optional, I needed it because I was getting alternator whine noise out of the default RCA output plugs) Tools: Trim removal tool set Various socket wrenches Various allen wrenches Various torx wrenches Philip screw driver Crimping tool, with wire stripper Wire cutter (especially a large gauge wire cutter for the amp power/ground cable) Power drill and drill bits (for securing the new amp) Label maker (for labeling all wires for reference) Installation Steps: A few notes before beginning - Read through the entire installation before beginning so that you can do any additional research as needed to fully understand the installation. Visualize the installation…live, breath, and be the installation…lol - You will also notice that I did not disconnect the battery negative terminal until I got to the electronics in the trunk. This is primarily because I needed to move the driver seat forward/back in order to access the bolts securing the seat to the floor. You can choose to disconnect the battery earlier if you'd like to be on the safe side, and just plug it back in as needed to move the driver seat. Prep work 1. Label BOTH ENDS of all wires (mic, GPS antenna, radio antenna and Fakra is obvious). You want to label all the wires so that you know what is what when you're making connections at both ends for the head unit in the front and the amp in the back: FL speaker FR speaker RL speaker RR speaker L sub R sub Rear camera AUX audio iPod USB extension USB wifi FL crossover FR crossover RL crossover RR crossover Prep Dynavin head unit illumination wire 2. The Fakra connector to the radio in the trunk does not include wiring for the head unit's button illuminations. So in order to provide power for the Dynavin's button illuminations, you will need to provide a power source for the ORANGE wire in the Fakra extension cable. 3. The easiest option is to splice the orange wire in the Fakra to the red ignition wire in the Fakra. This way the Dynavin's button lighting will turn on when the car is on. Tip: Be extremely careful cutting open the black fabric tape wrapping on the Fakra cable, there are some extremely thin wires running in there that you could easily snip accidentially. If you want to only turn have the button lighting on when the night driving lights come on, then you will need to find another power source for the orange Fakra wire (e.g. various wires in the dashboard such as the cigarette light, etc.) Running mic and GPS antenna wires 4. Pop out the overhead light using a trim removal tool. Best to work from the back of the light and pop it down. Disconnect the wires and set the overhead light aside. Tip: If you want to locate your mic on the A-pillar instead, just skip down to step #9. 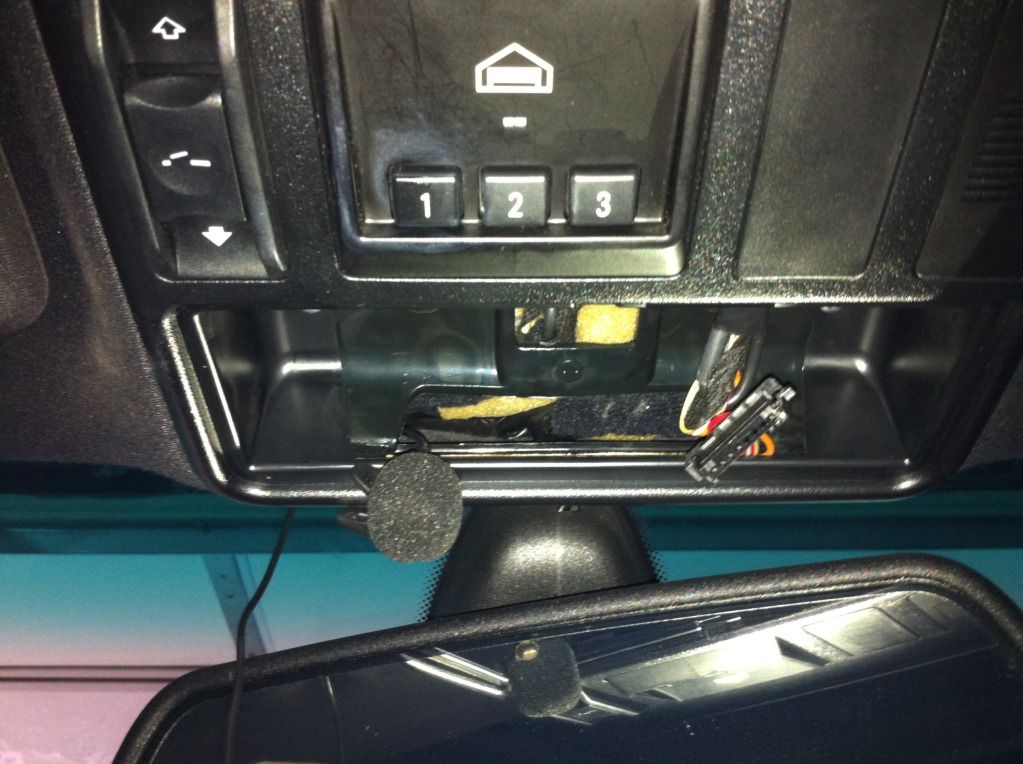 5. From the overhead light module opening, you should be able to put a finger through and pop out one of the extra unused overhead console caps. 6. Feed the mic through the opening. Trim a small opening from the unused overhead console cap to situate the mic in place 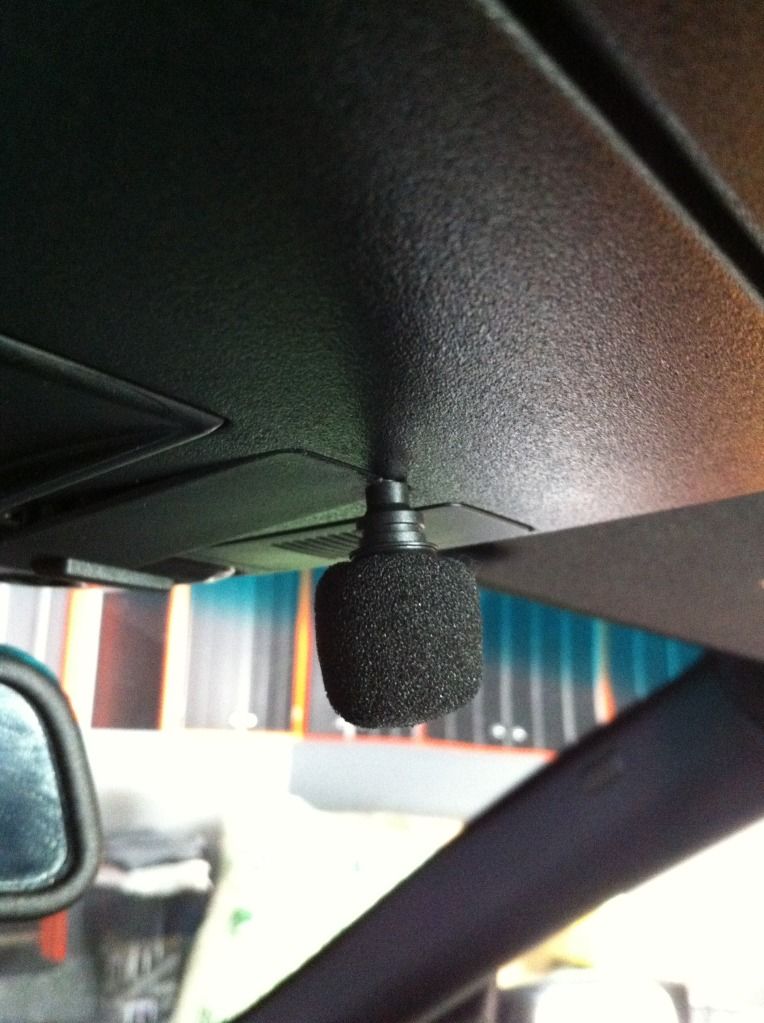 7. From the overhead light module opening, you should be able to put a finger through and push front of roof headliner to create a small gap opening. Feed the mic plug through the opening; it will take alittle bit of work to push it through. Once you have the plug end of the mic through, pull the extra wire length through and leave just enough wiring left for the mic end to be situated in the overhead console 8. Reattach the unused overhead console cap. Reattach the overhead light module 9. Run the mic wire along the edge of the front windshield and roof liner and down the A-pillar to the dash. This is easily done using a trim removal tool to tuck the mic wire into the roof/A-pillar liner. In my case, I ran it to the driver side as I did not want to remove the glovebox. 10. Place the GPS antenna on the speaker grill on top of the dash. The GPS antenna is magnetized, so it will stick to the metal speaker grill 11. Run the mic wire and GPS wire down the edge of the dash and the door weather strip. Use a trim removal tool to tuck the wires secure in. 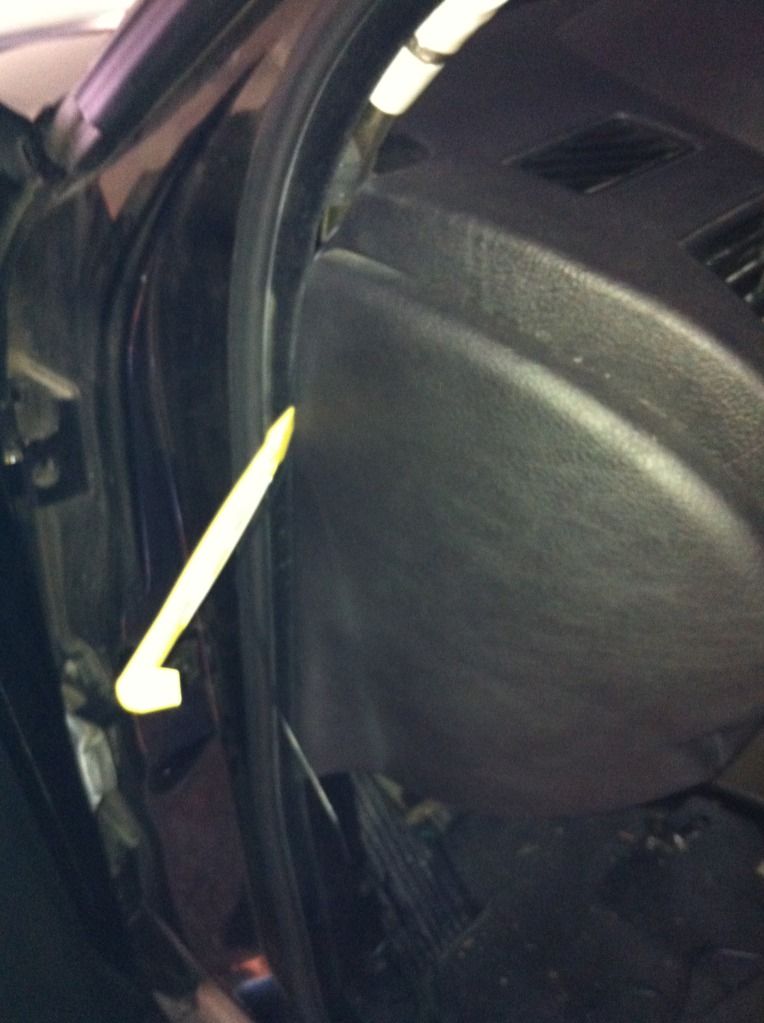 12. Remove the black plastic cover under the steering column, where the brake pedals are. There are 4 screws and 2 plastic knobs to remove and the plastic cover should drop down. 13. Tuck the mic wire and GPS wire under the dash, making sure to keep it away from any steering and brake pedal components. Run the wires to the center console end and leave the wires there for now. 14. Reattach the black plastic cover under the steering column Running USB extensions, AUX 3.5mm, iPod connection 15. Remove cigarette ashtray, just pull it up and out. Set the ashtray aside. Under the ashtray you will notice an opening in the left corner. This is where the USB extension, 3.5mm AUX, and iPod connectors will be run. 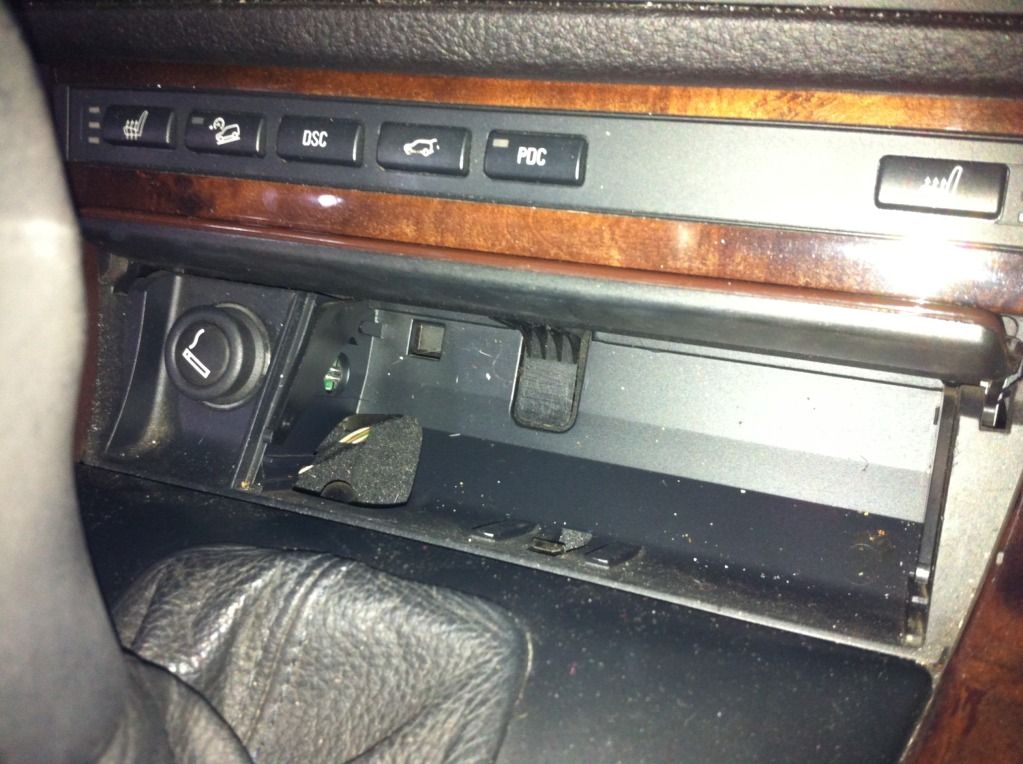 16. Unbolt the driver seat. There are 4 bolts you will need to remove. There are 2 nuts in the front, typically under a round plastic/rubber cap. There are 2 screws in the back. You'll need to move the seat forward and back to easily access these bolts (thus, do not disconnect the battery just yet).   17. Lift and lean the entire seat back to open up the front driver side working space  18. Remove the carpet trim along the center console. There is one screw towards the front next to the gas pedal to remove. Then carefully run your hand under the carpet trim and pull it straight out. I found it easier to work from the front towards the back. Now the side of the center console is expose to run your wires.  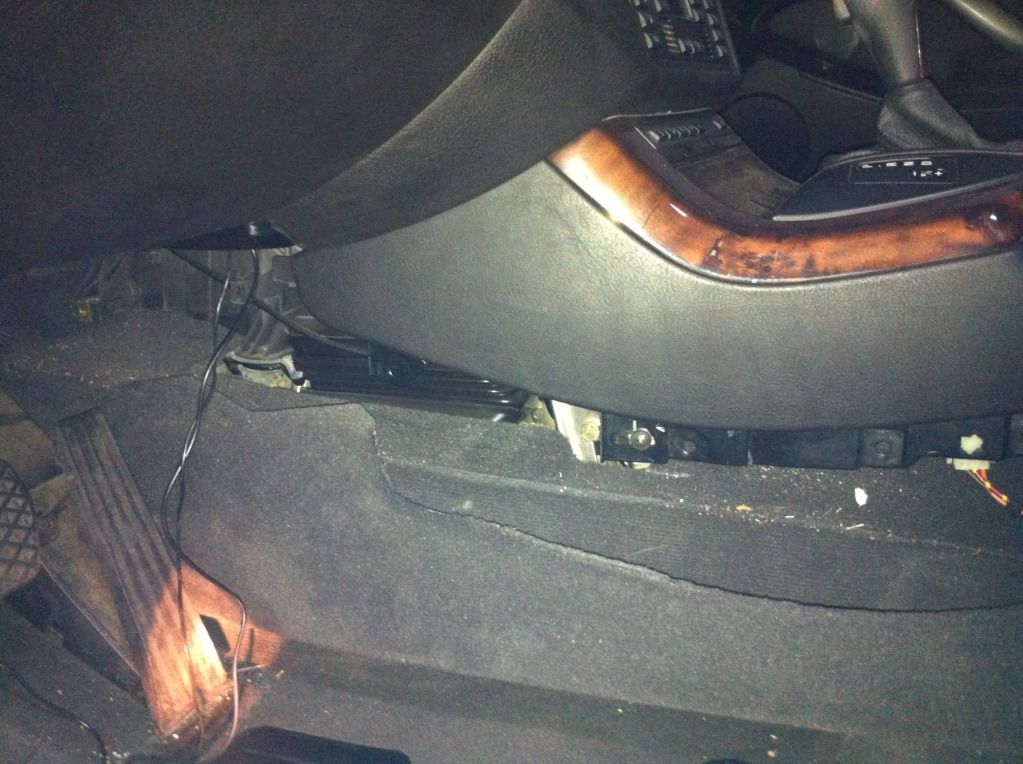 19. Drop/snake the various input extension cables (2 USB extension, 3.5mm AUX/RCA, and iPod cables) through the cigarette ashtray opening down through exposed center console carpet 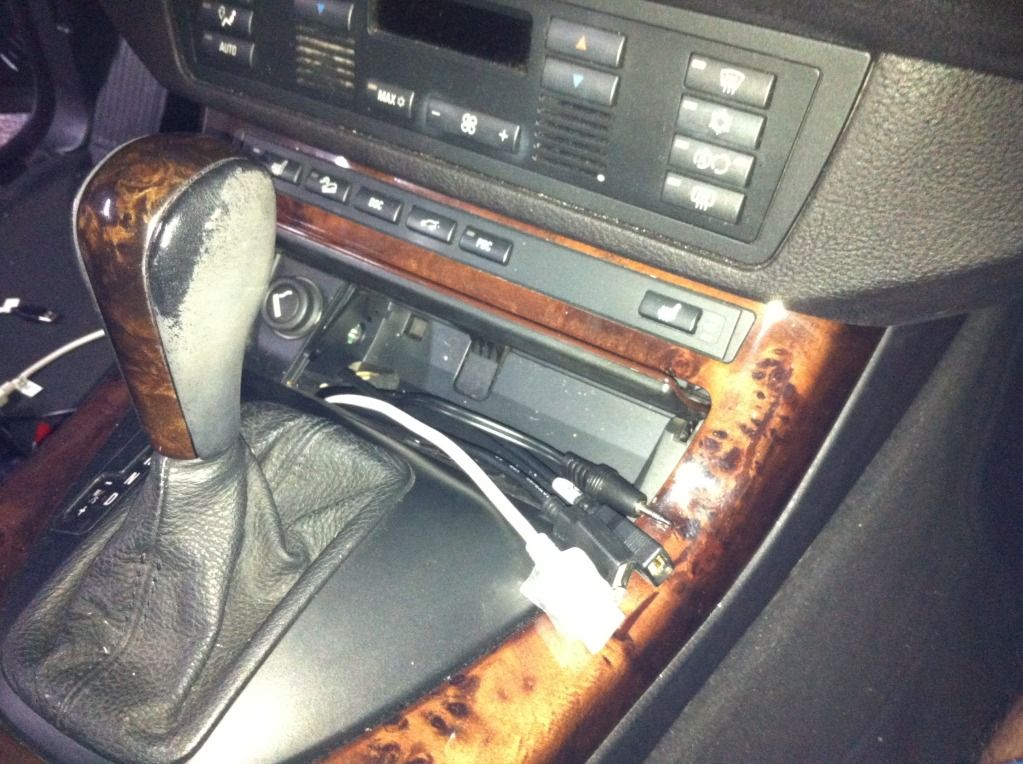 Removing stock 16:9 nav head unit 20. Remove the head unit trim using a trim removal tool. I found it easiest to work from the bottom left and right of the head unit trim and the top will pop right out  21. Remove the 4 screws holding the head unit to the dash bracket 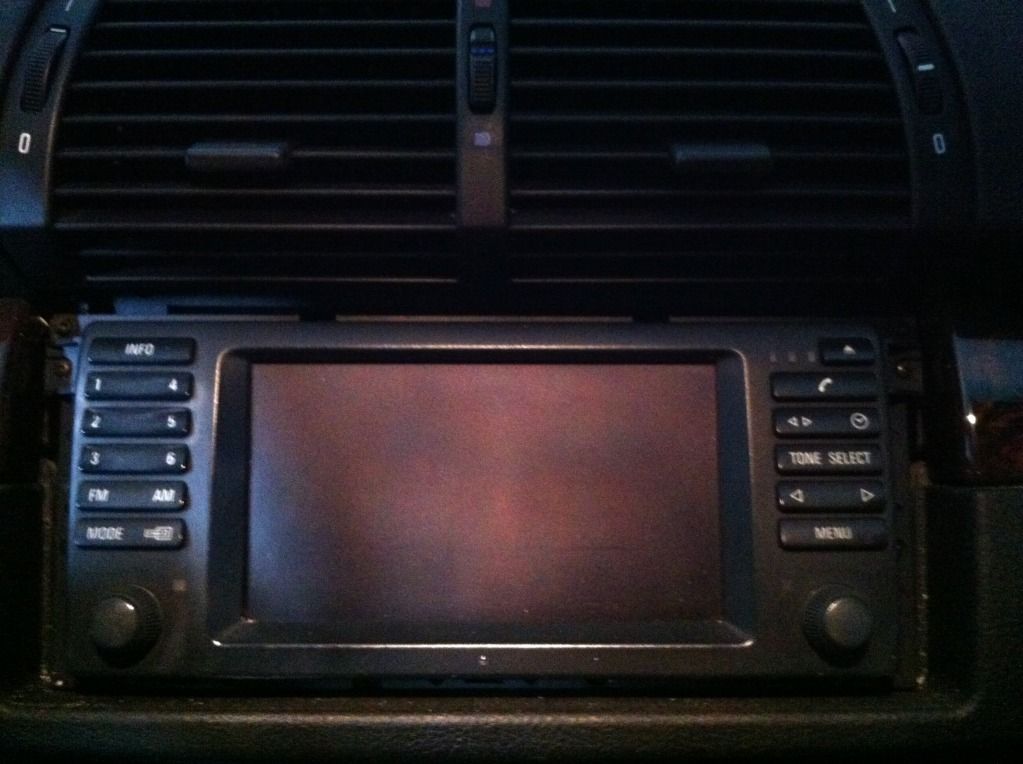 22. Pull out the stock head unit straight out and disconnect the 2 wiring hardness from the head unit. Set the head unit aside  23. Looking through the head unit opened space, you will see there's some room to run wires down to the floor 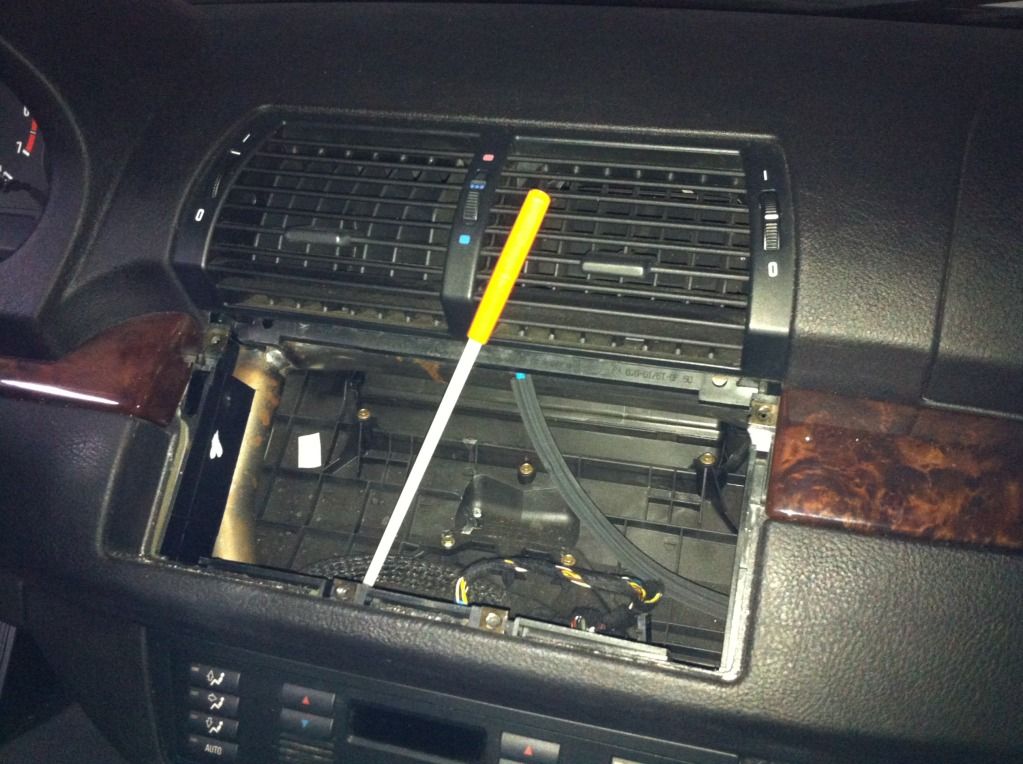 24. Snake the various wires up to the dash/head unit opening. That would be the following wires at this point: mic wire, GPS antenna wire, 2 USB extension, 3.5mm AUX/RCA, and iPod extension cables. 25. Snake the various audio/video/Fakra cables from the bottom up to the dash/head unit opening as well. That would be the following wires: Fakra (the 2 small harness end of the Fakra cable), radio antenna extension (male end of the radio antenna extension cable), FL/FR/RL/RR/Sub audio cables, and composite video cable 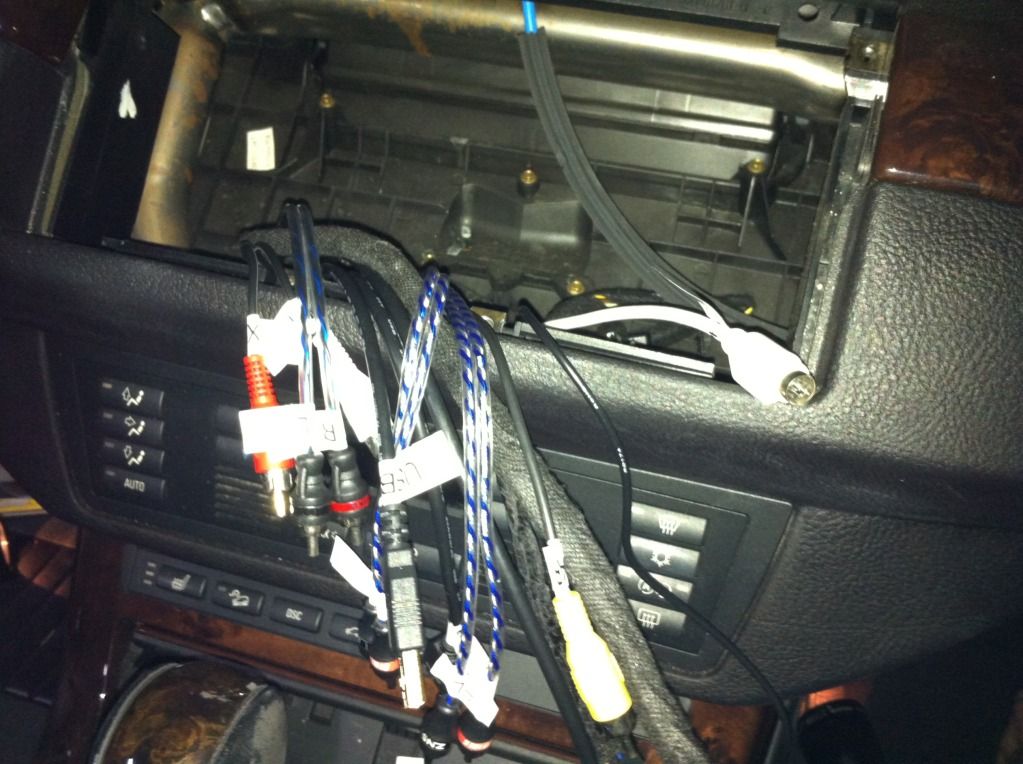 Running wires from the front to the back (Fakra, radio antenna extension, FL/FR/RL/RR/Sub audio cables, and composite video cable) 26. Run the Fakra/radio/audio/video cables along the exposed center console carpet. Use tie wrap to keep the wires grouped and clean 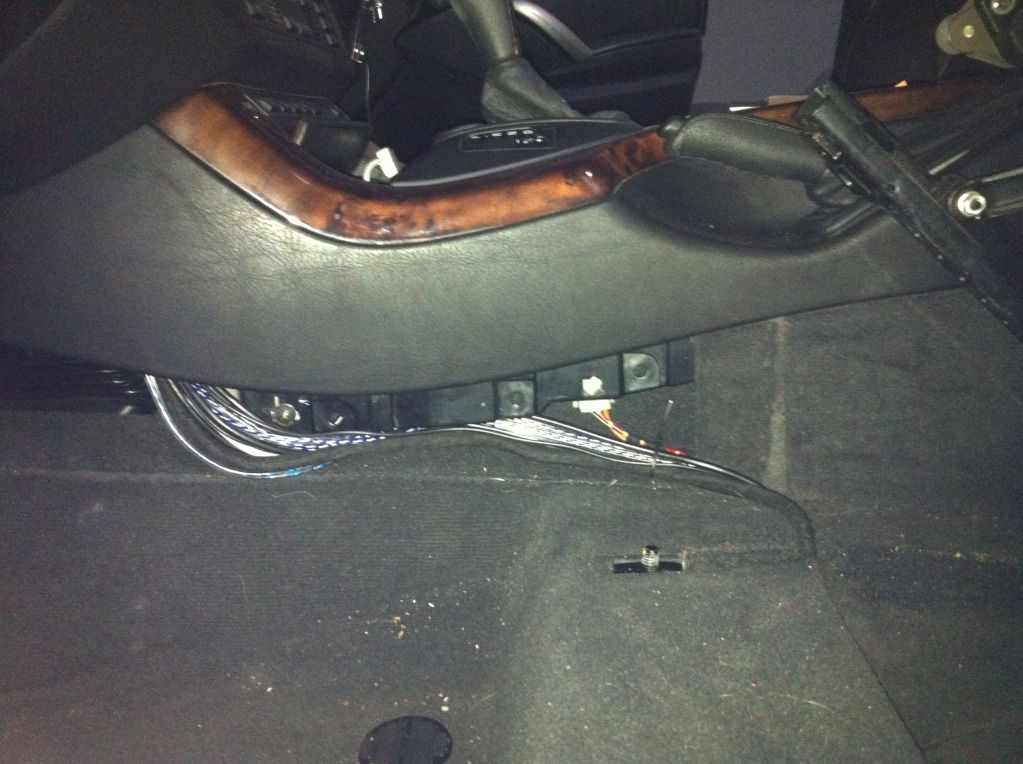 27. Run the Fakra/radio/audio/video cables from the center console to the driver side door. With the driver seat unbolted and leaned back, you will see that you can lift up the carpet line under the driver seat location. Tuck all the wires under the carpeting, making sure to keep the wires away from the holes where the seats are secured to. 28. Reattach the lower center console carpet piece 29. Place the driver seat back down on the carpet/floor (do not bolt the seat back on yet at this time, as you may need to move it around to remove the B-pillar lower trim next) 30. Remove the plastic trim piece along the driver side door/floor using a trim removal tool. I found that working the plastic trim from the front first and working towards the back is easiest. 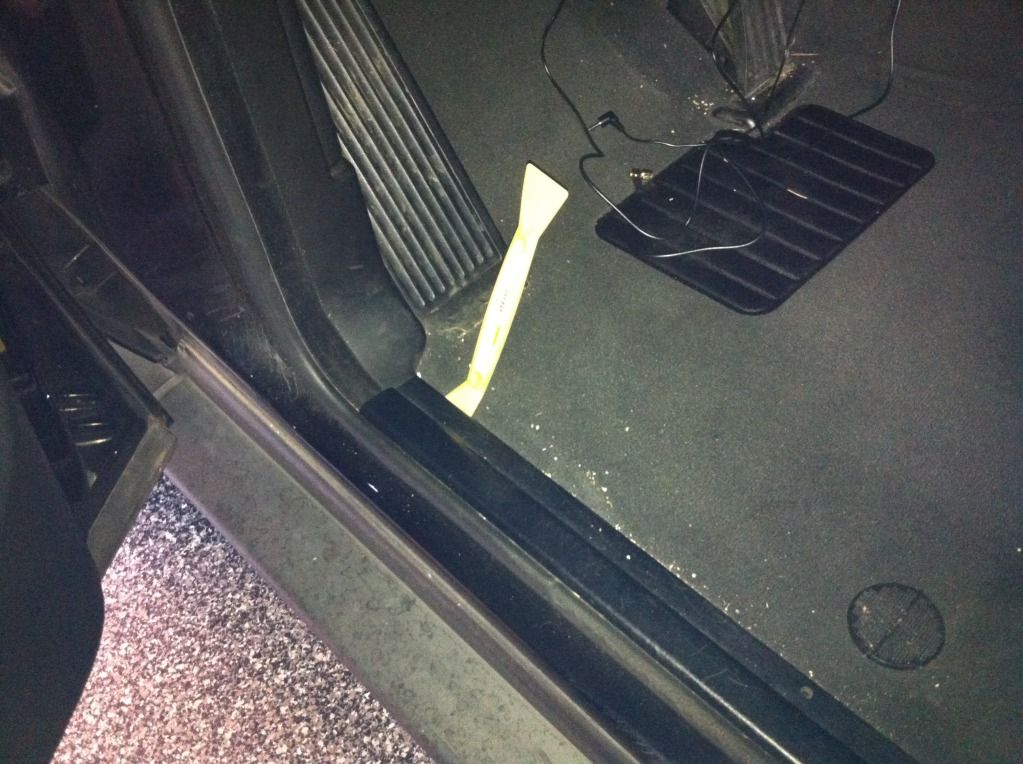 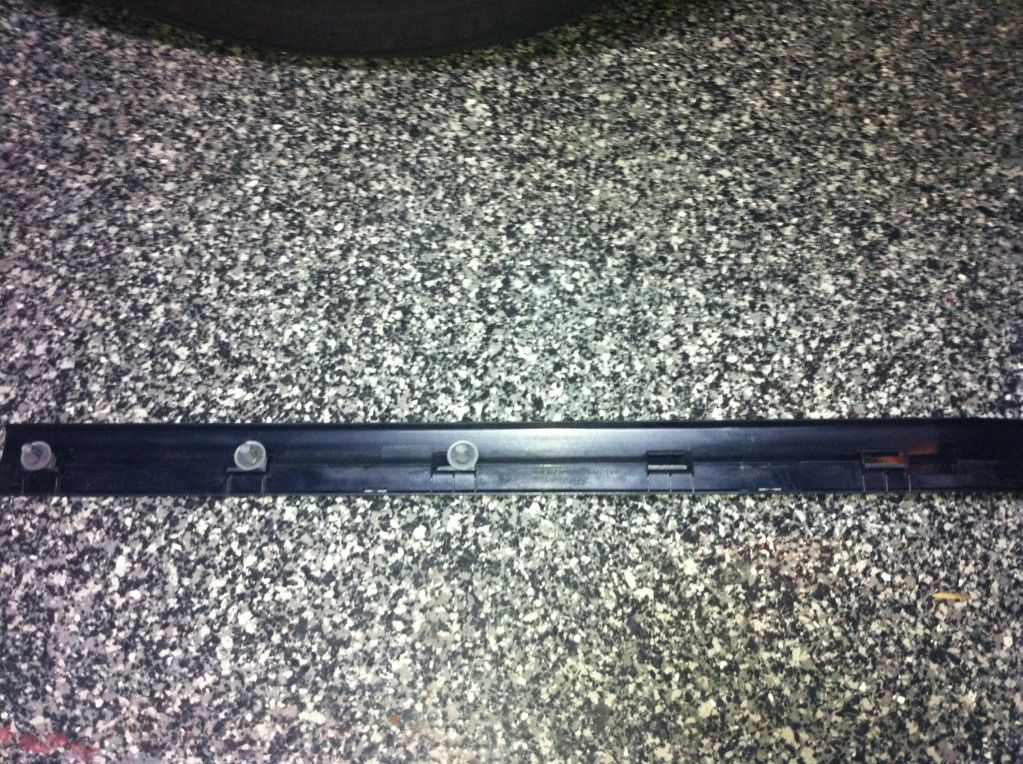 31. Moving to the rear seat area, remove the cushion back piece next to the door. Using your left hand, grab the top edge. Using your right hand, run your hand down the side of the back cushion nearest the door (approximately half way down). Then give it a firm pull out and the cushion piece should pop out. Note: The plastic clip may still be attached to the frame hook, just pop it out and reattach it to the cushion piece on the back side. Set the cushion piece aside. 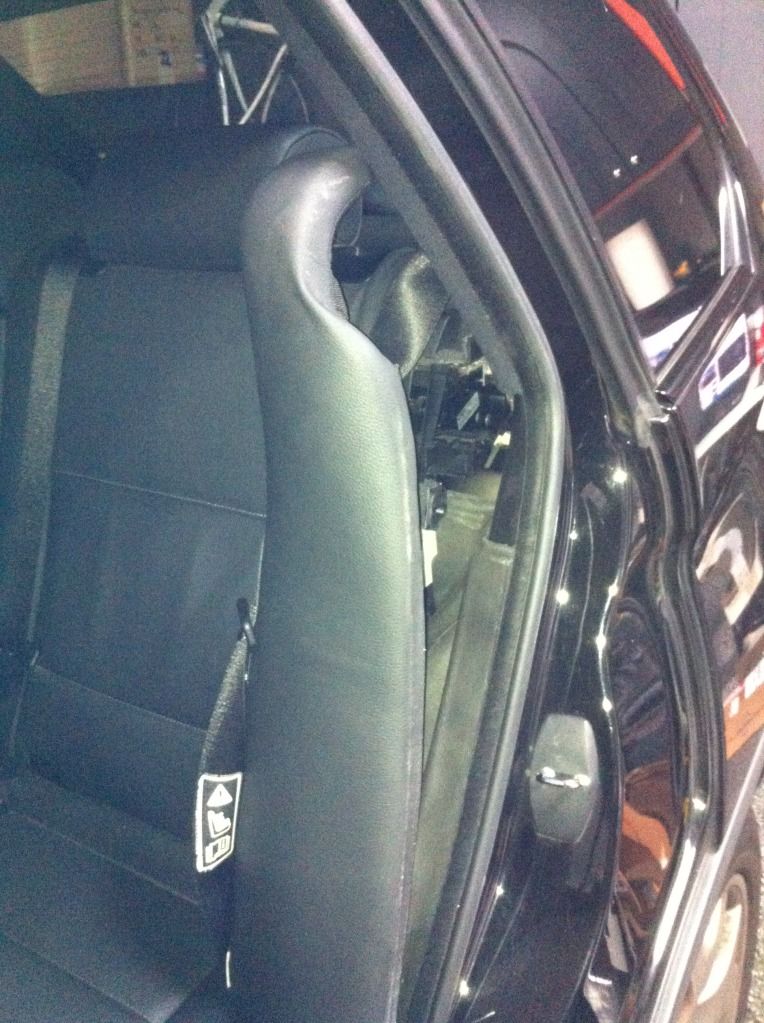 32. Remove the rear seat. Extremely easy, just grab the bottom of the seat where it meets the carpet lining and pull straight up. It's just held in place by 2 large clips on the left and right front 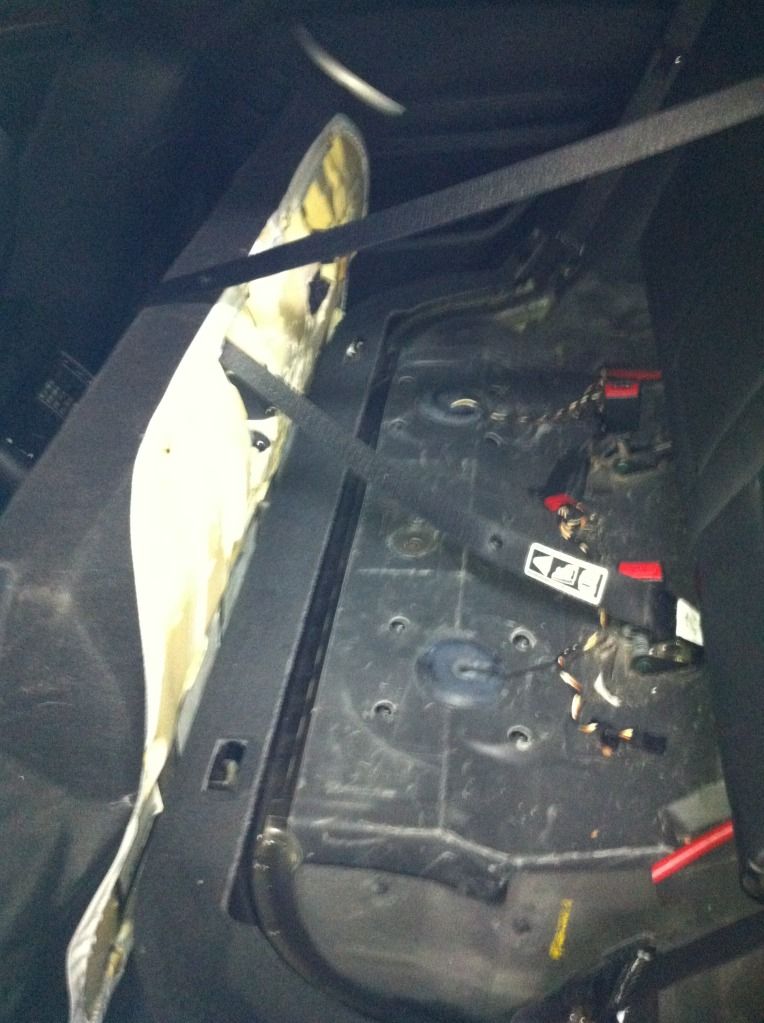 33. Remove the plastic trim piece along the rear side door/floor using a trim removal tool. I found that working the plastic trim from the back first and working towards the front is easiest. 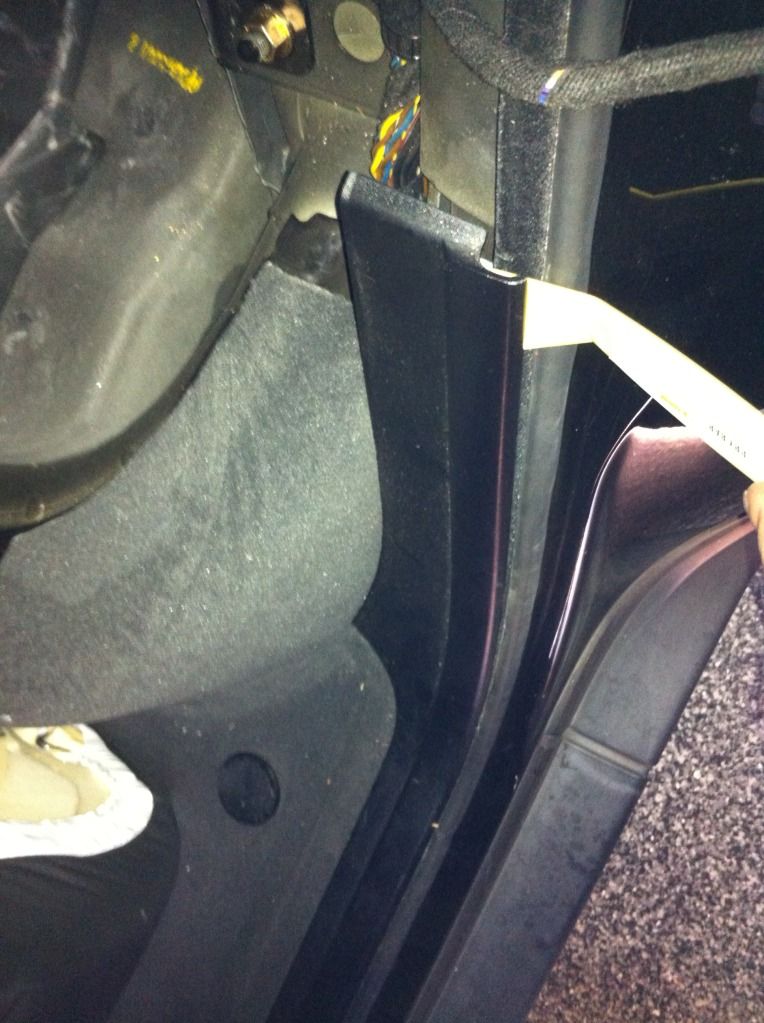 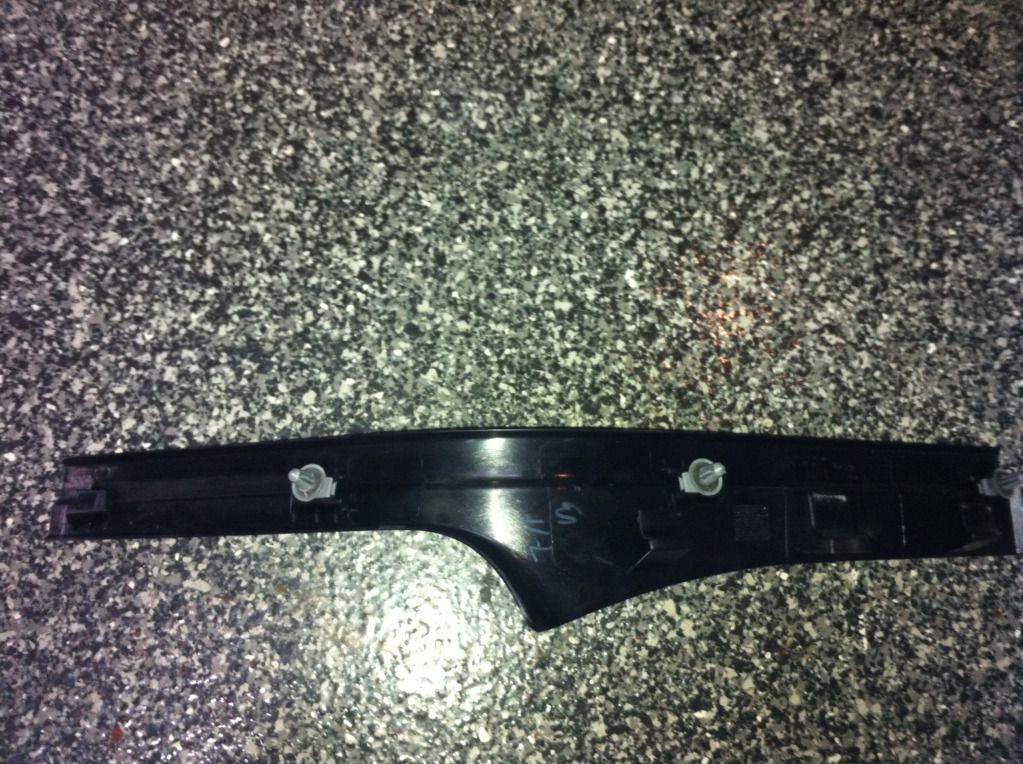 34. Remove the lower B-pillar trim. To do this, gently pull out the weather strip along the lower B-pillar trim in the front door and the rear door. Just remove enough to clear the lower B-pillar trim. The weather strip comes off and can easily be pushed back into place. Once the weather strip is removed around the B-pillar trim, you can pull the trip straight outwards towards the center of the car interior. Work the back side first, and then move to the front side. You may need to move the driver seat around (forward/backward) to remove the trim piece. 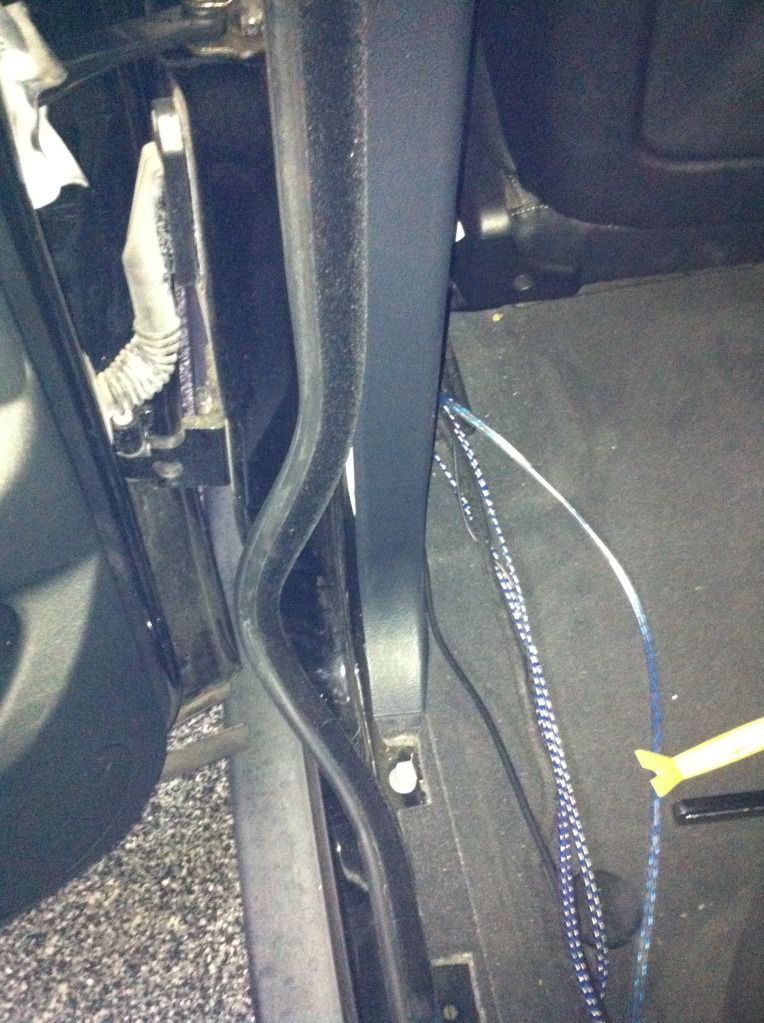 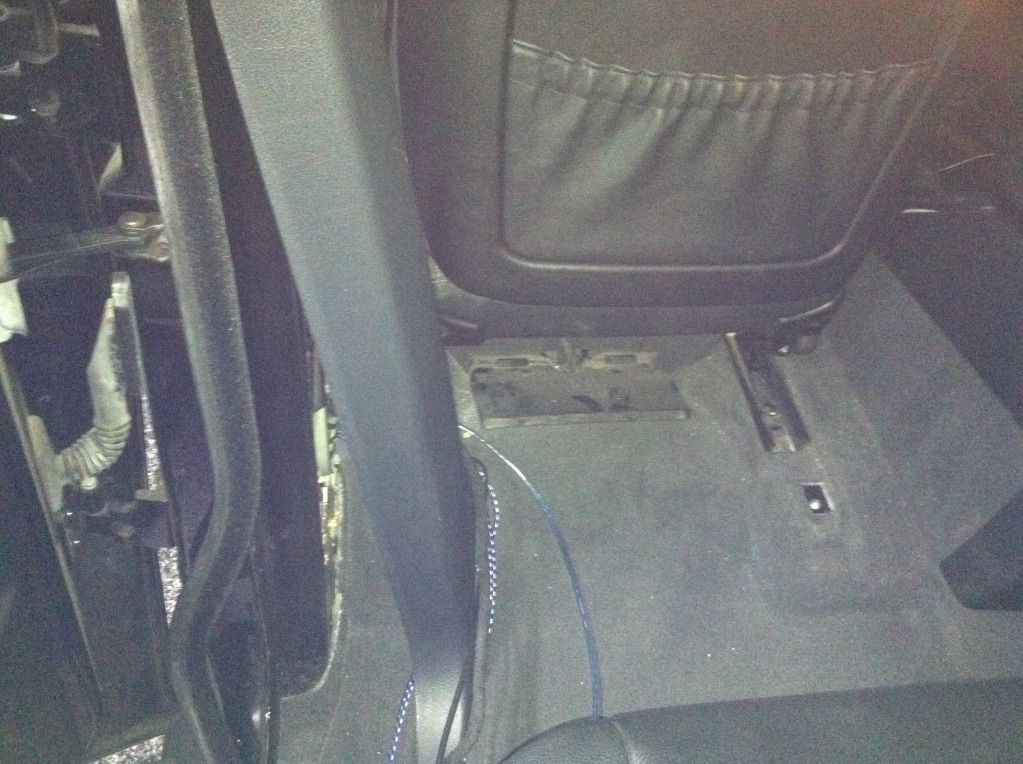 35. Now you have all the trims removed to access the carpeting to continue running the Fakra/radio/audio/video cables to the back. Proceed to tuck the Fakra/radio/audio/video cables completely underneath the carpeting, working your way from where you left off at the driver's seat. You should be able to carefully pull up the carpeting and tucking the wires as far in/below as possible, making sure to clear the holes for the plastic trims. 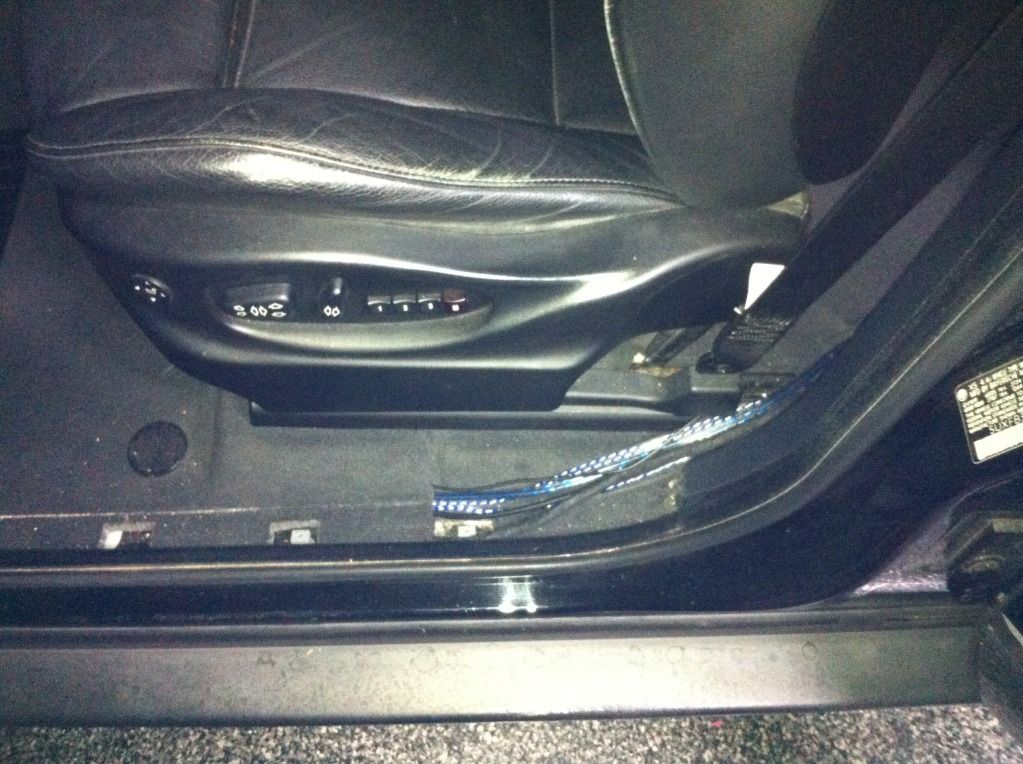 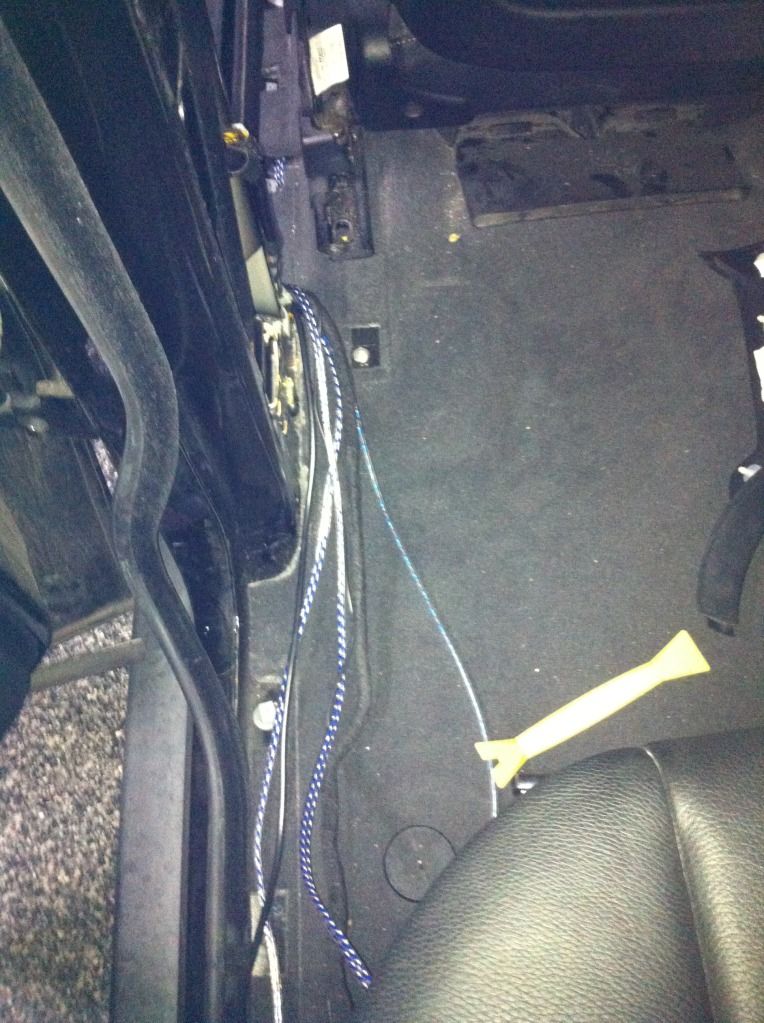 36. Continue working the Fakra/radio/audio/video cables up the back seat, using tie wraps to cleanly place the wires away from key areas where the back seat cushion connections to. 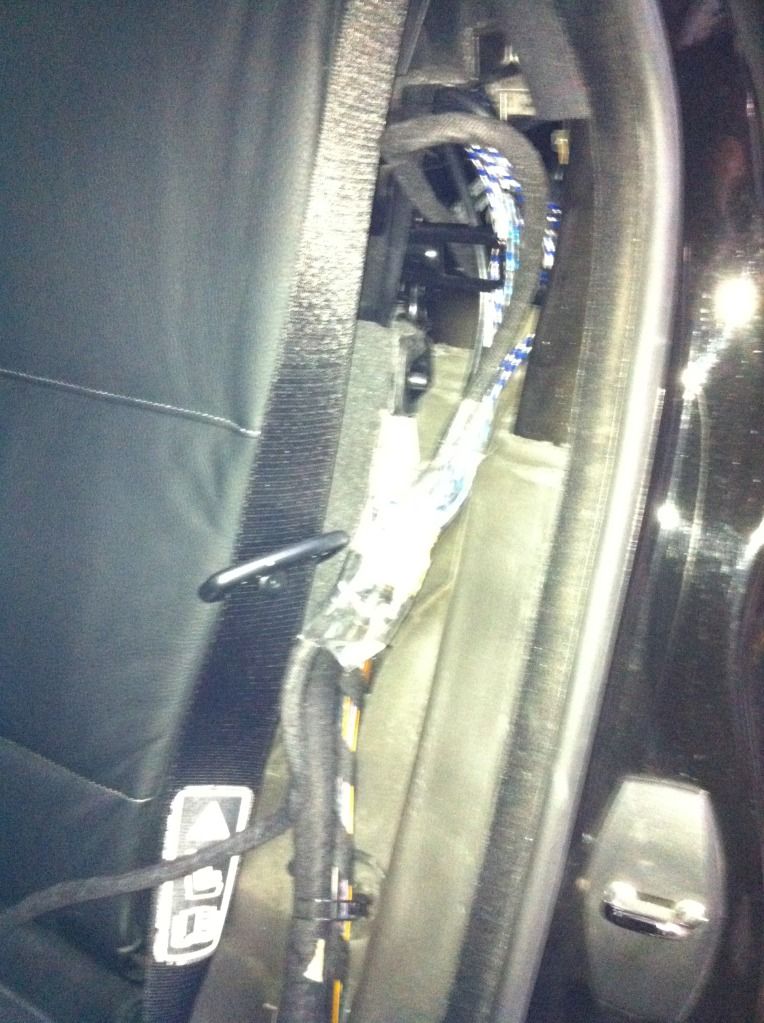 37. Once you have all the Fakra/radio/audio/video cables cleanly tucked away: reattach the B-pillar trim, push the weather strips back onto the body panel, reattach the plastic trim along the front driver door/floor, reattach the plastic trim along the rear passenger door/floor, reattach the driver seat and bolt it back on, reattach the rear passenger seat (make sure to get all the seatbelt buckles in their slots). Note: we are not reattaching the rear seat back cushion yet at this point. Disconnecting car battery negative terminal 38. Self explanatory: remove spare tire, remove air suspension component (if you have 4.4i), disconnect negative terminal from battery 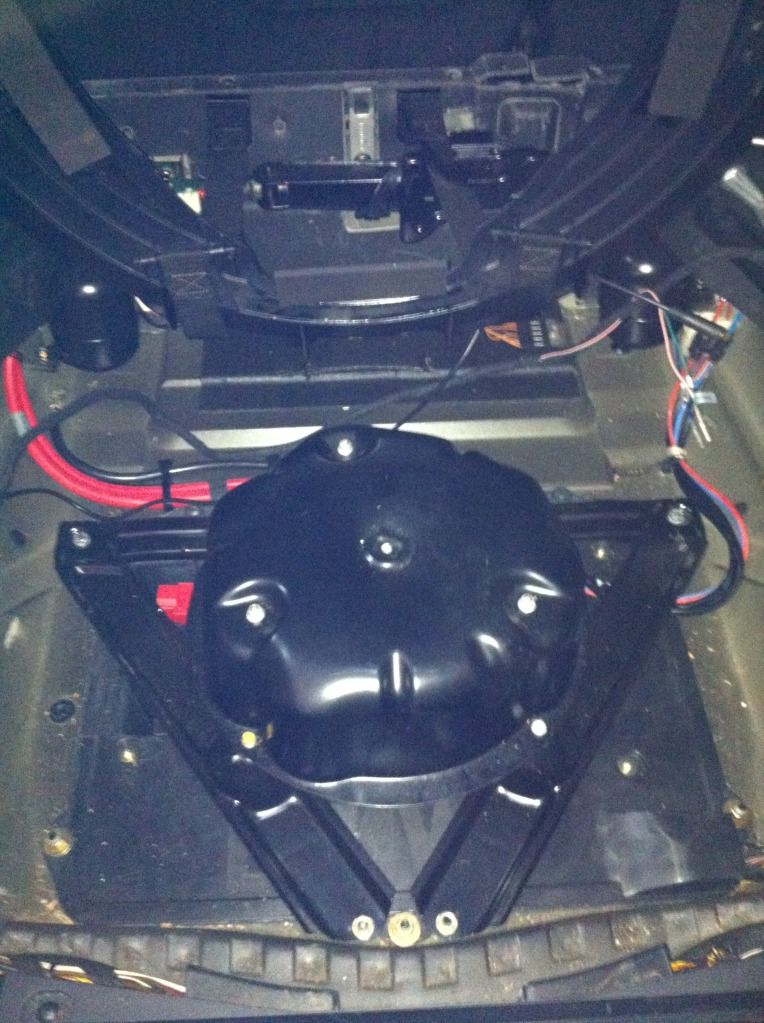 Removing stock MKIV nav, CD changer, DSP amp, and radio 39. Remove the left compartment cover. Remove the plastic bracket between the spare tire well and the left compartment. It is held in place by 3 plastic nut 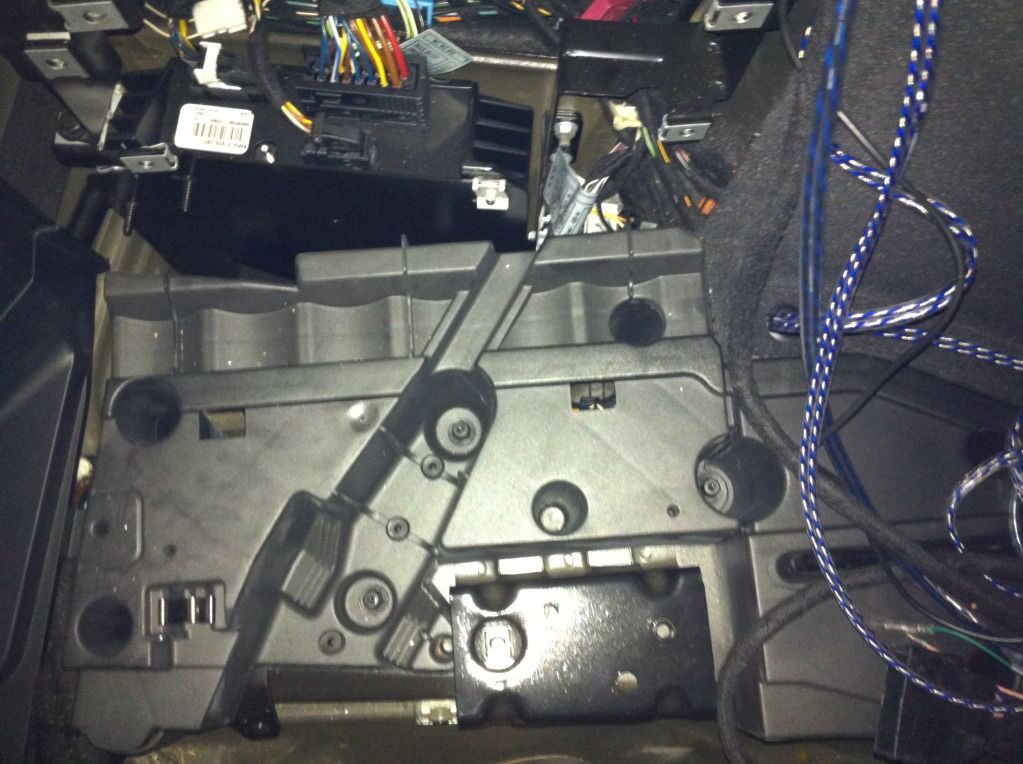 40. Remove the MKIV DVD drive and 6 disc CD changer in the left compartment (and any other components you might have in there). They are attached with 4 bolts each to the mounting bracket. Disconnect the wiring harnesses. Tip: Unload all DVD/CD from the MKIV and CD changer. I labeled each of the wiring harnesses as I removed them for future reference if needed. 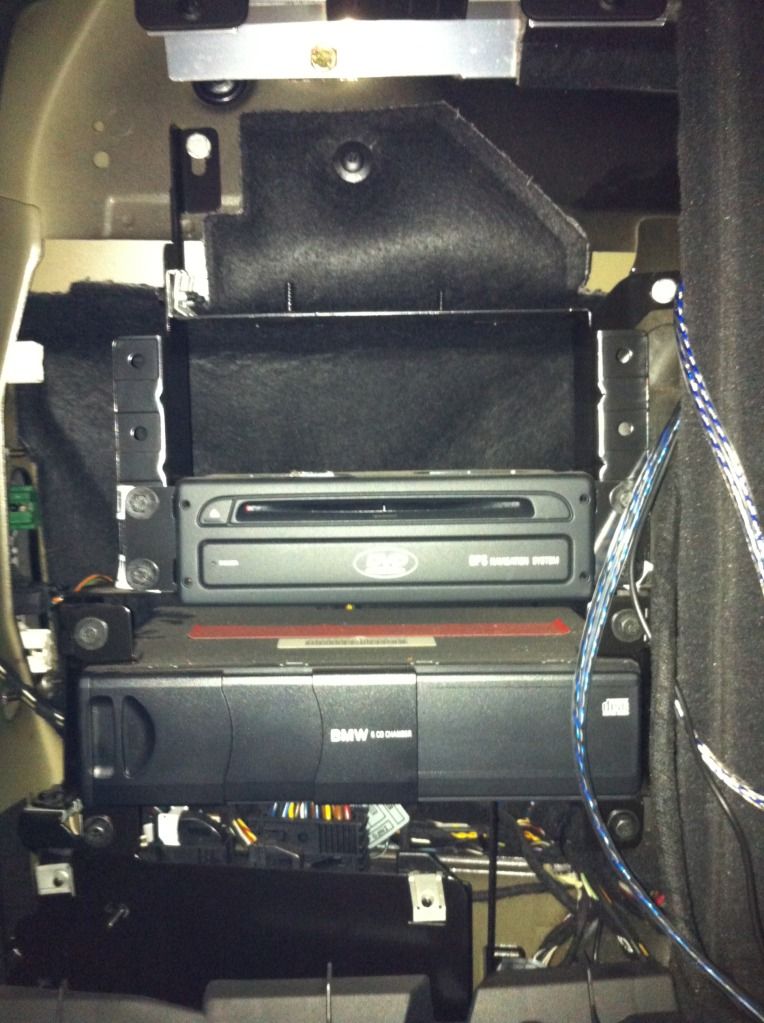 41. Detach the upper mounting bracket to free up space. It's connected to the lower bracket by 4 bolts. Tip: the 2 right bolts are behind a large wiring harness that's connected to the lower bracket. To detach the harness to easily access the 2 bolts, just turn the entire wiring harness (I forget if it was clock-wise or counter clock-wise) and it should easily come off of the lower bracket. 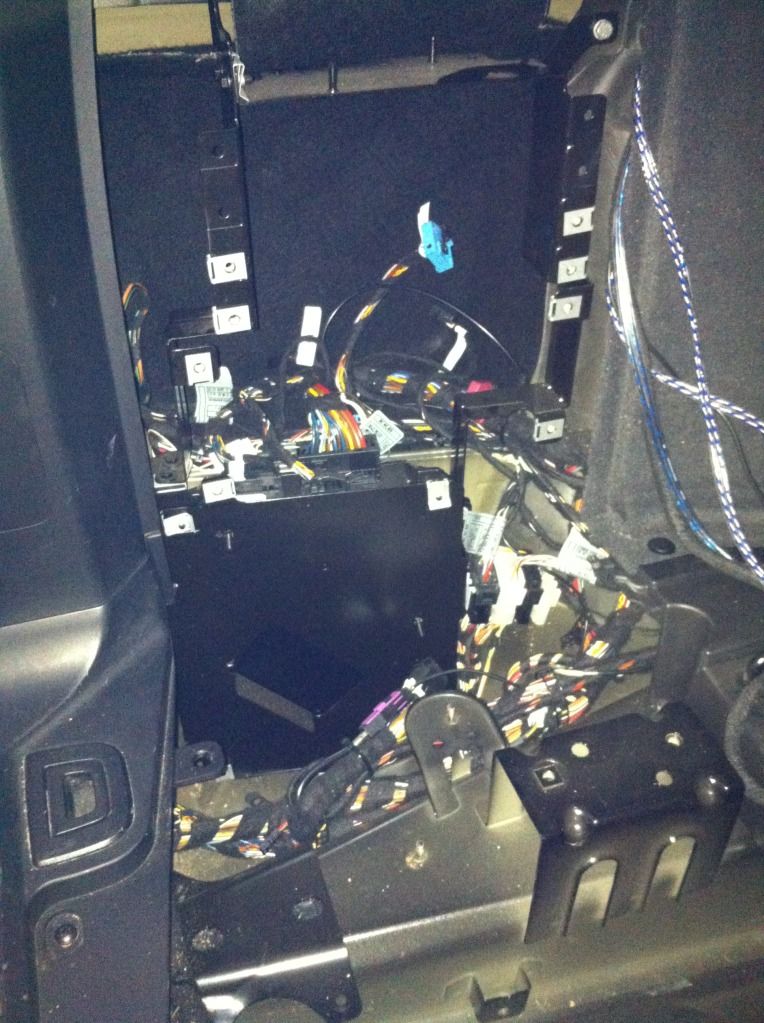 42. Disconnect the wiring harnesses to the DSP amp. Tip: I labeled each of the wiring harnesses as I removed them for future reference if needed. 43. Detach the lower bracket from the vehicle frame, with the DSP amp in place. It is held in place by 5 bolts. Pull the DSP amp/bracket out. Remove the DSP amp from the lower mounting bracket and place them both aside. 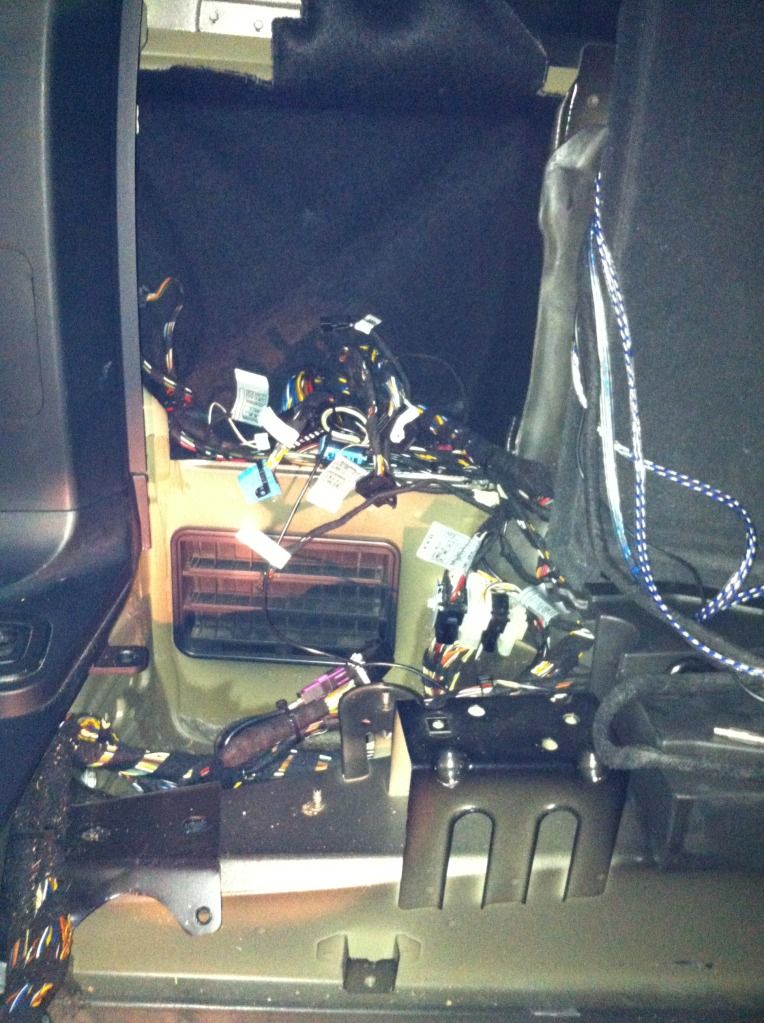 44. Continue working all the Fakra/radio/audio/video cables from the back seat, through the left compartment, into the trunk area. 45. Reattach the rear seat back cushion. 46. Remove the plastic cover below the battery to access the radio module and Fakra connector. It is held in place by 3 screws 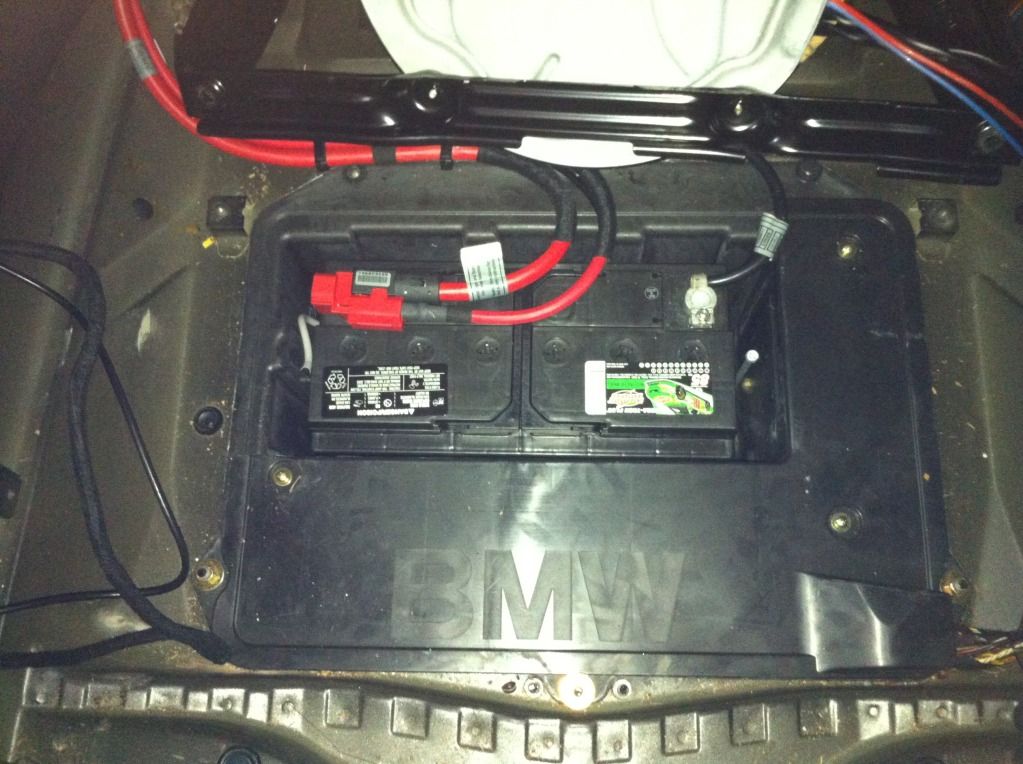 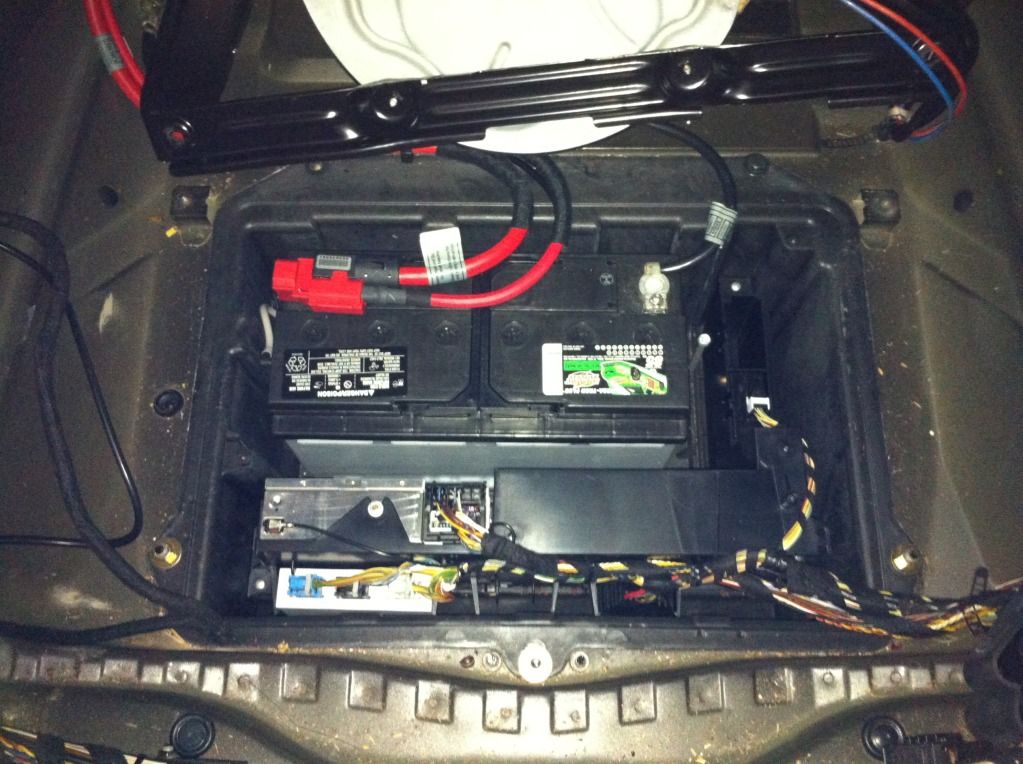 47. Remove the radio module (optional). 48. Disconnect the radio antenna wire from the radio module. Using one of the radio antenna connector adapter that came with the Dynavin, plug it into the female end of the radio antenna extension cable that you've ran from the front head unit to the back. Connect the radio antenna extension cable to the radio antenna wire. 49. Disconnect the large square Fakra harness from the radio module. Connect the Fakra cable that you've ran from the front head unit to the back to the Fakra harness. 50. Tuck all the radio antenna wires and Fakra cables below in the radio space and reattach the plastic cover 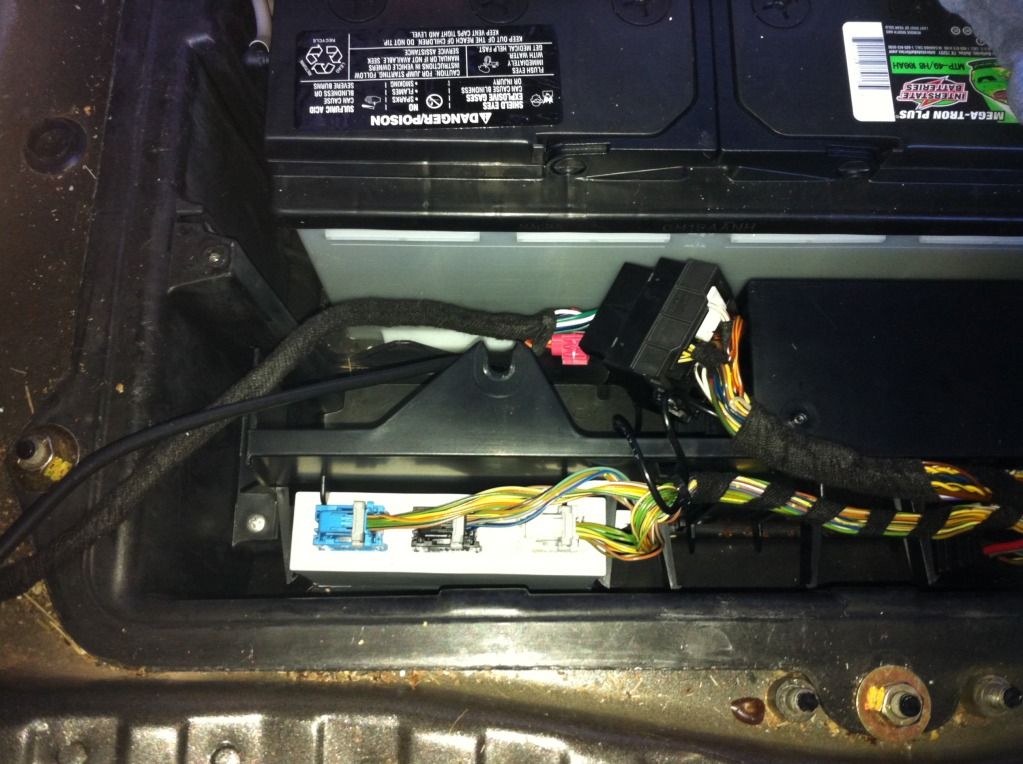 Wiring aftermarket amp, crossovers, and speakers 51. Assemble the new amp's power cable (e.g. measure the length for the fuse placement). Connect the new amp's power cable to the positive battery terminal. Run the amp power cable along the path for the other BMW power cables from the battery, using tie wraps to secure the cable. Run the power cable to the left compartment slot 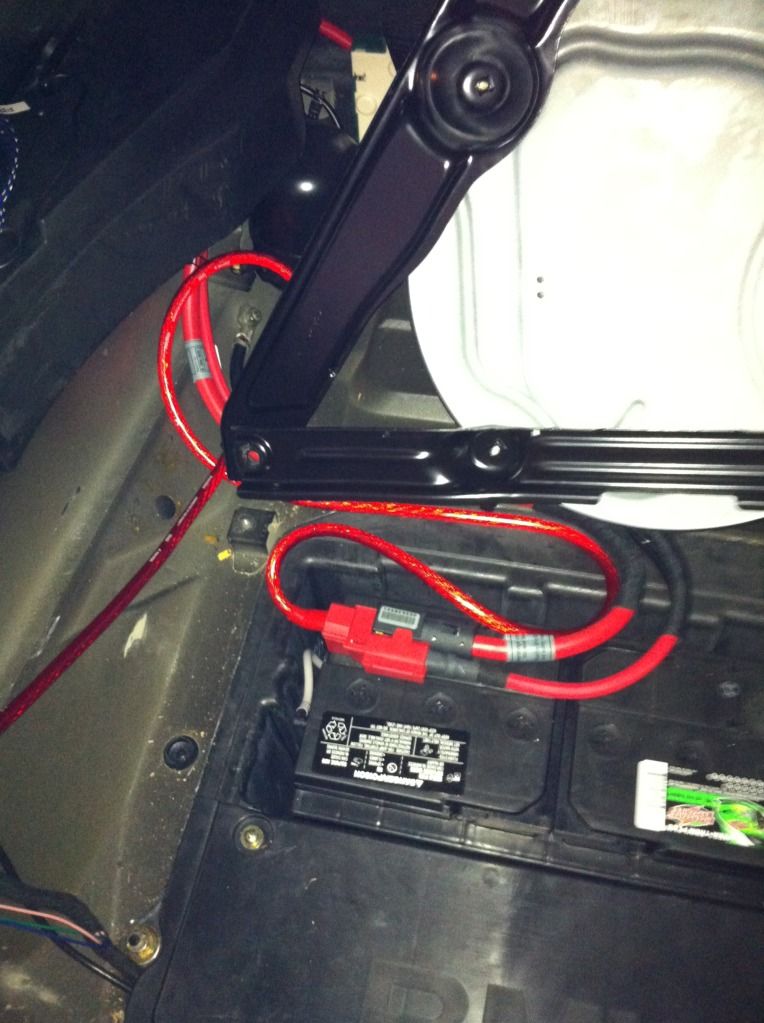 52. Assemble the new amp's ground cable. Connect the new amp's ground cable to the metal frame. Run the ground cable to the left compartment slot. 53. Connect the new amp's remote turn on cable to a switched power source. The Fakra cable has a few wires extended from it towards the end of the large Fakra harness. One of the blue wire is labeled Amp On/Con. Using a connector, I connected the remote turn on cable for the new amp to this blue wire from the Fakra cable. 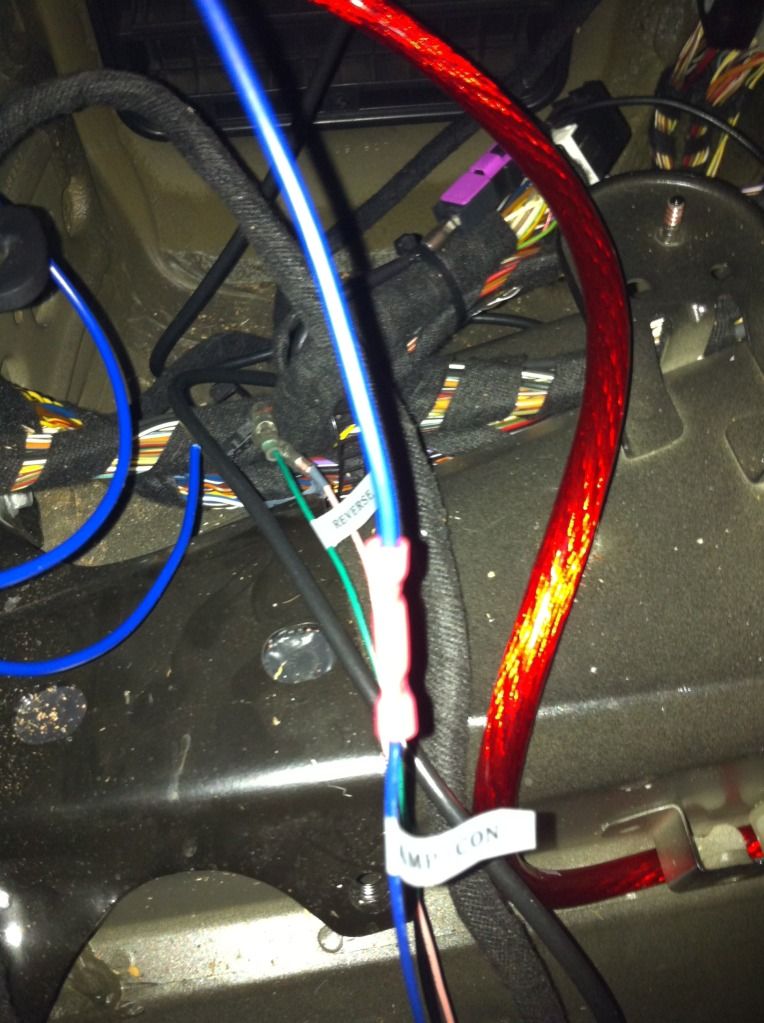 54. Connect the speaker out wires from the new amp to each of the passive crossovers: FL/FR/RL/RR. 55. Now for the hairy part of the wiring, tapping in to power each of the 10 speakers for FL/FR/RL/RR. You will want to carefully look over the wiring diagram for the DSP amp to see which twisted pair of color combinations are for each of the component speakers. Note: The below speaker wiring diagram is specifically for the DSP stereo only! http://i285.photobucket.com/albums/l...kerswiring.jpg 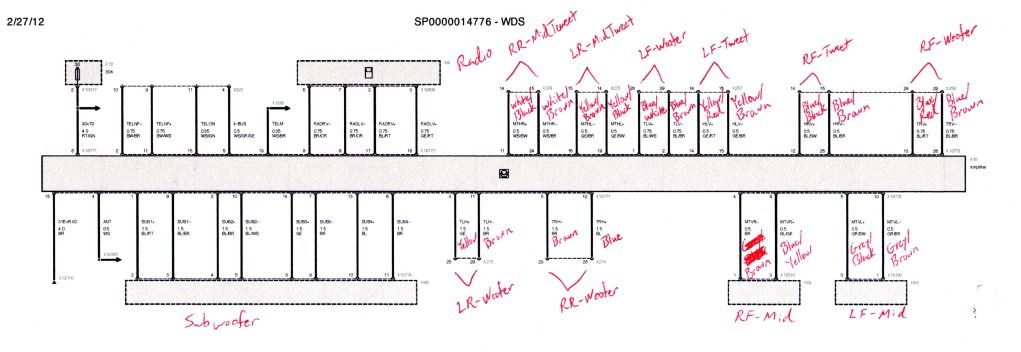 56. Remove some of the black cloth tape BMW used to wrap all the wirings together. Remove enough so that you can easily work with each of the wiring pairs. 57. Working with 1 pair of +/- wire for each of speaker at a time, using the tap connectors, label and run a line to each of the crossover output (spade terminals): LF-tweeter, LF-mid, LF-mid-bass, RF-tweeter, RF-mid, RF-mid-bass, LR-mid, LR-mid-bass, RR-mid, and RR-mid-bass 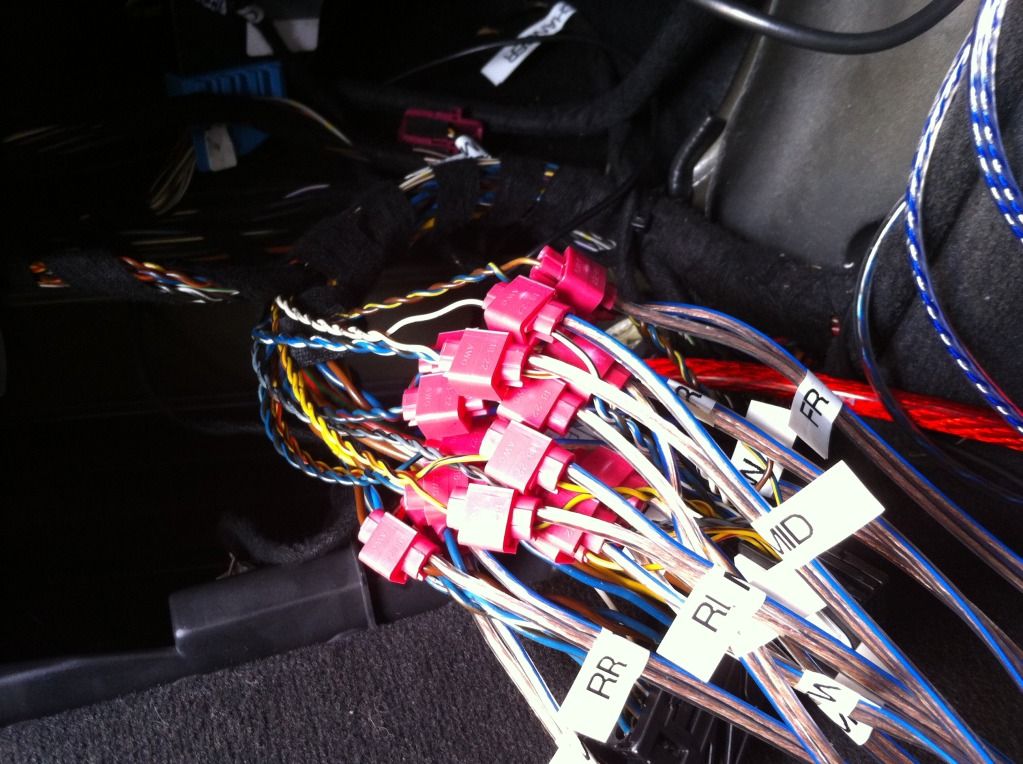 58. Connect the input wires to the new amp: power cable, ground cable, remote turn on cable, and the RCA cables you've ran from the front head unit to the back (FL/FR/RL/RR/Sub L/R) 59. At this point, the only cable you should still have loose is the composite video cable for the rear backup camera. Connecting the Dynavin head unit 60. Connect all the wires to their associated labeled connections with the Dynavin head unit and harnesses: mic, GPS antenna, USB1, USB2, 3.5mm AUX R/L, iPod, FL/FR/RL/RR/Sub RCAs, radio antenna, Fakra plug, and the steering wheel control module (small black plastic box that came with the Dynavin accessories. Tip: make sure to make the connection to the steering control module as tight as possible. The mini USB side of the steering wheel control module is NOT connected to anything (used for some sort of programming). If the connection is loose, you will notice that the steering wheel control buttons will not work, and the Dynavin head unit's OBC will not work either. Just make sure to push the connector in as far as possible 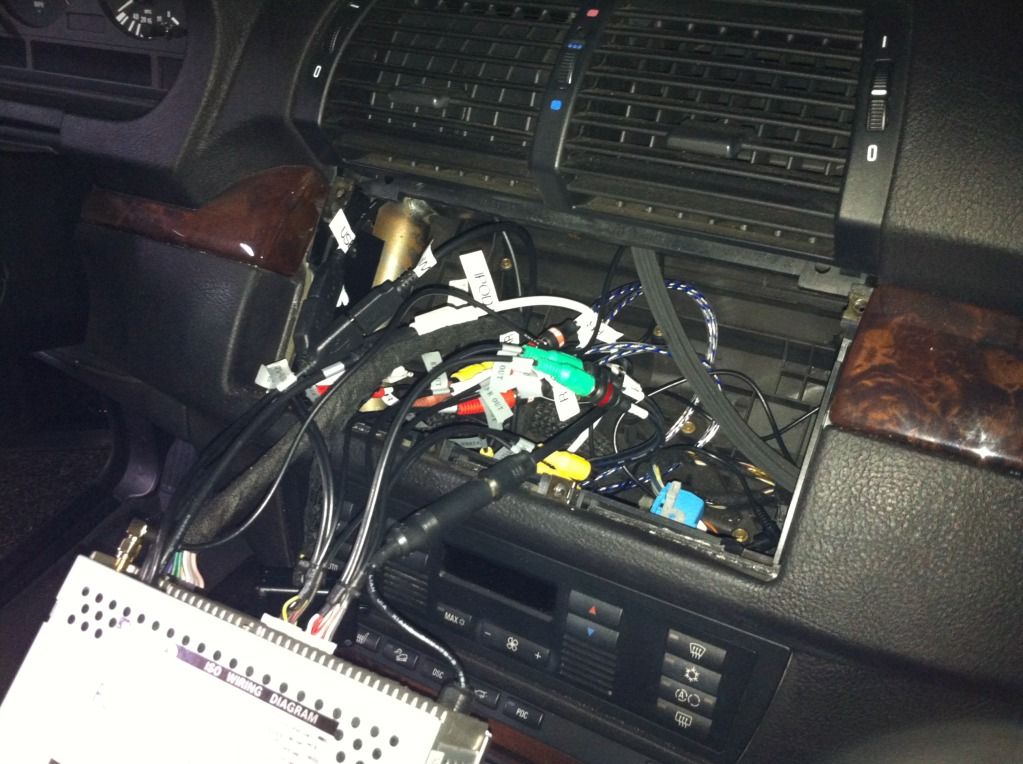 61. If you have the Dynavin Android unit, connect the Dynavin wifi USB stick to the USB extension cable in the ashtray compartment that you labeled as USB wifi. Note: you can attach the wifi USB stick to the USB plug in the back of the Dynavin head unit, but I decided to use an extension cable as I did not want it to accidentally get disconnected and lost in the dashboard in the future. 62. I did not use the head unit bracket supplied with the Dynavin E39 D99. It looked like too much work to attempt to remove the existing stock nav bracket in the dash, and I wasn't sure if it would even fit properly since it was made for an E39 dash. The Dynavin head unit will slide right in to the existing nav slot in the dash, and the stock nav bracket holds it in place. The Dynavin is held in place very securely with just the normal pressure from the contact with the dashboard, and can still easily be pulled out using a trim removal tool. So I did not see any need to attempt to replace the mounting bracket. 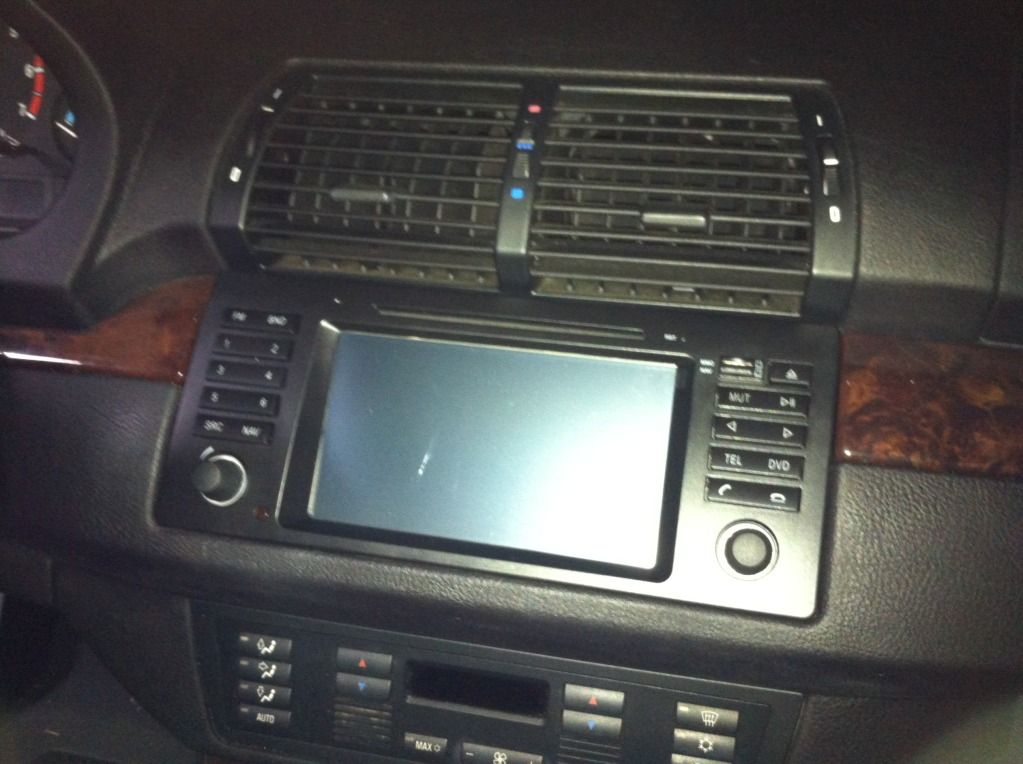 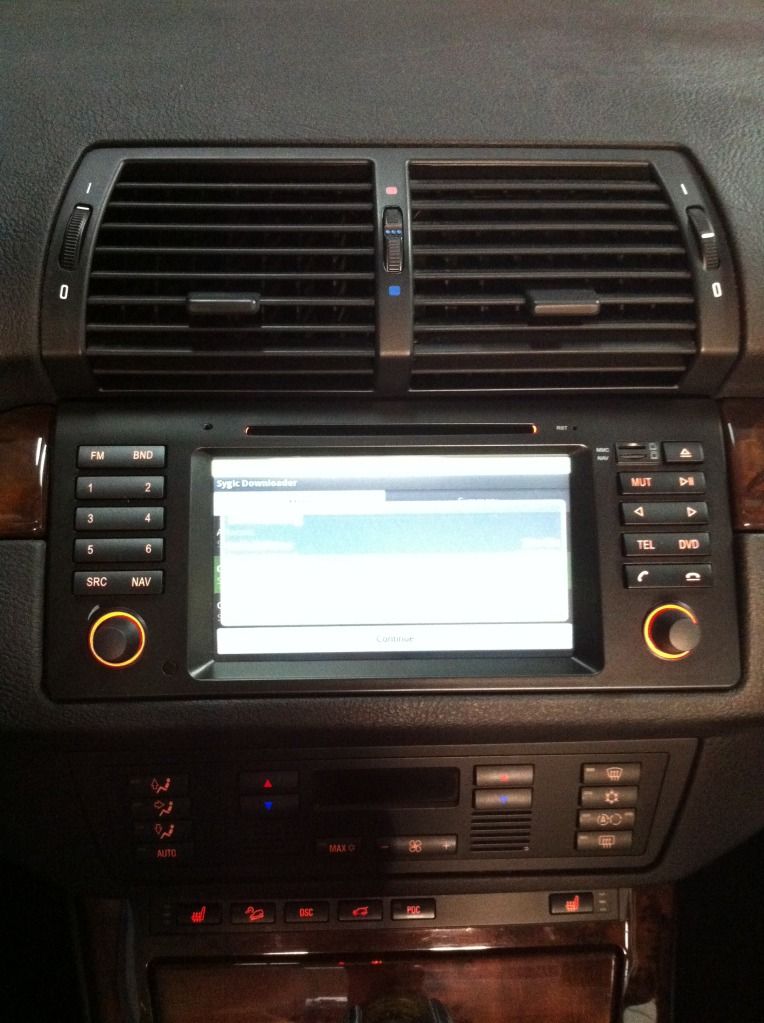 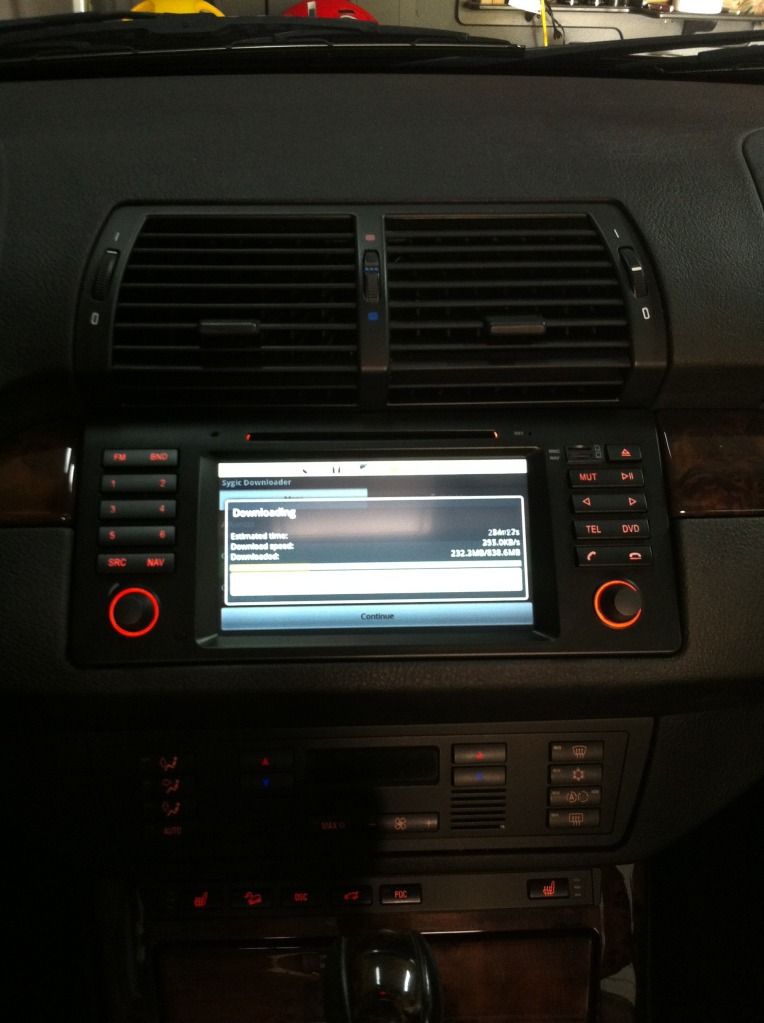 Reconnecting car battery negative terminal 63. Self explanatory: connect negative terminal from battery, secure air suspension component (if you have a 4.4i), reattach the plastic bracket between the spare tire well and the left compartment (making sure the amp power, ground, and remote turn on cables are clear of any obstructions), put the spare tire back in. Wrapping up What's left is to securely mount the new amp and passive crossovers in the trunk left compartment. It'll depend on the specific amp and passive crossovers you used, so it'll be up to you on where/how you want to securely mount it (e.g. using the stock mounting bracket of the DSP amp). In my case, the amp I'm using is very close in dimensions with the original DSP amp. So I just used a power drill and drilled 4 new holes on the stock mounting bracket and attached the new amp to the bracket. Tip: Before putting the amp/bracket back in place, make sure to test the sound on the speakers (especially under some load, i.e. gas on the pedal) and adjust the gain settings as needed. In my case, the sound was fine when the car is on/idling; however, when driving as the car is accelerating, there was a high pitch whining noise that would increase with rpm. I ended up having to use a high/low converter on the speaker output wires in the Fakra cable (white (+), white/black (-), grey (+), grey/black (-), green (+), green/black (-), purple (+), purple/black (-) wires are the speaker output wires; see the diagram on the top side of the Dynavin chassis to know which color group goes to which speaker corner) and plugged the RCA cables into output of the high/low converter that instead of the default RCA outputs on the head unit. Perhaps the default RCA output was picking up interference from the speaker wires, or the RCA output was damaged somehow? 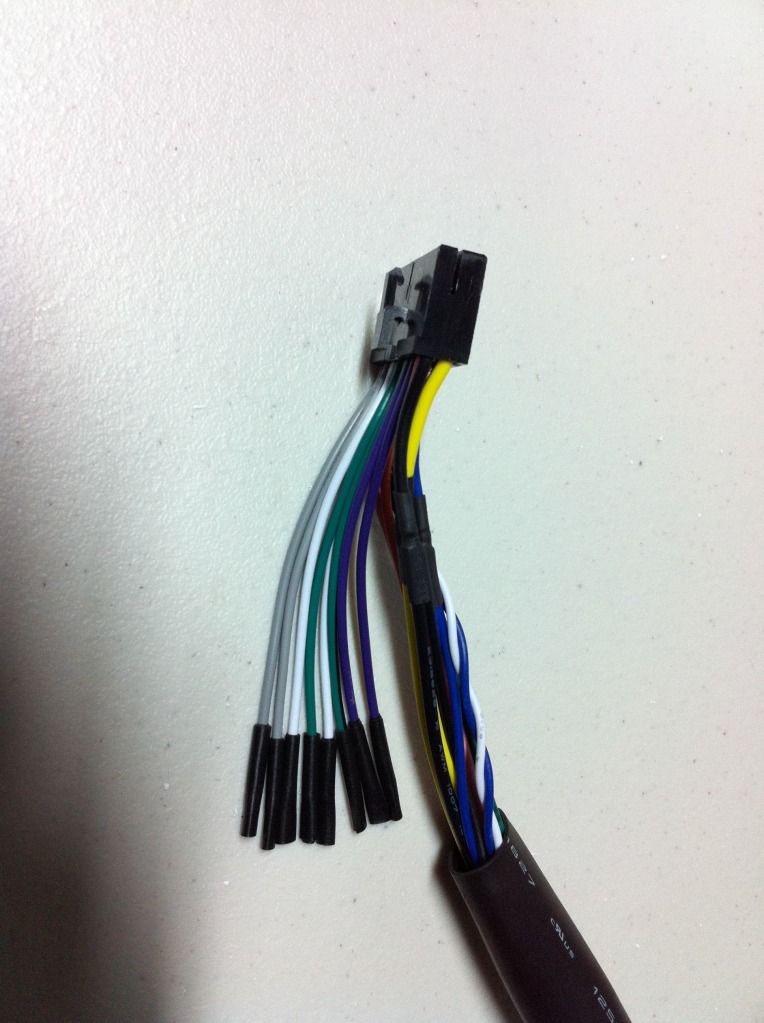 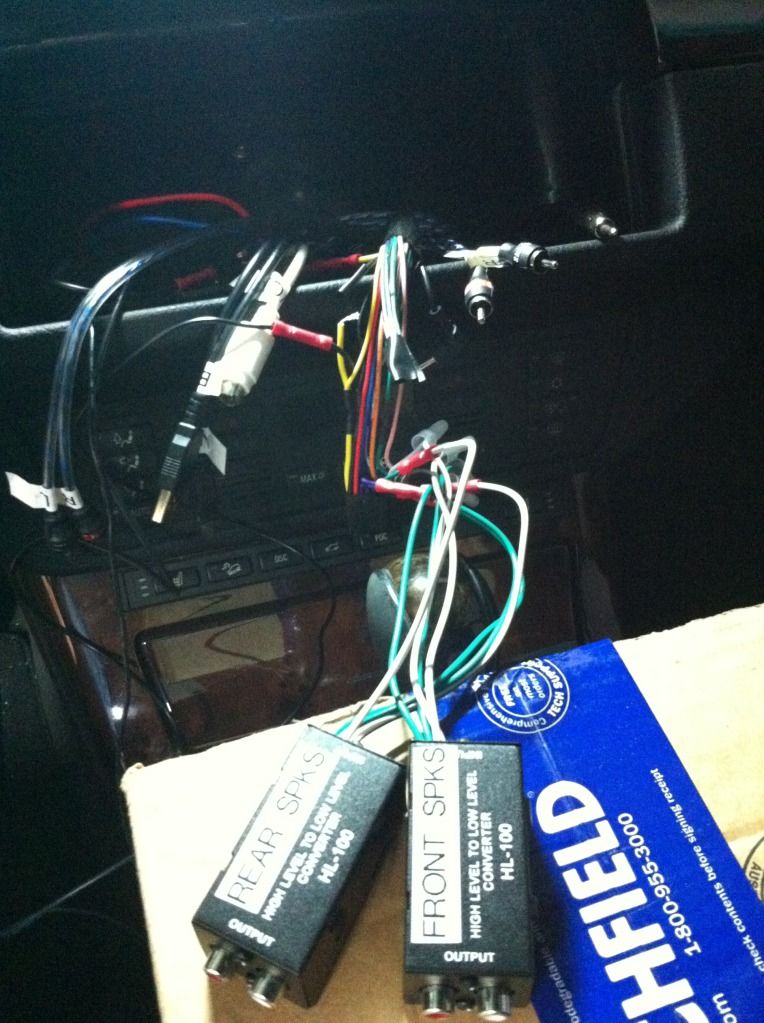 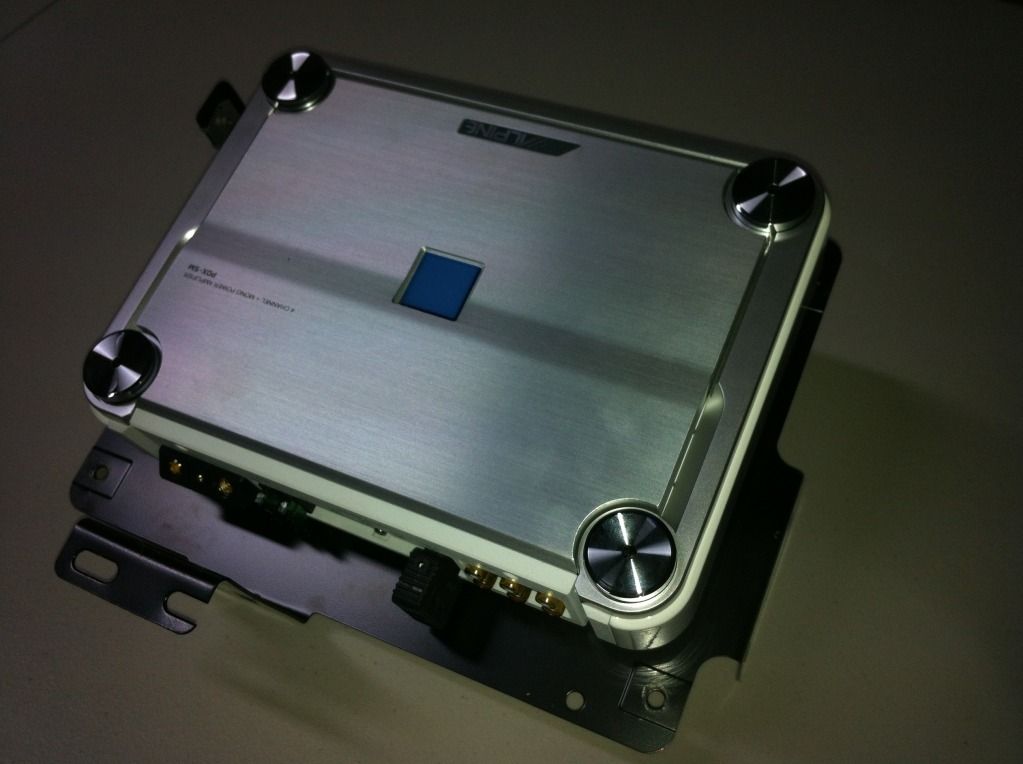 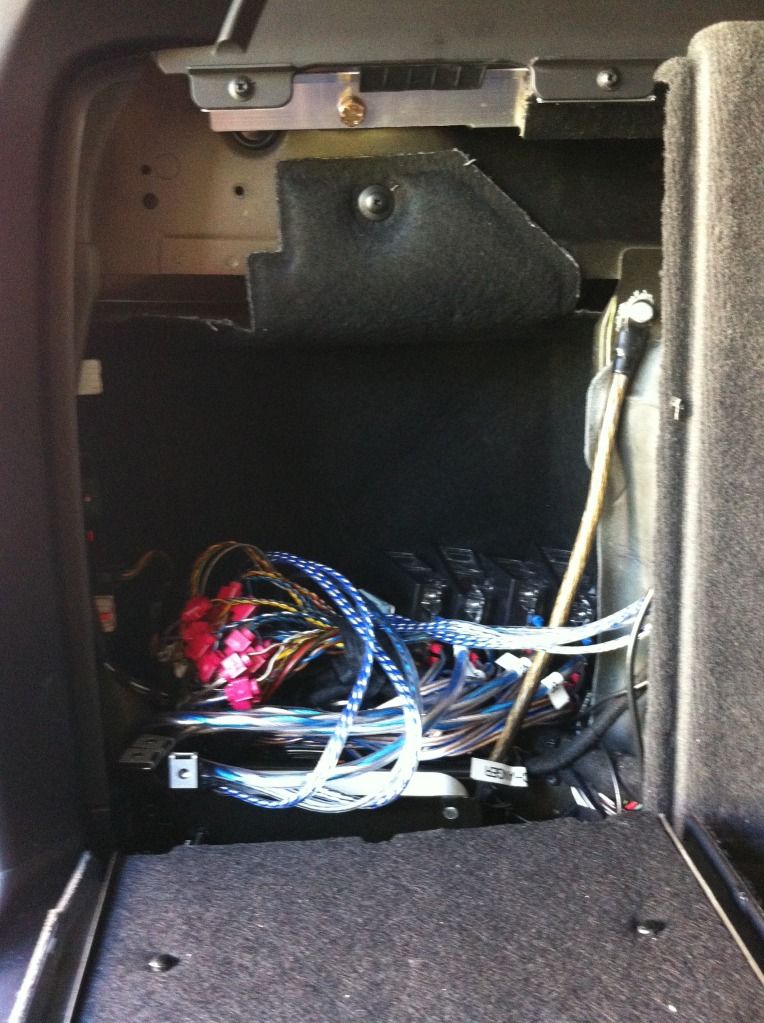 As for the composite video cable for the rear backup camera, that installation will be a project in and of itself (to be continued…). You might also noticed that the stock subwoofer is not connected to the new amp. I'm planning on replacing subwoofer in the near future as well (based on the custom box dimensions provided in other threads on this forum: http://www.xoutpost.com/electronics/...-included.html), so I did not bother tapping into the stock subwoofer speaker wires at this time since I'll be running new subwoofer speaker wires when the time comes (to be continued…). A comment about the speedometer cluster and MID info. I can still use the button on the signal stalk to cycle through the OBC/MID info and receive warning notifications, plus outside ambient temperature reading. The only drawback is that you cannot reset/adjust any of the OBC/MID info (e.g. internal clock, timer, average fuel consumptions, etc.). If this is really important to you, you can pick up a used MID from a non-nav X5 and extend the MID harness detached from the stock 16:9 nav head unit into the glovebox compartment. I might do this in the future if I can grab a non-nav MID for cheap. Parts removed and to be resold to recover some of the upgrade costs: 16:9 nav head unit, MKIV DVD drive, 6 disc cd changer, DSP amp, and radio module Last edited by blkxer; 05-05-2012 at 08:13 PM. 
|
| Sponsored Links | |
|
|
|
|
#2
04-15-2012, 09:36 AM
|
||||
|
||||
|
Great write-up. Should be very helpful when doing mine. Thanks
__________________
 00 E39 DINAN S1 //M5 (82k miles) 06 E53 DINAN 4.8iS, born 2/18/2006 (126k miles) http://www.xoutpost.com/bmw-sav-foru...s-my-dslr.html 90 Straman Z32 TwinTurbo Convertible, (1 of 44 ever made) 5 speed, 444rwhp/451rwtq 01 360 Novitec Spider F1 (26k miles)
|
|
#3
04-15-2012, 11:41 AM
|
||||
|
||||
|
Blkxer, fantastic DIY write up!! For those planning to do this, the write should make the job more doable!
Wat I don't understand and may be missed, is why do you have to tap into a seprate power source to illuminate the unit's buttons? Shouldn't those illuminated buttons be powered internally from the same power source that powers the unit itself? Why are they separate?
__________________
Current: 2017 640Xi Convertible 2011 Acura MDX 2018 Santa Fe Past: 2013 Honda Accord 2008 Acura TL Tech.------2004 BMW X5 4.8is----2004 Acura MDX Tech 1994 BMW 525i.----------1994 Lexus 300 GS.----1994 Acura Legend GS 1991 Acura Legend LS.----1991 Honda Accord.----1991 300ZX twin turbo 1996 Buick Regal GS.-----1984 300Z 50th anniv.--2002 BMW X5 1982 280Z
|
|
#4
04-15-2012, 12:50 PM
|
|||
|
|||
|
Quote:
The other option if you want it to be truly on/off for the button illumination is to find a different power wire source to tap into that is sync'ed with the on/off interior lighting for day/night driving. I didn't bother with this approach because I wanted to keep the Fakra wires fully contained within itself, rather than having 1 wire lead out to somewhere else (plus it was less work this way to just tap the orange wire into the red wire) Last edited by blkxer; 04-15-2012 at 01:20 PM.
|
|
#5
04-24-2012, 03:49 AM
|
|||
|
|||
|
Been following the thread here and ur initial purchase thread... I'm thw guy from m5 forums that did this on his m5. Did you ever diagnose the whine noise? I have since graduated to a d99 unit but i still get weird noises. I added another ground wire which cleaned it up a little bit, but not enough. Your writeup made me want to install the passive crossovers. How much did u spend on them? Your writeup was great and thorough. The reverse camera is a pain in the butt so prepare for that. My unit requires a relay between the trigger wire and the unit because my system has a tendency to ping my reverse lights. Every time this happens the unit thinks it is in reverse so it would flip to the camera then cut back to music every 30-40 seconds. Get ready for that if your system is similar.
|
|
#6
04-24-2012, 12:02 PM
|
|||
|
|||
|
Hey Tho///a5,
Yeah, I'm still working to try to iron out the last kink...the dreaded alternator whine noise. I've tried everything I could think of and find online: - made sure all unused plugs taped up with electrical tape - toggled the "Brake" option in the Dynavin settings menu - grounded the "Park" wire on the Fakra cable - adjusted the gain down on the aftermarket amp (helps make it less obvious, but still there) - pulled all the RCA cables (Streetwires twisted pair) from under the carpet floor and had it running straight through the interior cabin from the head unit to the amp - installed a ground loop isolator (also helps make it less obvious, but still there) - cut the amp ground cable to the bare minimum - used a dremel to sand down the contact point where I bolted the amp ground cable to a medal piece of the suv - ground the head unit's chassis - tested with the shorter harness cable with the head unit in the trunk None of it worked. Ultimately, I took it to a stereo shop and had them try to diagnose the alternator whine noise. They were able to trace it to the wires going into the Dynavin head unit (had to leave shortly after, plus did not want to pay for more of their hourly rate). I'm also in contact with Jeff from J&T Distributing and he's been really helpful (glad I purchased it from him). So at the moment, I'm waiting to get a power line filter delivered from Crutchfield in order to try it on the incoming wires into the head unit. In the meantime, I'm thinking of trying to run the red wire on the Fakra to the battery to see if there's any change. Regarding the crossovers, I picked them up from eBay. I think they were like $20/each. Last edited by blkxer; 04-24-2012 at 12:09 PM.
|
|
#7
04-24-2012, 01:19 PM
|
|||
|
|||
|
What is your volume at when it is really loud? I turned down my gain quite a bit. I also spliced an additional ground directly from the head unit. The wires I used were really thin so the addition of a heavy gushed ground wire helped the most. My whine is gone but I have a random ticking noose when music is playing at low audio levels. Good thing I frequently listen to music at loud levels Haha. I also tried a ground loop isolator and it did nothing. What was your total for the crossovers?
|
|
#8
04-24-2012, 03:02 PM
|
|||
|
|||
|
So depending on the gain setting on the amp, if I have it down to the lowest/min setting, then the alternator whine noise is only noticable if the head unit is on and the volume is at the point where there is no sound through the speakers (less than 30). With this setting (gain set to lowest level on the amp), the music volume has to be turned up pretty high on the head unit to achieve acceptable music volume for driving conditions (greater than 50; and the max on the head unit is already 65). I don't like this as I want to be able to go up/down depending on use (though most of the time it would just be set at average listening level).
Yeah, I tried the ground loop isolator on the RCA cables and that did not really help. I'm trying a power line filter next. Have you tried a power line filter on the yellow cable and the red cable on the Fakra? Regarding your grounding from the head unit, are you grounding it directly from the head unit's frame? Or are you splicing into the black wire of the Fakra cable at the point where it is leading into the head unit? For the passive crossovers, I got them for $18/ea on eBay (AUDIOPIPE 500 WATT PASSIVE 3-WAY 4ohm CROSSOVER NETWORK | eBay)
|
|
#9
04-24-2012, 03:19 PM
|
|||
|
|||
|
How many of those cross overs did you have to purchase I mean. I have i think 10 speakers in my car. I'm using an alpine pdx500 (i think that's what it is) and it's a 5 channel amp. I have an additional amp installed on the back of one of my fold down seats for my sub woofer, but it stopped working mysteriously. Long story short i'm trying to figure out how many of those crossovers I will need to purchase for my 3 speakers on the FL 3 speakers on the FR and 2 speakers on both the RL and the RR. I didn't do 100% of my install, so i'm not sure of the finer parts of my install. based on your write up you clearly have more knowledge in this department than i do. haha.
|
|
#10
04-24-2012, 04:25 PM
|
|||
|
|||
|
You only need 4 of the 3-way crossovers: FL/FR/RL/RR
Basically, for each crossover, your amp output will go to the input for the crossover. So for example, the amp FL output will go to the input for the FL 3-way crossover. From the FL 3-way crossover, you will then have 3 output to each of the FL component speakers (e.g. tweeter, mid, and mid-bass). Repeat for the FR, RL, and RR speaker sets. For the rear, since you only have 2 speakers for each rear side, you only need to use 2 of the outputs from the crossovers for the rear (e.g. mid, and mid-bass). Hope that helps. Oh, btw, you can use 2-way crossovers for the rear RL/RR speakers; however, the frequency range for each of the 2 channels coming out of the 2-way crossovers will not match the ranges for the mid and mid-bass speakers. That's why I used the 3-way crossovers for the rear sets as well. Last edited by blkxer; 04-24-2012 at 06:04 PM.
|
|
| Bookmarks |
|
|
|
|


 Linear Mode


