
|
|
|
|
||||||||||
| Xoutpost server transfer and maintenance is occurring.... |
| Xoutpost is currently undergoing a planned server migration.... stay tuned for new developments.... sincerely, the management |
 |
|
|
LinkBack | Thread Tools | Display Modes |
|
#11
 04-11-2006, 11:48 AM
|
||||
|
||||
|
Quote:
__________________
2001 X5 3.0i (PP/WP/AP) Traded at 213K miles RARE White on Black - Why does everyone get Tan??  First E53 with 215s on XOutpost!! 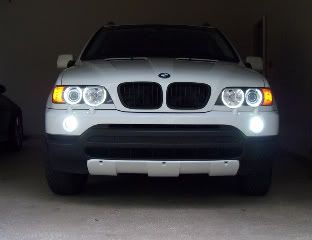 

|
| Sponsored Links | |
|
|
|
|
#12
04-11-2006, 11:54 AM
|
||||
|
||||
|
Quote:
You could contact the vendor and wait for replacement parts or go to radio shack for a new set of matching plugs which may cost you $5. There is a chance the vendor may tell you to cut the plugs and solder the connections (I've seen that response before) but that's just unacceptable IMO.
__________________
Wake up every day that would be a start. Last edited by rayxi; 04-11-2006 at 12:01 PM.
|
|
#13
04-11-2006, 11:56 AM
|
|||
|
|||
|
Quote:

|
|
#14
04-11-2006, 12:00 PM
|
|||
|
|||
|
Quote:
LOL Kidding aside...I take it the ballasts hook directly to the rings? Michael
|
|
#15
04-11-2006, 01:04 PM
|
||||
|
||||
|
Quote:
Section 1 - Main Power You have a positive and a ground wire that both run to the relay. The positive is the one with the inline fuse. I recommend you replace the 5 or 10 Amp fuse they give you with a 2 Amp fuse. People have reported problems with the cheap fuses they give you and 5 or 10 Amps is way to much to protect the circuit. Be careful where you connect your ground as not all body points give you good ground because of paint. I measured 700K ohms resistance on the vendor's recommended ground point. Use the negative jumper post if you can. Section 2 - Relay That's the black plastic cube with all the wires in the upper right of your photo. You need to locate it close to your power source but away from heat as the lines aren't that long. Section 3 - 12V Ballast Power There will be two pairs of wires, one for each ballast. You'll know which wire by the connectors that match up to the ballast connectors. There may be a long pair and a short pair but other than that they are the same. Depending on where you locate your relay you route the short pair down the shorter side to one ballast and the longer pair around the engine to the other ballast. Take your time and use zip ties and existing conduits where you can to keep the wires out of harm's way. Section 4 - Trigger wires Depending on your kit the number of trigger wires may vary. They are all the same with regards to the circuit but may vary in length. The function of your rings will depend on where you tap your triggers. I have one trigger on the ECU accessory power and one on my interior footwell light. Section 5 - Ballasts There is one pair 12V wires and two pairs of high voltage wires for each ballast. The two 12V wires connects to the wires from the relay. The high voltage pairs connects to the rings. Locate close to the lights in a spot that won't get wet or too hot. Take care in handling and securing the high voltage wires as they are thin and a nick in the wire could cause arcing problems. Section 6 - Rings Use the same care in handling and securing the wires. See above post regarding connectors. Secure connectors in a dry location as this is where many arcing problems occur. I taped mine up as an added measure. [edit] I noticed the instructions above show the use of heat shrink on the connections. Use those if the kit comes with them. Installation tips: 1) Locate your main power/ground before doing anything else. Then lay out your harness to make sure you know the routing. 2) Pull the fuse out of the harness before making any connections. 3) Mount your relay and connect the main power/ground. 4) Lay out the ballasts and rings in a safe place and connect them all up. 5) Connect up one trigger. 6) Put the fuse in and give it a test. 7) If all the rings work then go ahead and complete the install. Hope that helps.
__________________
Wake up every day that would be a start. Last edited by rayxi; 04-11-2006 at 04:12 PM.
|
|
#16
04-11-2006, 01:28 PM
|
||||
|
||||
|
Quote:
 Not very good QA by the vendor. I couldn't tell the genders from the photo. Yes the ballasts connect directly to the rings. Not very good QA by the vendor. I couldn't tell the genders from the photo. Yes the ballasts connect directly to the rings.If the vendor doesn't replace the parts I recommend going the radio shack route over the soldering. Soldered connections are a pain if you ever have to disconnect them or if you want to test them before installing.
__________________
Wake up every day that would be a start. Last edited by rayxi; 04-11-2006 at 07:34 PM.
|
|
#17
04-11-2006, 02:11 PM
|
||||
|
||||
|
Very informative write-up, rayxi. Would you happen to have a camera and take some pix for us and can you elaborate a little bit more on the ECU and interior light wire tapping part (where they are. color, wiring route ...)? Thanks much, rayxi.
Justin. Quote:
|
|
#19
04-11-2006, 03:08 PM
|
||||
|
||||
|
Quote:
1) My install is on a E46 so there may be important differences some may not pick up on if they look at my photos. I haven't looked under the hood of my E53 closely enough to point out where they may be. 2) Kits can vary in color coding the wires so telling you to connect a specific color wire may be wrong for your kit. I have DDE Titaniums. This really isn't necessary as all the wires have connectors that only fit one way, with the exception of the main power. 3) I'm lazy and my engine bay is embarassingly dirty right now.  I tapped one trigger to the accessory wire from the ECU. You need to take the cover off the ECU housing to get at it. On a E46 the wire is red with a white stripe and yellow dots. I cannot verify if it's the same on a E53. Tapping a trigger to the interior lights (a.k.a. remote trigger) can be done in several ways. Basically you need to find a route through the firewall into the cabin. I went throught an existing opening below the ECU housing into the driver's side footwell. I had to open the cover below the steering column and fish through the wire from the top. Others have had success going through an existing grommet in the firewall on the glove compartment side. I have no idea what method works best on a E53. If need be you can easily extend the trigger wires with a crimp connector. I found a diagram over on E46Fanatics that may help you.
__________________
Wake up every day that would be a start. Last edited by rayxi; 04-11-2006 at 03:24 PM.
|
|
#20
04-11-2006, 04:03 PM
|
||||
|
||||
|
Thanks for a quick response
 , rayxi. , rayxi.Justin. Quote:
|
|
| Bookmarks |
|
|
|
|


 Linear Mode


