
|
|
|
|
||||||||||
| Xoutpost server transfer and maintenance is occurring.... |
| Xoutpost is currently undergoing a planned server migration.... stay tuned for new developments.... sincerely, the management |
 |
|
|
LinkBack | Thread Tools | Display Modes |
|
#21
 04-11-2006, 04:23 PM
|
||||
|
||||
 rayxi, you are speaking my language!!!! This was all I needed. rayxi, you are speaking my language!!!! This was all I needed.Come this weekend, boys, I am going in!!!! I will keep everyone updated and take pics along the way.
__________________
2001 X5 3.0i (PP/WP/AP) Traded at 213K miles RARE White on Black - Why does everyone get Tan??  First E53 with 215s on XOutpost!! 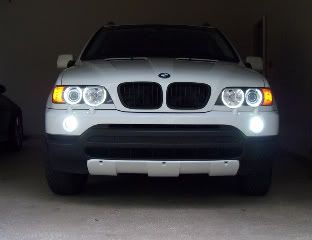 

|
| Sponsored Links | |
|
|
|
|
#22
04-11-2006, 04:28 PM
|
||||
|
||||
|
I am with you,.
I will do this this weekend, I had an idea as well, since I will open up the headlights what if I paint the lens smoke color?? or attempt to tint them out. If so this will look good ( I hope) Will post pics before so if anyone is trying or thinking of doing the same they can see what it would look like.
__________________
 Road it's what's for dinner
|
|
#23
04-11-2006, 04:41 PM
|
||||
|
||||
|
X5Dawg/NOC,
Lots of pix would be great  . Will install mine after I move. Thank you in advance. . Will install mine after I move. Thank you in advance.Justin. Quote:
|
|
#24
04-11-2006, 05:10 PM
|
||||
|
||||
|
I mounted the relay in a spot next to the brake fluid reservoir. Tapped into the positive post on the front of the firewall. Ran the wiring down the fender for driver side. Then ran other wiring if front of cabin filter area of engine bay to other side, then wiring for the ballast down passenger side fender. I could not find the red/white stripped/yellow dot wiring in the ECU the Jlevis instructions stated. I tapped into a red/white strip wire in the ECU for my switched power. If you have a test lamp you can verify that it is switched before you tap into it. Still have to wait to tap into the interior lights, might not do it at all.
One work of caution. THE RINGS ARE VERY DELICATE!! Make sure that when installing them into the headlamp assembly that you do not bend or put any pressure on them at all.
__________________
2011 X5 35i Space Gray/Black Nevada Leather w Dark Bamboo Trim Convenience Pkg/Running Boards/Cold Weather Pkg/Comfort Access 3rd Row Seating/20% Tint/Style 215 wrapped with Toyo Proxes ST II/ LUX v4 2001 X5 4.4i TiAG/Grey Leather-Retired djbock's Custom X Page!
|
|
#26
04-11-2006, 05:44 PM
|
||||
|
||||
|
Here are some pics, hope they help. I attached the ground wire to the same bolt that I used for the relay.
     Not the best arrows I've ever made, but I hope you get the idea.
__________________
2011 X5 35i Space Gray/Black Nevada Leather w Dark Bamboo Trim Convenience Pkg/Running Boards/Cold Weather Pkg/Comfort Access 3rd Row Seating/20% Tint/Style 215 wrapped with Toyo Proxes ST II/ LUX v4 2001 X5 4.4i TiAG/Grey Leather-Retired djbock's Custom X Page!
|
|
#27
04-11-2006, 06:46 PM
|
||||
|
||||
|
That is actually better then the instructions that came w/ the kit (no offense JLevySW) I will take a crack at this over the weekend, since sunday should be a good day for mods. I will put the titanium grill and rear handle along w/ the mirror sorrounds and the 20" chromes.
__________________
Road it's what's for dinner
|
|
#28
04-11-2006, 07:01 PM
|
||||
|
||||
|
The basic wiring diagram on an E46 is very similar if not exactly identical to an X5. I'm not sure why people are having trouble translating the two, there really are very few differences between an X5 engine bay layout and E46./
__________________
Call Toll Free: 1.888.JLEVISW ANGEL EYE UPGRADES FOR ALL MODELS | PAINTED REFLECTORS AND DOOR LOCKS | V2 LED TURN SIGNALS Suscribe to the JleviSW newsletter!
|
|
#29
04-11-2006, 07:30 PM
|
||||
|
||||
|
Looks like a nice install DJ.
 My only comment is regarding the ground location. While it's possible to have operational lights even with a high resistance ground it could be problematic. Current through resistance causes heat. You could get down to bare metal using steel wool for a better ground there but I'd be hesitant to remove the corrosion protection on any sheet metal. The owner's manual says to jump start the X5 using a special ground nut found on the left side panel. If you can reach it that's where I would attach the ground. The body ground post is where my DDE ground is attached on my E46.
__________________
Wake up every day that would be a start.
|
|
#30
04-11-2006, 07:59 PM
|
||||
|
||||
|
Quote:
Don't take it personal, I was just stating that the inst. posted are a bit easier (as far as the wiring goes) than the install page that came w/ the kit.
__________________
Road it's what's for dinner
|
|
| Bookmarks |
|
|
|
|


 )
)


 Linear Mode


