
|
|
|
|
||||||||||
| Xoutpost server transfer and maintenance is occurring.... |
| Xoutpost is currently undergoing a planned server migration.... stay tuned for new developments.... sincerely, the management |
 |
|
|
LinkBack | Thread Tools | Display Modes |
|
#321
 06-20-2025, 11:48 AM
|
||||
|
||||
|
__________________
Current Original owner 2002 E53 X5 4.4i to 4.6i swap 2025 G06 X5 50e Former 1972 Audi Fox 1986 Saab 900S 1996 BMW Z3 1998 BMW E36 M3 Sedan 2004 BMW E46 M3 2006 Audi A3 Quatro 1993 Mopar 318 Jeep Grand Cherokee 2015 V6 Jeep Grand Cherokee 
|
| Sponsored Links | |
|
|
|
|
#322
06-20-2025, 06:27 PM
|
||||
|
||||
|
Hex versus torx bolts
The torx head screws that are most often used on the tension strut ball joint have always been a hassle for me to remove reliably so I ordered some 20mm, M10, 10.9 grade hex bolts to see if they would work.
 I had assumed that there wasnt clearance for a socket, and thats why they use the torx head screws, but not so. I cant think of any reason not to try these, with a little blue loctite of course. Same grade as OE, zinc plated, 20mm.  The bearing value line kit arrived, but Im still waiting on my Amazon prime Loctite 638 which should have been here yesterday, but now shows mid-next week. The inner seat that the bearing gets pressed into is coated 50% in the stuff. The kit is pretty complete, and has a new dust shield and all the single use suspension nuts needed. 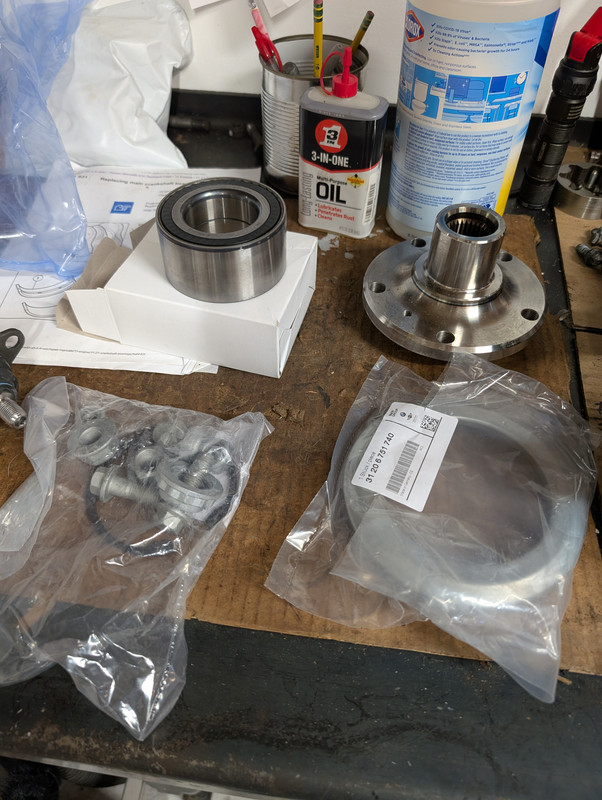 The second problem is that I thought I bought the last word on cheap yet huge Amazon bearing and bushing tool sets, but although it has a ton of cups, none are close to the 90mm I need to pull the wheel bearing in.  Ill either take it back to the machine shop, or try to find a size that will work.
__________________
Current Original owner 2002 E53 X5 4.4i to 4.6i swap 2025 G06 X5 50e Former 1972 Audi Fox 1986 Saab 900S 1996 BMW Z3 1998 BMW E36 M3 Sedan 2004 BMW E46 M3 2006 Audi A3 Quatro 1993 Mopar 318 Jeep Grand Cherokee 2015 V6 Jeep Grand Cherokee Last edited by Henn28; 06-20-2025 at 11:20 PM.
|
|
#323
07-06-2025, 03:25 PM
|
||||
|
||||
|
If its worth doing, its worth doing twice
Im finally back to the steering knuckle, or swivel bearing in BMW speak, rebuild. In truth tho, I was in a hurry and knocked it back together a week ago, but put the dust shield on backwards. Idiotic mistake, especially because I knew which way it goes on because I took pictures, but I was in a hurry. So down to the steering shop I went where they destroyed the bearing to get it all apart again. No way around it though. The back shoulder in the knuckle that the bearing presses up to precludes any ability to press either the hub or the bearing out cleanly.
Round two with a new bearing went down this am. The last time I struggled to pull the bearing in with my monster, and cheap, eBay bearing press set so this time I froze the bearing all night and put the knuckle in the oven for a few hours at 150 degrees. A much easier time was had. I fact I didnt bother with the press, but rather hammered it in with the 90mm cup and a BFH. Whereas the first time took over an hour, and most of that spent on the final 10mm, this time I spent about 10 min total banging the bearing home. I did remember to spread a thin layer of loctite 638 over 50% of the knuckle bore.  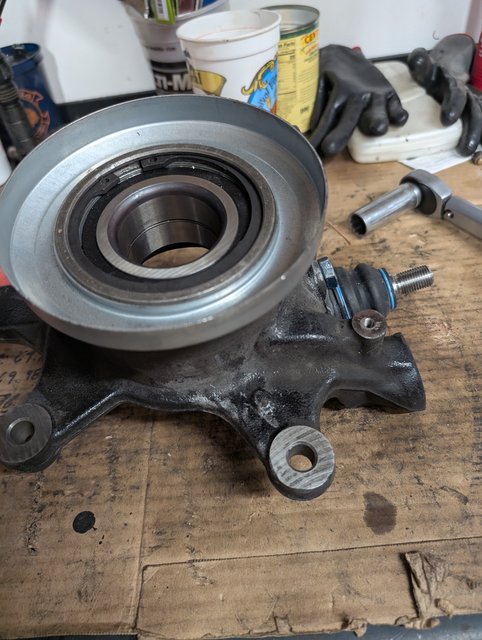 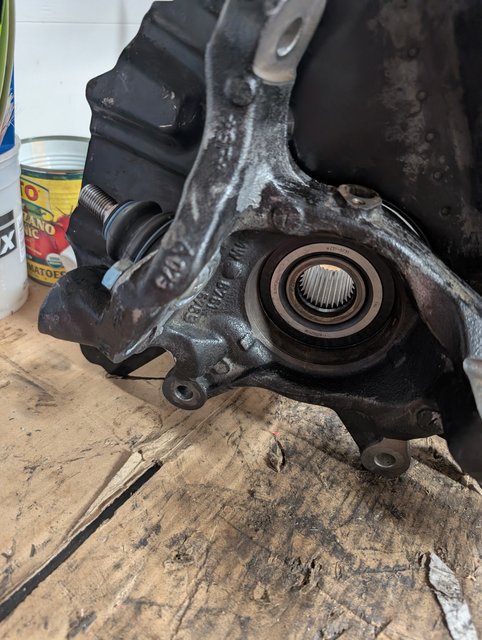 On my first attempt the wheel hub drew in easily with my bearing puller. No so much this time because it kept starting at an angle, no matter how many times I tried. My solution was to use a large wood clamp to put max pressure on the high side, then continue to pull with the bearing kit. It righted itself and then pulled in easily. 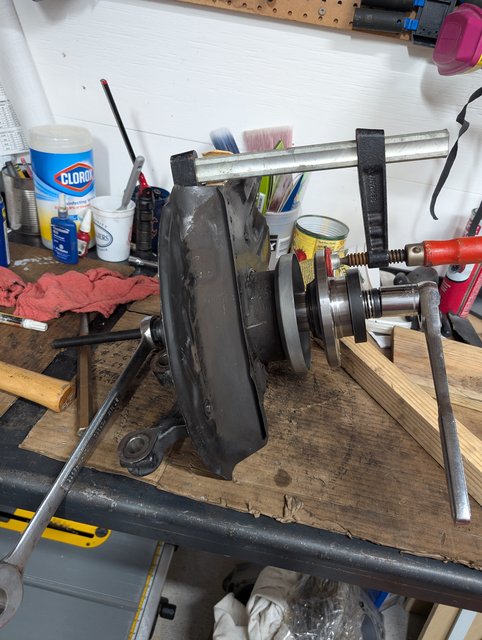 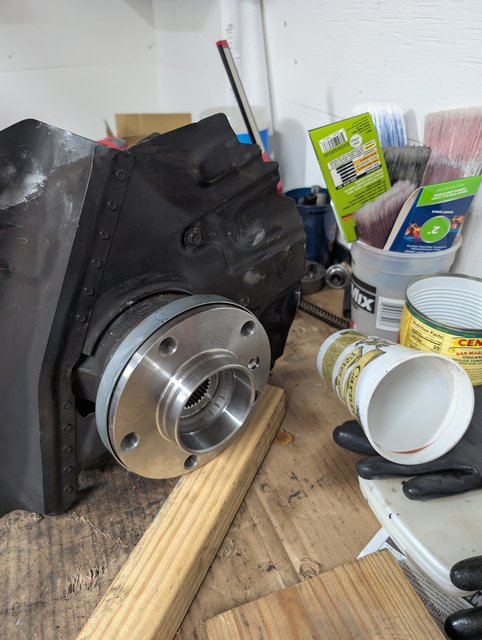 The gotchas on this job are the fact that you cant fix anything done incorrectly once the wheel hub is in, so take your time getting the dust shield and brake shield on correctly. Finally I popped the new tension strut ball joint (guide joint in BMW speak) into the knuckle and used the new hex bolts torqued to 60NM, per TIS. I hit the guide joint with some anti-seize where it goes into the knuckle, and used blue loctite on the bolts. I also witness marked them so I can make sure they arent moving. They should be much easier to remove so I dont have to go through this BS again. 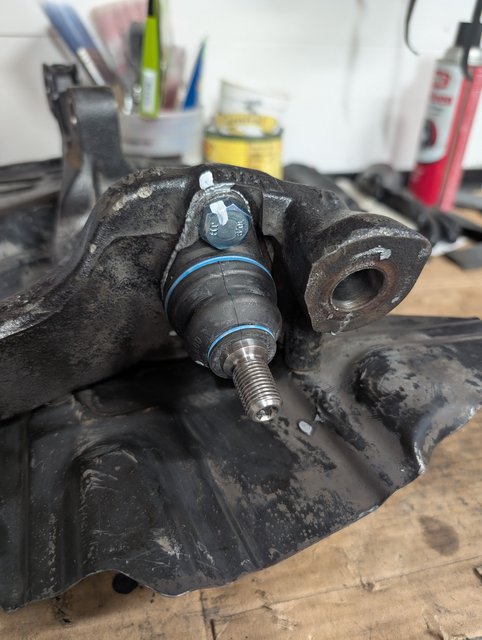
__________________
Current Original owner 2002 E53 X5 4.4i to 4.6i swap 2025 G06 X5 50e Former 1972 Audi Fox 1986 Saab 900S 1996 BMW Z3 1998 BMW E36 M3 Sedan 2004 BMW E46 M3 2006 Audi A3 Quatro 1993 Mopar 318 Jeep Grand Cherokee 2015 V6 Jeep Grand Cherokee Last edited by Henn28; 07-06-2025 at 03:30 PM.
|
|
#324
07-08-2025, 10:44 AM
|
||||
|
||||
|
Knuckle installation
Took the afternoon yesterday and got the swivel bearing (right side steering knuckle) installed. Not a terrible job, now that Ive had these things off a few time in the past. The correct tools really, really make a difference in how fast the job can be done. It took me about 4 hours to remove and replace the knuckle this time, with some shooting of the $hit at times.
Previously, and before I owned some key tools, it took 6 or 7. Once I had to take the knuckle, with the axle and control arms attached, down to my friends at the local steering shop so they could press everything out. As much as I hate owning BMW only tools, the axle puller kit turns an hour + with a hammer and block into a 10 min exercise. Likewise, my giant 3 leg press gets used rarely, but makes quick work pressing the axle out of the road hub. Happily the low speed knocking is finally gone and the front end it BMW tight again. Replacing the entire knuckle is a tough way to replace a tension strut guide/ball joint, but at least Ive got a new bearing in there too. The left side joint is soon to fail too, Im sure but Im going to give some more thought as to how I can get it out without pulling the entire knuckle. It too has a stripped head on the crappy torx head screws holding it in. At any rate I loosed the lug bolts, tapped the stakes on the axle nut back as much as I could with a punch and broke it free with my 3 breaker bar. Then it was up in the air and the wheel came off, as did all the nuts on the hub for the arms and tie rod end. The ABS sensor are looked quite rusty so I elected to leave it in until I freed the entire knuckle and had more room to work. Next time Ill just buy a new one as mine have 170k on them. Then the caliper came off and got hung on the spring. From here I put a floor jack under the road hub and compressed the suspension several inches. Ive found this to be helpful because otherwise the arms and tie rod are fully extended and dont want to come free from the knuckle. Regardless, it took some pounding with a heavy brass punch to pop the lower arm and tie rod end out, but they came free without having to get out a puller. The tension strut has only been on the job a few months and it came off with a little hammering on its upper surface. I did have to pull the lower control arm end at the subframe eventually to get enough clearance for it to drop out of the knuckle. I tried some hammering on the axle end with a punch in the hopes it would pop out easily, but no luck. Note, if you go this route it helps to put the old axle nut back on the axle a bit to protect the threads. Regardless its a crapshoot as to if youll ruin the threads. I threw in the towel quickly and got out my large three leg puller, which took longer to set up than to press the axle out. Finally, the big bolts at on the strut came out and the knuckle was free. Puller in the process of being installed:  Next up was to rest the knuckle on the floor jack and work the speed sensor out. A liberal spray PB Blaster and some very gentle persuasion freed it up. Lots of surface rust in that area so I cleaned it well. I should have bought a new one, but Ive also found the connectors and the plastic box where they connect to the car can get very brittle and shatter. I had to take some time to trim up the dust shield with an angle grinder to match the one I was taking off. Otherwise it rubs the 16 wheels Ive got on the X5. Lots of grease still visible on the splines as this axle has only been in for a couple years. The boot is already failing though. Cheap rebuilds versus expensive OE axles still not sure where those curves intersect. 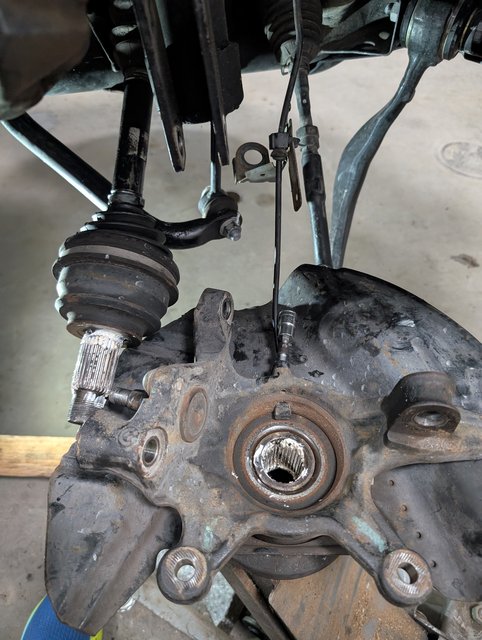 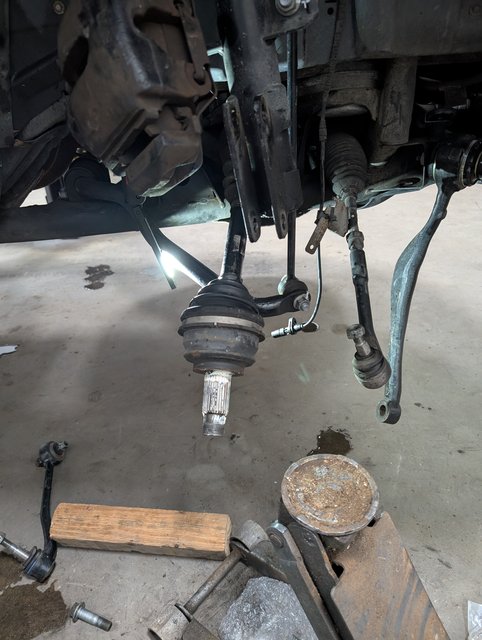 As with most jobs like this, disassembly takes 2/3 of the time spent. The toughest part of putting the new knuckle in is getting the rear control arm back in at the subframe, which just takes time, effort and moving the knuckle around to get the holes to line up. First I hoisted the knuckle into place while sliding the axle into the hub, then popping in the big bolts that secure it to the strut to hold it. Then the axle puller came out and I pulled the axle into the hub maybe 50% or 75% of the way (just in case I screwed something up and had to get it back out, a punch would easily do it at this stage). The tie rod and tension strut ends slide in by finding the right combo of ball joint, jack height, and steering angle to pop them in enough to get the nuts started enough to hold them a few threads. Then I put the lower control arm ball joint into the knuckle, popped a nut on a few threads and wrestled with the whole thing for 20 min until I could get the bolt through it at the subframe. At this point I pulled the axle in fully. After that it was down to torquing and witness marking everything , and reinstalling the speed sensor, the rotor and the caliper. I really need to rebuild that caliper. Last up was the axle nut. I ran it down until it bottomed out with a small breaker bar, then hung the wheel with a few lug bolts. Before the bolts went on I did remember to spin the wheel on the hub and check for rubbing. In fact the dust shield had gotten bent in shipping or me working on it and it was rubbing on the rotor in a few places quick fix with a hammer. Lug bolts on with a little torque and the car went down on the ground so I could put an initial 250 ftlbs on the axle nut (max available with my big torque wrench), and then another 30ish degrees with my 3 breaker I bought just for axle nuts and the M62 crank jesus bolt. The axle nut is supposed to be at 320 ftlbs I think, so its got to be close to that. 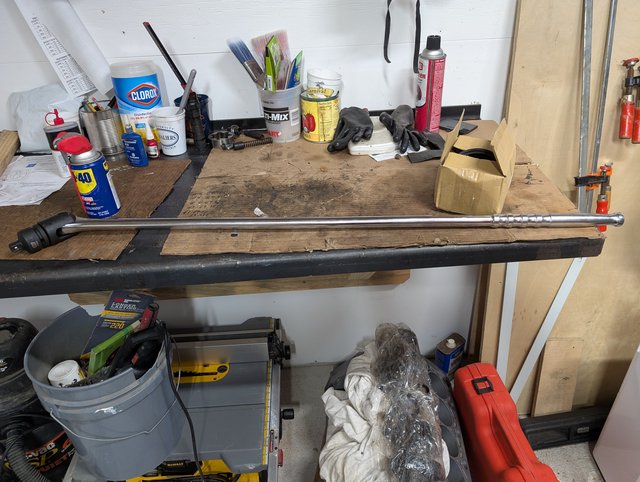 Back up in the air for a final check of everything and then the wheel went back on. No ABS lights or trifectas, and the steering wheel is only off 20ish degrees which Ill adjust when I have time. Best of all, the clunk is finally gone. The tension strut ball joint thst came out was a mess and flopped around freely. 3 years old. All in all it could have been a 3 hour job if I hadnt spent time talking to guys who were also at the shop. The axle tools make all the difference.
__________________
Current Original owner 2002 E53 X5 4.4i to 4.6i swap 2025 G06 X5 50e Former 1972 Audi Fox 1986 Saab 900S 1996 BMW Z3 1998 BMW E36 M3 Sedan 2004 BMW E46 M3 2006 Audi A3 Quatro 1993 Mopar 318 Jeep Grand Cherokee 2015 V6 Jeep Grand Cherokee Last edited by Henn28; 07-08-2025 at 10:50 AM.
|
|
#325
07-16-2025, 11:50 AM
|
|||
|
|||
|
nice work!!
__________________
I swear, my cars are like a girlfriend. Sometimes its a rough ride, sometimes its smooth motorin'. Sometimes she doesnt like how i treat her and sometimes i dont like how she behaves. BUT at the end of the day, she loves it when I am inside her. _______________________ '91 850i '05 X5 4.4i '09 Clubman S
|
|
#326
11-11-2025, 10:28 AM
|
||||
|
||||
|
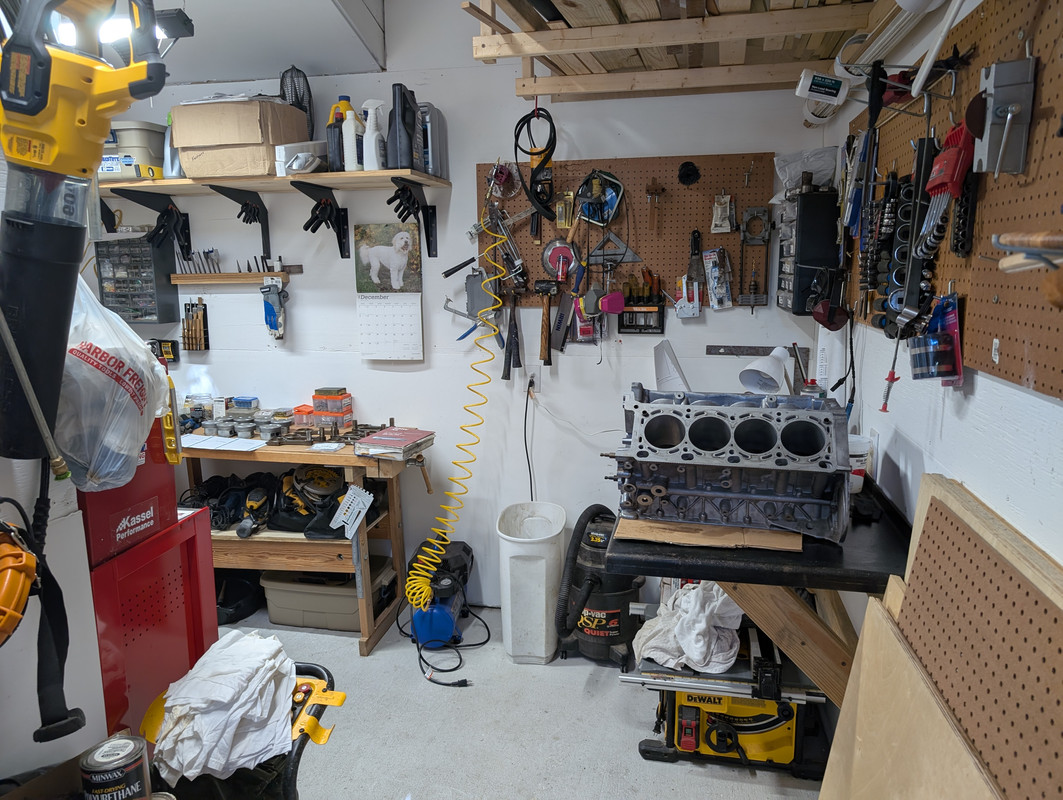
M62 Rebuild Progress
I've been somewhat stuck trying to find cheaper springs for the 4.4 from my X5 that I'm rebuilding. I'm putting 4.6 cams in in it which have 1.5mm more lift than the 4.4 cams, so the 4.4 springs may cause valve float at higher RPM but the 4.6 springs, while still available from BMW, aren't cheap when multiplied by 32. Therefore I went down a rabbit hole evaluating S62 springs for the motor. The S62 cams have slightly less lift than the M62TUB46 pieces, but I was hopeful they would work since a member on Bimmerforums gave me a set of these springs used. Unfortunately the machine shop i took the heads to determined that they were too close to coil bind for comfort at full compression with the 4.6 cams. In for a penny....as they say. One set of new M62TUB46 springs have been dropped off at the machine shop so he can go ahead with the valve/head job and rebuild, and I can start assembling the bottom end.
I picked up the pistons from the shop and the 1.5 mm extra they took out of each valve relief look great and should ensure the motor doesn't turn into shrapnel, at least from piston/valve interference. 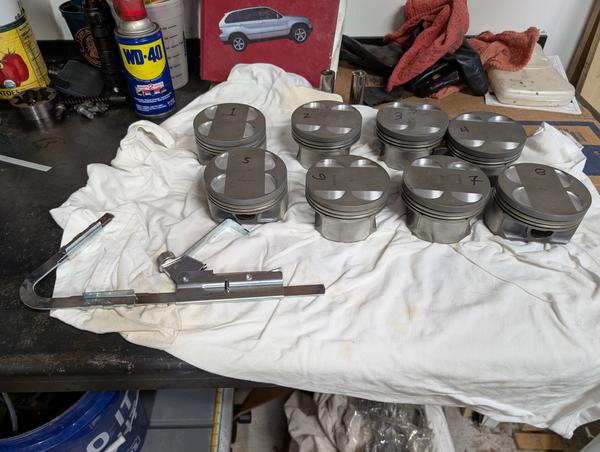 So I spent a few hours a day over the past 3 or 4 continuing to clean the carbon out of the piston ring groves. I had done an initial clean with Chem Dip before taking them to the machine shop, and I elected to stay with Chem Dip now, because I had it on hand and it cleans up very easily with water. No doubt its nasty stuff like diesel, carb cleaner, etc., but I didnt need to use more nasty stuff to clean the pistons each time I dunked them. All told it took 3 baths in the nasty stuff for all of them, with a couple taking a 4th swim. 4 hrs is the single-dip limit for aluminum parts, according to the can and I would limit the pistons to an hour or two each time. Three at a time fit in the basket and Id make note of the order number as they went in. The chem dip would strip the sharpie number on top and often the paint pen number I put on the inside too. what was left after the second dip:  and after the last (usually 4th) dip: 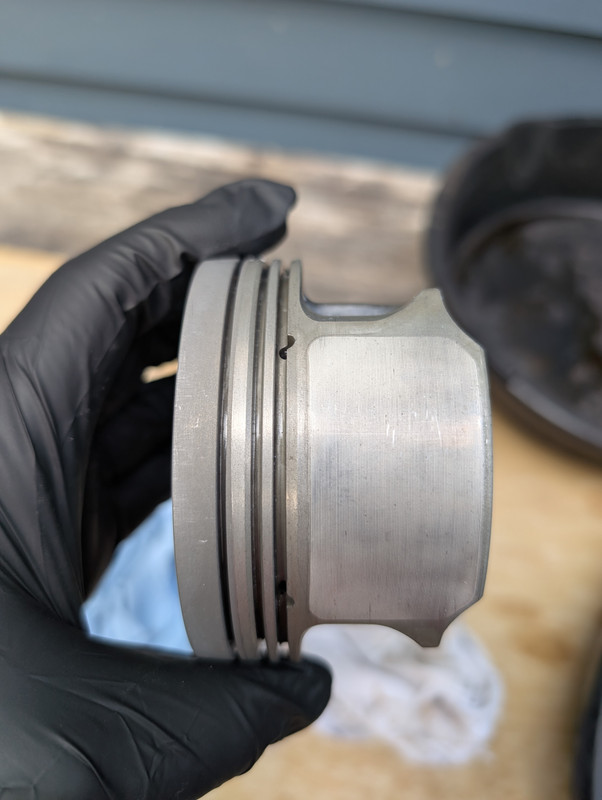 everyone in the pool: 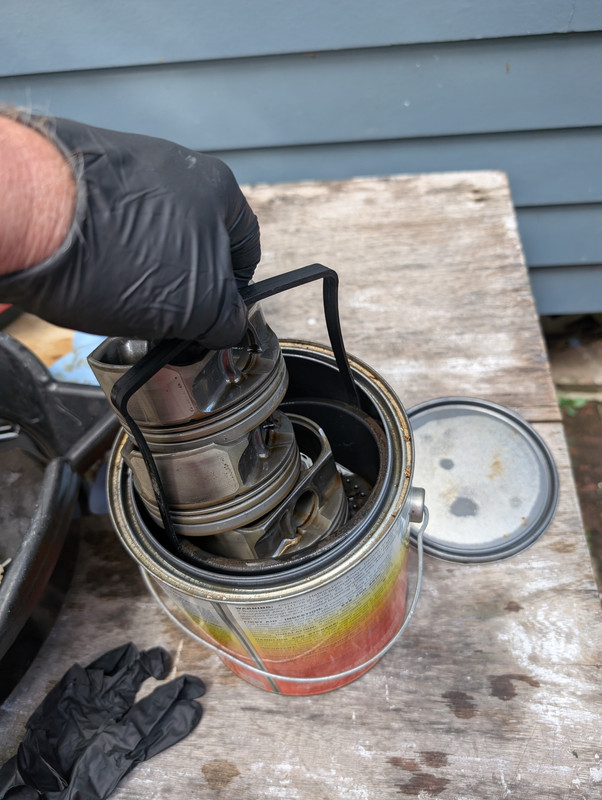 The cutting edge of the tool I bought for the job (because I wasnt smart enough to hang on to an old ring) 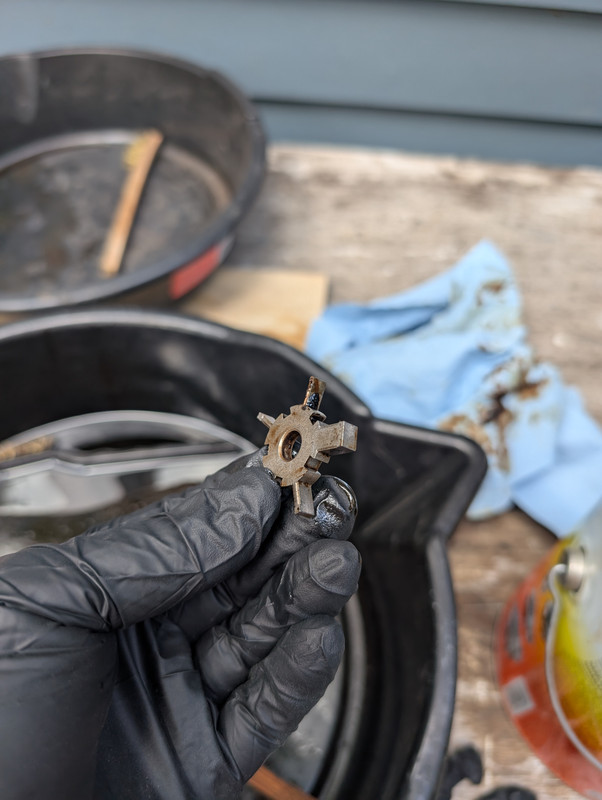 The tool was worthless when assembled, but the edge insert worked well after each dunk. Basically Id put it in the groove with a bit of pressure and spin the piston against the beveled (cutting) edge on the tool insert. They are free of carbon finally, but in truth they look like old pistons. Some wear on the skirt coatings and occasional very light surface scratches. They are getting used regardless as new pistons seem like a silly expense for a motor that isnt going to be anything earth shattering. I have got to think they will seal better now than they did at 150k, with all that carbon under the rings and on the tops. As mentioned, keeping them in order was a pain as the numbers dissolved in the chem dip, so I made sure to write down each time the order they were stacked in the can, and reapply a sharpie number on top as soon as the rinse water dried. There is a greater than zero chance that I mixed up pistons 8 and 6 though so we will see just how serious BMW is about keeping all the rods, pins and pistons together in their OE positions. 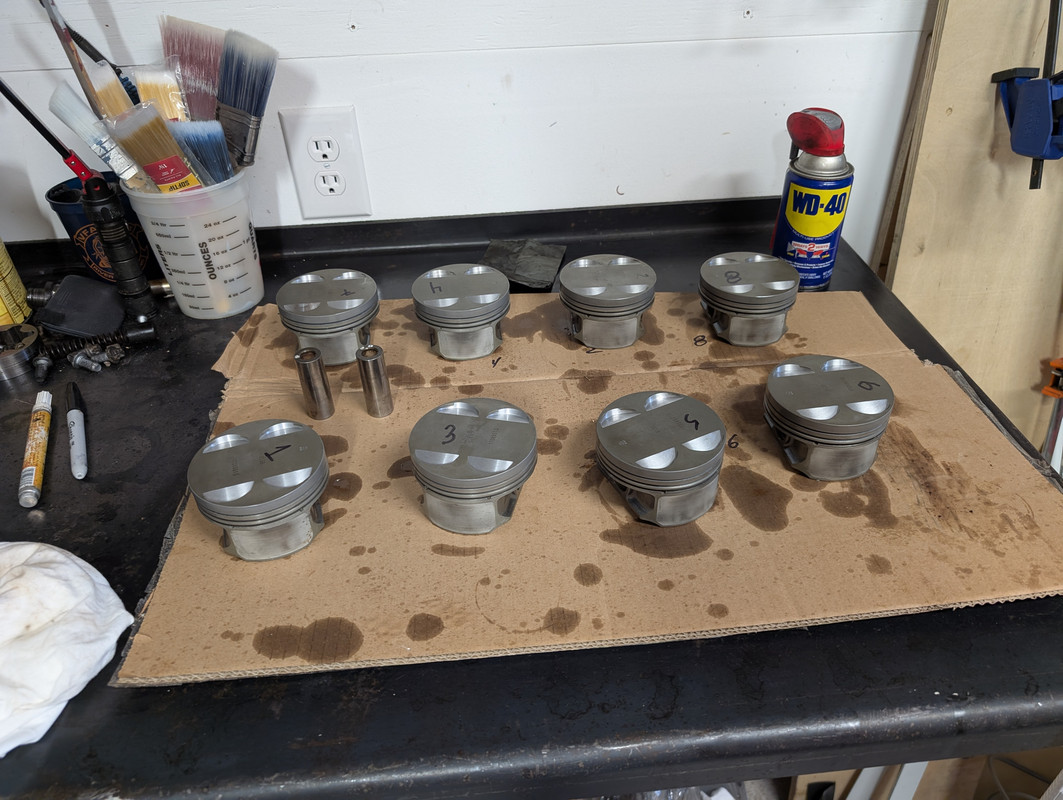 a spray with WD40 to help drive out any excess water and they are ready for the new rings and to be reunited with the rods - maybe tomorrow after I remind myself of the particulars of the job in TIS.
__________________
Current Original owner 2002 E53 X5 4.4i to 4.6i swap 2025 G06 X5 50e Former 1972 Audi Fox 1986 Saab 900S 1996 BMW Z3 1998 BMW E36 M3 Sedan 2004 BMW E46 M3 2006 Audi A3 Quatro 1993 Mopar 318 Jeep Grand Cherokee 2015 V6 Jeep Grand Cherokee
|
|
#327
11-11-2025, 10:41 AM
|
||||
|
||||
|
Pistons - part deux
With the pistons cleaned and all the parts on hand, I didnt have any more excuses to put off beginning the assembly of the motor in earnest. So I cleaned my small shop for most of the day instead. In fairness, it was a pig sty and needed it.
 After spending some time with TIS, I organized all the parts I need to reassemble the pistons with new rings and pin retaining clips. 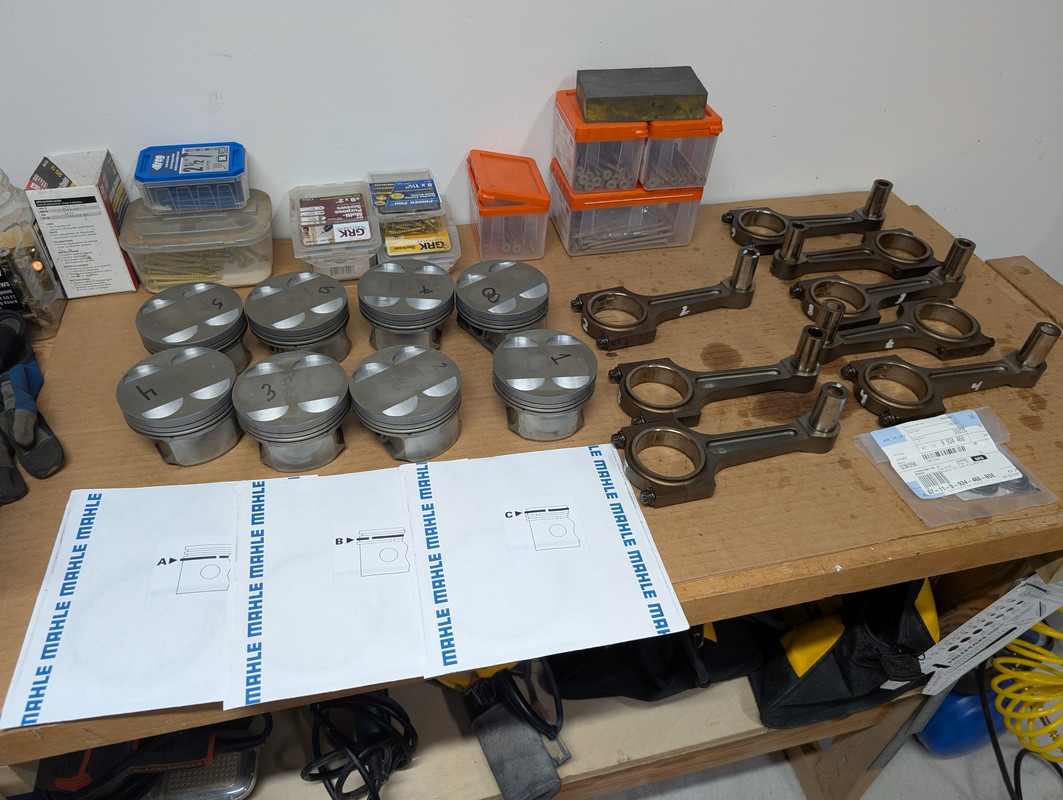 The rings come from Mahle three to a box and each package happily tells you which ring it contains. The bottom oil scrapper ring is a three piece without a top or bottom, the middle ring has a profile and has top etched on it, and the topmost ring seems symmetrical, doesnt have top etched on it but does have the Mahle symbol on one side, so thats the side I put facing up. TIS calls for specific end and axial gaps on all 3, so I bought a cheap feeler gauge and ring tool on Amazon. 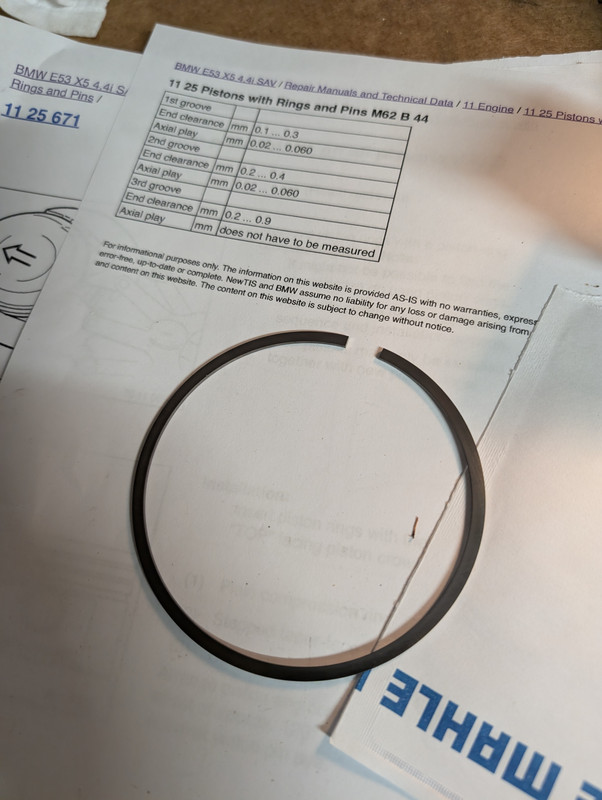 First I labled the ring packages with the cylinder number they were destined for. Then after oiling the bore and ring lightly with motor oil, I placed worked it into the top of the bore and used the tool to press it down a precise amount. The idea is to not have it askew in the bore or the gap will be off. 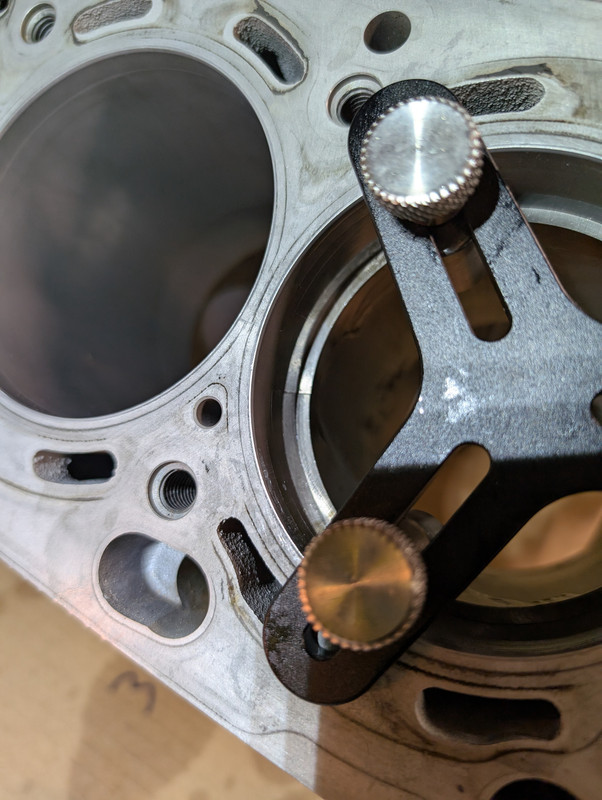 Then I would measure the gap with the feeler starting with the small end of the range given (ie .2mm) and then the largest. If the largest didnt fit I knew we were within tolerance. I only found one on the tight side (within.05mm of the lower limit) so I used the other cheap Amazon tool I bought to sand a .05 mm off of it. It only took a few passes to get it to .2 mm. 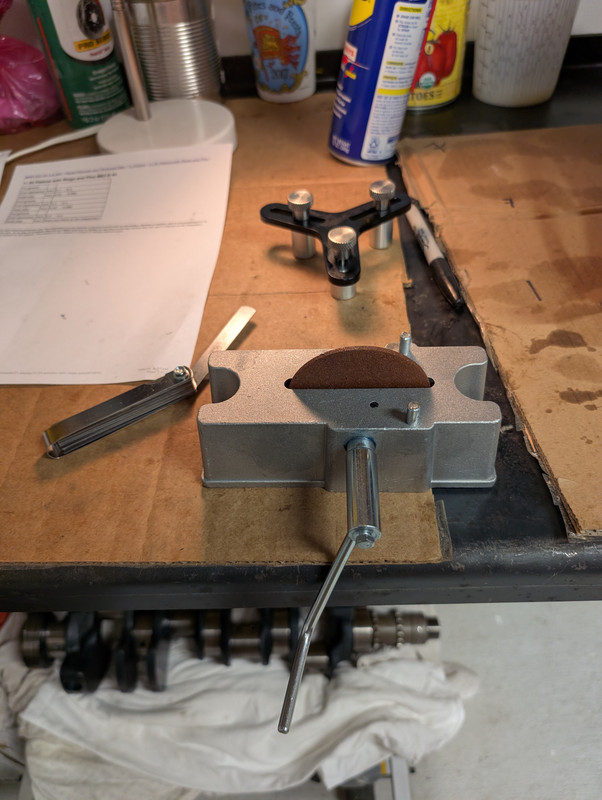 I checked the gap in all the rings, but probably didn't have to. One was a bit tight, but within spec, and all the others were well within spec. Thanks Mahle!. After measuring them all assembly was pretty straightforward. Oil the ring grooves with engine oil: 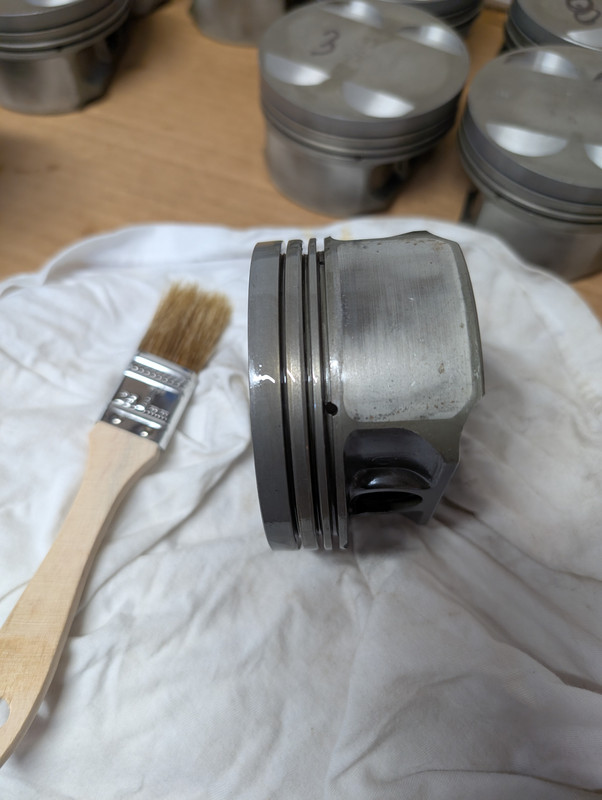 install the rings, starting with the oil scraper (bottom) ring assembly, then the top two working bottom to top. A ring spreader was handy for the upper rings. I separated the oil scraper ring gaps by 10 orm15 degrees and will clo 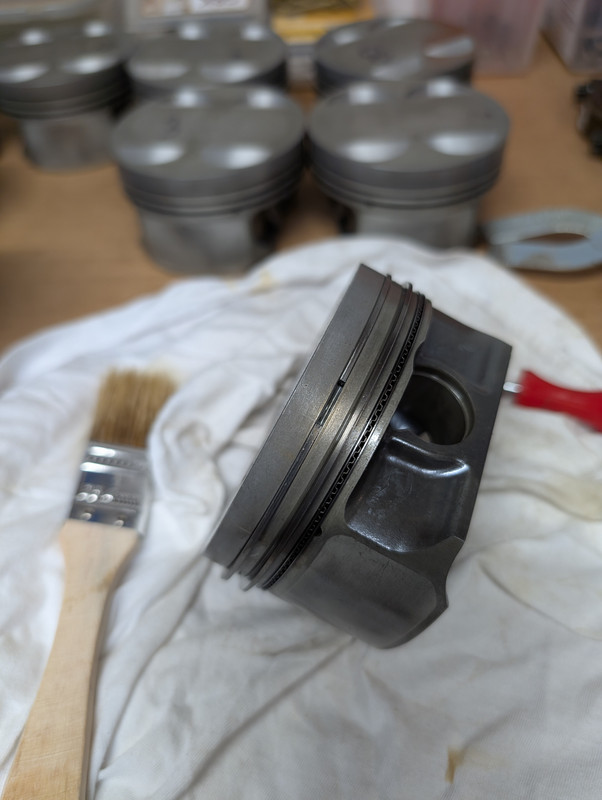 ck all the ring gaps 120 degrees when I install the pistons. ck all the ring gaps 120 degrees when I install the pistons.TIS wasnt too helpful at first with rod orientation, but after looking over some pics of the rod bottoms during disassembly, it did make sense. The rod bottoms have some numbers etched in them biased to the "front" (right side) of the rod. This allows you to match the forward side of the rod to the "forward" arrow on the top of the piston for assembly. Unlike the N62 rods, the M62 rods seem perfectly symmetrical at the bottom, but direction must matter somehow. Below you can see the y84 on the right side of the rod bottom, which matches to the piston-top arrow facing right during assembly. I also put a sharpie arrow on each rod facing forward during disassembly, but had forgotten this. 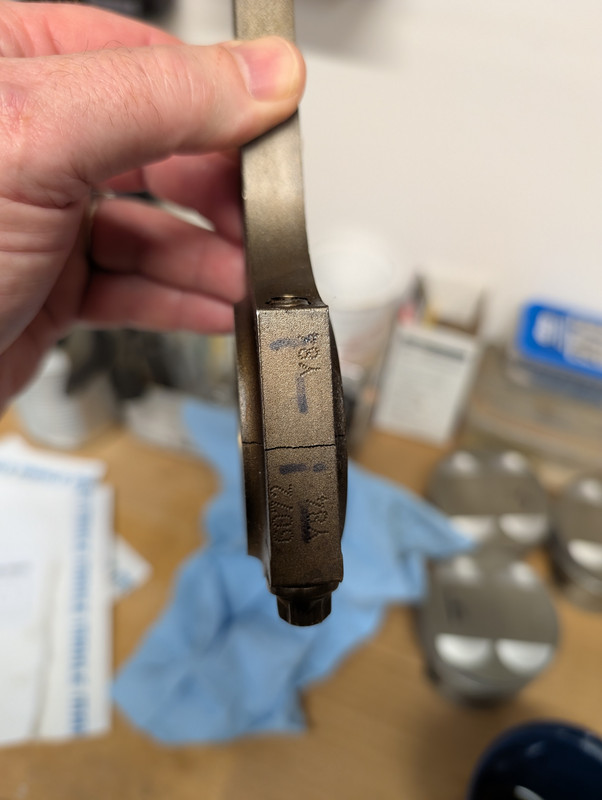 Pins, rod and piston bushings all got a light coat of oil and the pins slid in nicely. TIS emphasizes that no force should be used or needed to to get the wrist pins in. New snap rings went in to finish the assembly. 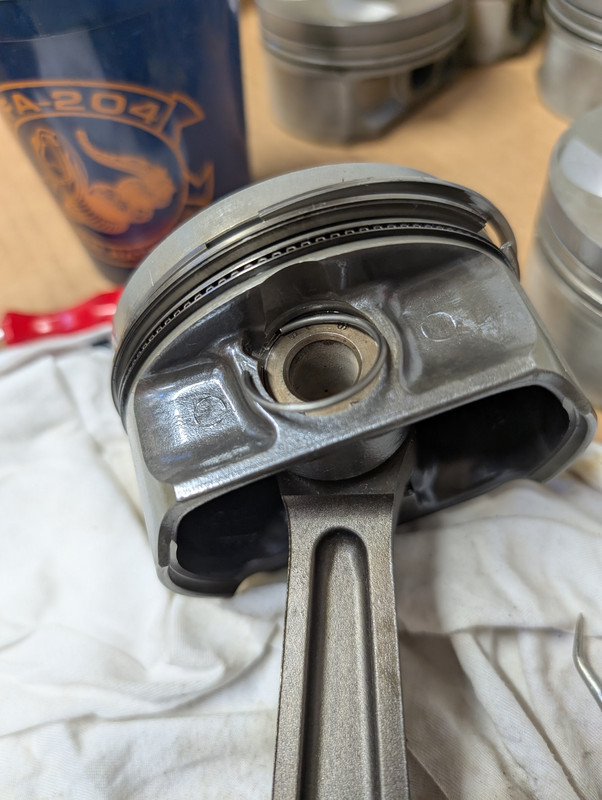 Two done, six to go. 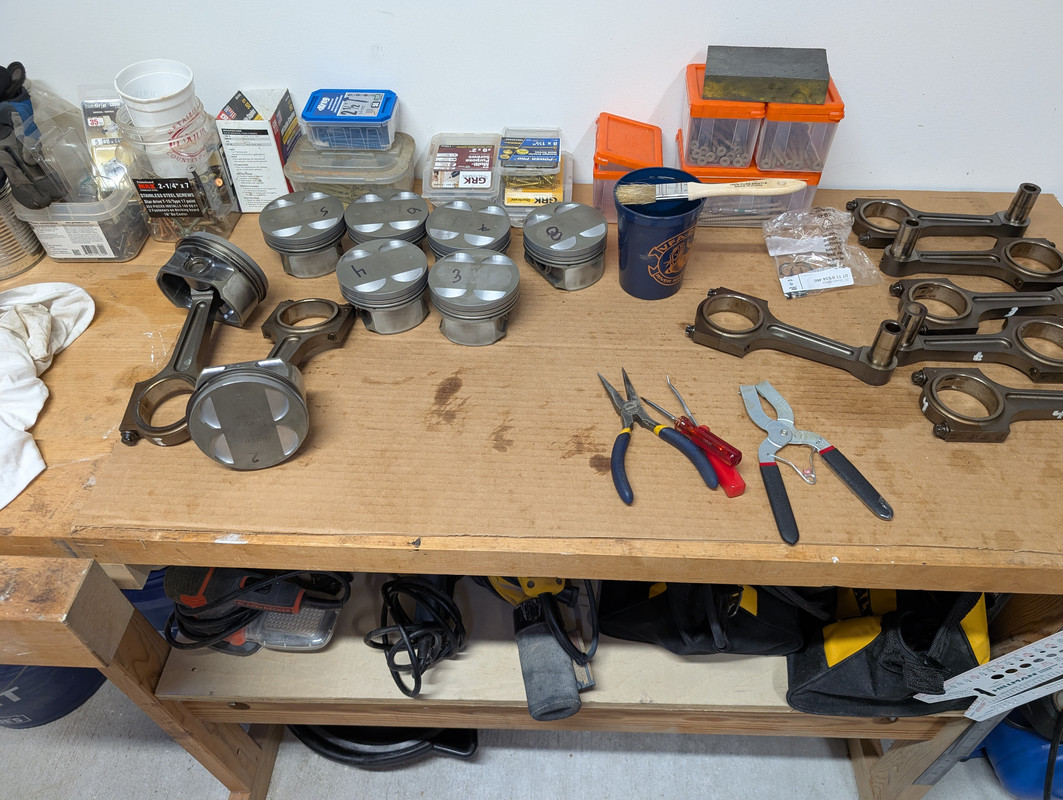 Ill pull the rod caps off when get to stuffing them in the block but I dont want to risk mixing them up since each cap is "snapped" off the rod after the rod is manufactured. This creates a unique mating surface which doesn't allow for swapping caps and rods. Theoretically Im also supposed to plastiguage the new version rod bearings using the old bolts, so I didnt want to loose them.
__________________
Current Original owner 2002 E53 X5 4.4i to 4.6i swap 2025 G06 X5 50e Former 1972 Audi Fox 1986 Saab 900S 1996 BMW Z3 1998 BMW E36 M3 Sedan 2004 BMW E46 M3 2006 Audi A3 Quatro 1993 Mopar 318 Jeep Grand Cherokee 2015 V6 Jeep Grand Cherokee
|
|
#328
11-11-2025, 10:50 AM
|
||||
|
||||
|
Cleaning up the block
The block is amazingly light and could weigh less than the crank.
With the pistons assembled, I cleaned the deck of the traces of head gasket where I could feel it when I dragged a fingernail over it. Interestingly bank 1-4 started out with significantly less old material around the water and oil passages than 5-8. I used 1200ish wet/dry sandpaper with wd40 to lubricate the decks. Lots of grime left on the surfaces which I'll clean off with a good spray down with cleaner. 1-4 after working it over: 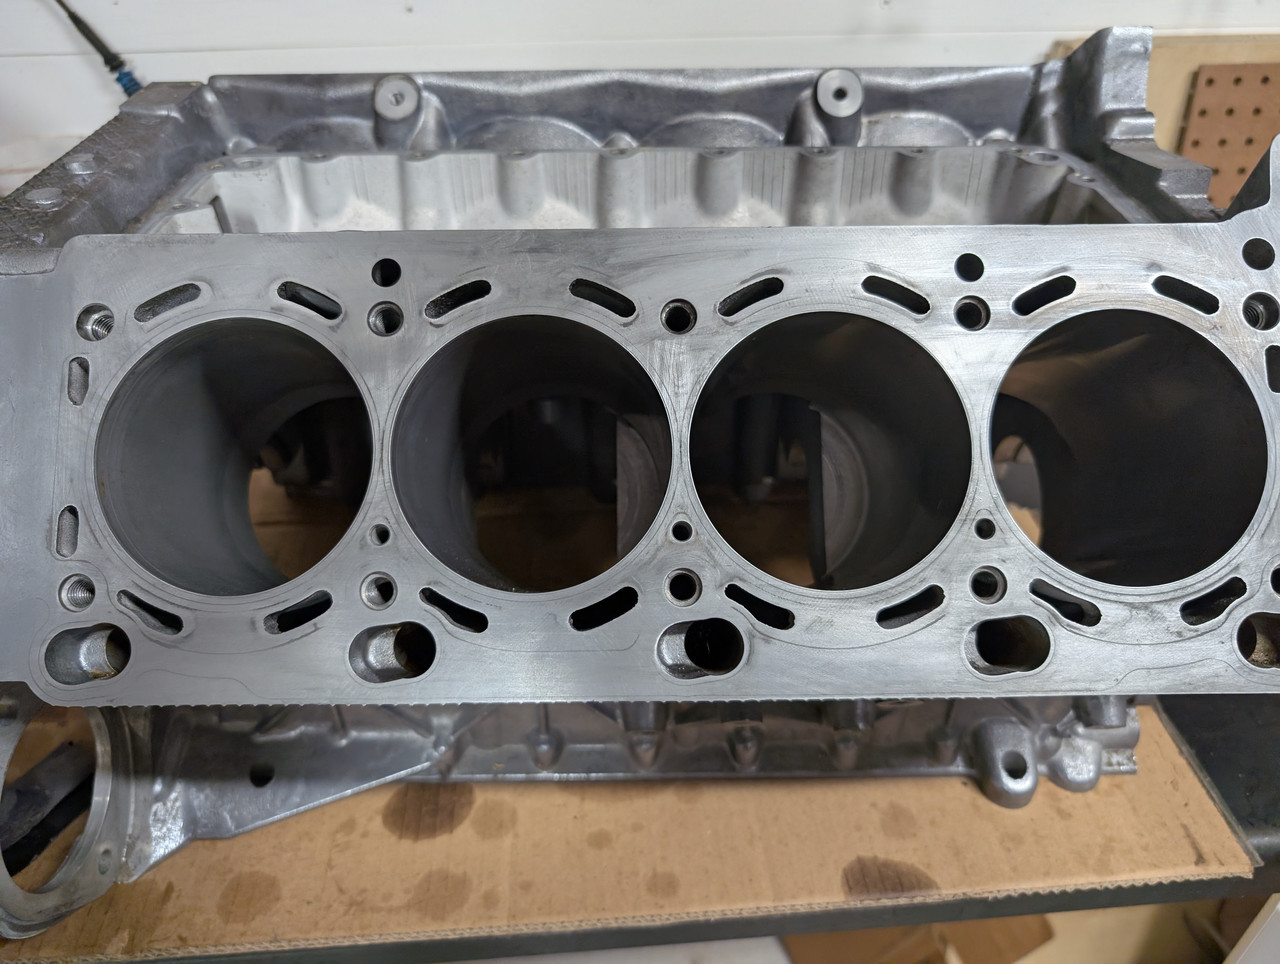 and 5-8 during the process. I ended up using some Permatex gasket cleaner on this side which helped get the last bits off. 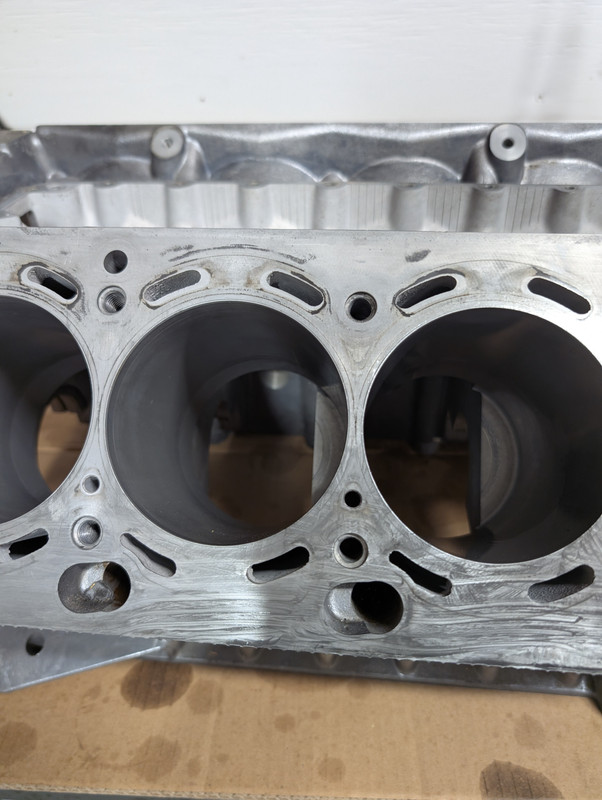 I also cleaned the mating surface for the coolant gallery cover and the rear main seal assembly on the back of the block with Permatex Gasket cleaner and a very gentle scraper to get the 20 year old paper gasket remains off. The block has several of these very small hex head plugs scattered around the bottom. I assumed they are drain plugs (in addition to the two large plugs on either side) so I pulled several that came out easily (several, like below, didnt budge so I left them in rather than strip the hex head). My plan is to reinstall them with a little blue loctite to ensure a good seal after I do a final cleaning of the block with brake cleaner, once I size all the rings. 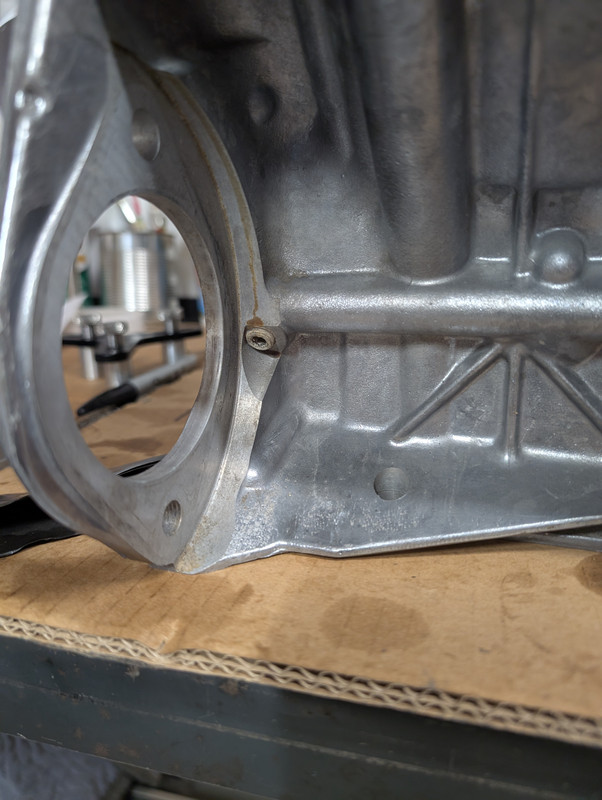 ****update*** I traced the fluid path leading to these small plugs and they are plugs in oil passages which lead to the oil squirters under the pistons. The oil flows under the valley in a tube cast into the block to the back where it hits a spring valve. I assume this keeps the oil in the head until it warms up, then the valve opens up and allows oil to flow down into the squirter circuits on each bank after which it simply falls into the pan below.
__________________
Current Original owner 2002 E53 X5 4.4i to 4.6i swap 2025 G06 X5 50e Former 1972 Audi Fox 1986 Saab 900S 1996 BMW Z3 1998 BMW E36 M3 Sedan 2004 BMW E46 M3 2006 Audi A3 Quatro 1993 Mopar 318 Jeep Grand Cherokee 2015 V6 Jeep Grand Cherokee
|
|
#329
Yesterday, 07:55 PM
|
|||
|
|||
|
Nice work!
Will the 4.6 cams on the 4.4 need a tune? I didnt know these motors have cracked connecting rods. Interesting on the ring deposits, are the M62's prone to them? I was thinking of trying Valvoline Restore and Protect just because there is a lot of evidence they clean so well. No oil consumption on the 4.6 and it was spotless under the valve cover last time the gaskets was done though.
__________________
04 X5 3.0i auto 03 X5 4.6is
|
|
| Bookmarks |
|
|
|
|


 Linear Mode


